In Germany, almost everyone will have memories about gingerbread houses – many families love baking and decorating them with kids for Christmas. At least when I was a kid. I don’t think this is the same for »Book Nooks«. Not everyone will know immediately what you mean by that or they might think of something completely different. But don’t worry – by the end of this article you will know what a Wednesday Gingerbread Book Nook is and how to bake one… yes, baking!
What is a Book Nook?
Well… a Book Nook can be a cozy little (enclosed) space where you read your books, but what we are talking about right here are small dioramas you can place between the books on a bookshelf. Fairly narrow boxes – usually no wider than 2-3 books – that depict a miniature scene. Theoretically, this could be anything: the view of a small back alley, a bookstore, a garden shed, or a cozy room for reading books. Anything your imagination can produce can theoretically be packed into a small box. The sky is the limit… or better said the walls of the box?
Many crafters build their Book Nooks with wood, cardboard, and/or paper. We’re going a step further here. We’re baking ourselves a Gingerbread Book Nook! It’s not quite as durable as the wood and/or paper versions, but that shouldn’t discourage anyone… it’s all about crafting and decorating the gingerbread diorama – not about creating something that can be given to grandchildren when you’re dead.
Because we like to do things a little differently here, this gingerbread house aka. Gingerbread Book Nook isn’t decorated for Christmas, as you might expect from »regular good old« gingerbread houses. Anyone could do that… if they want to put in the effort.
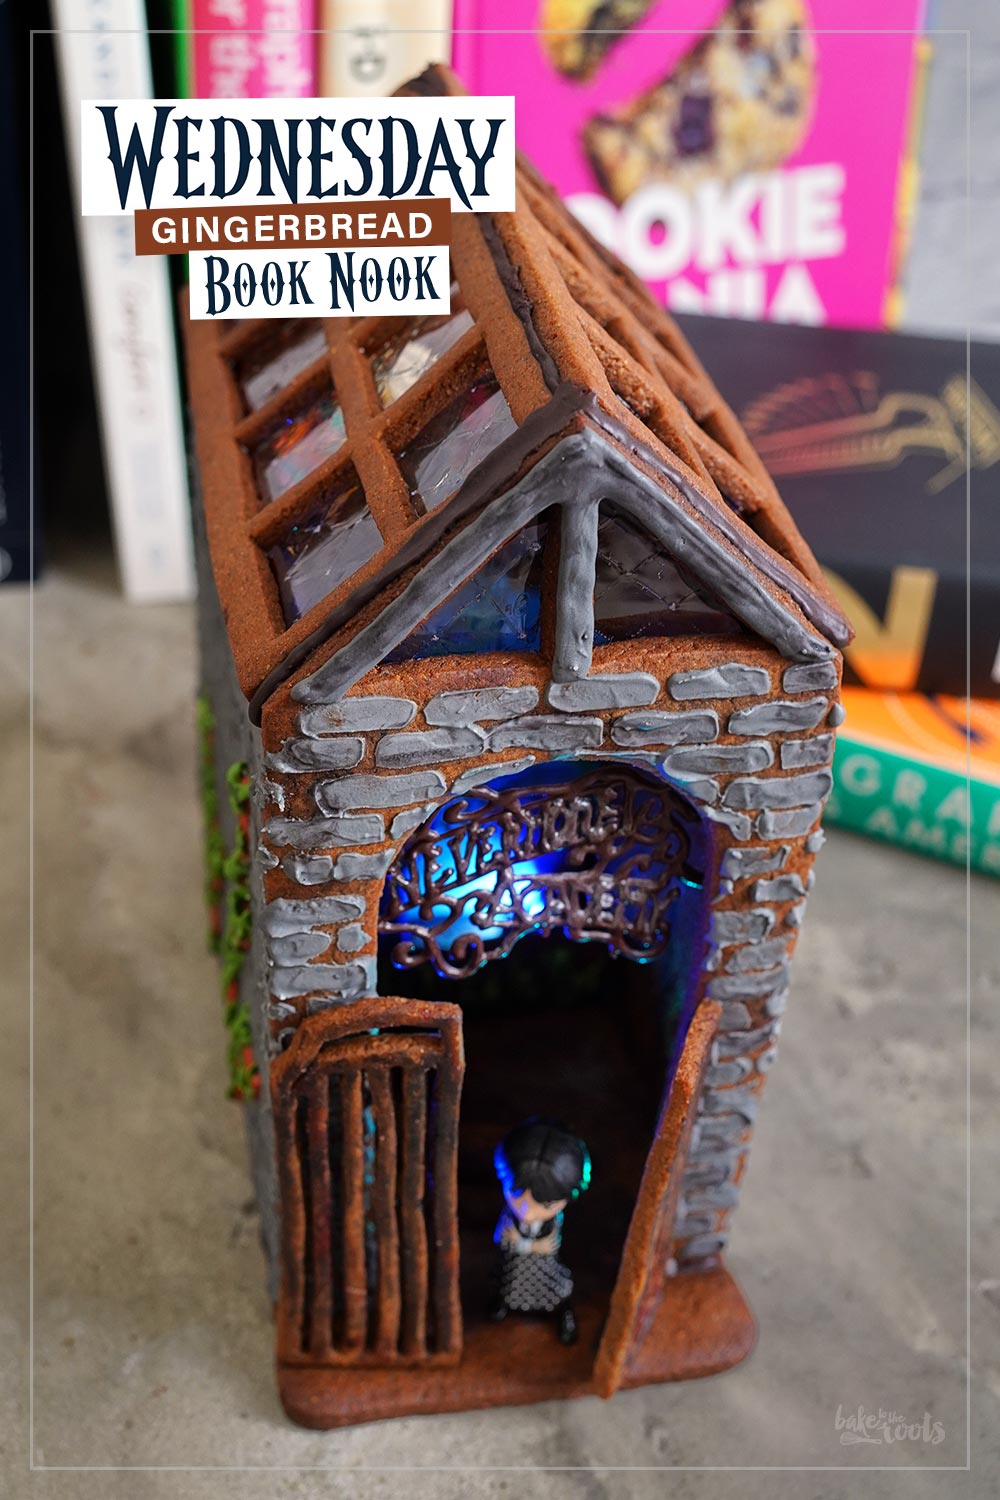
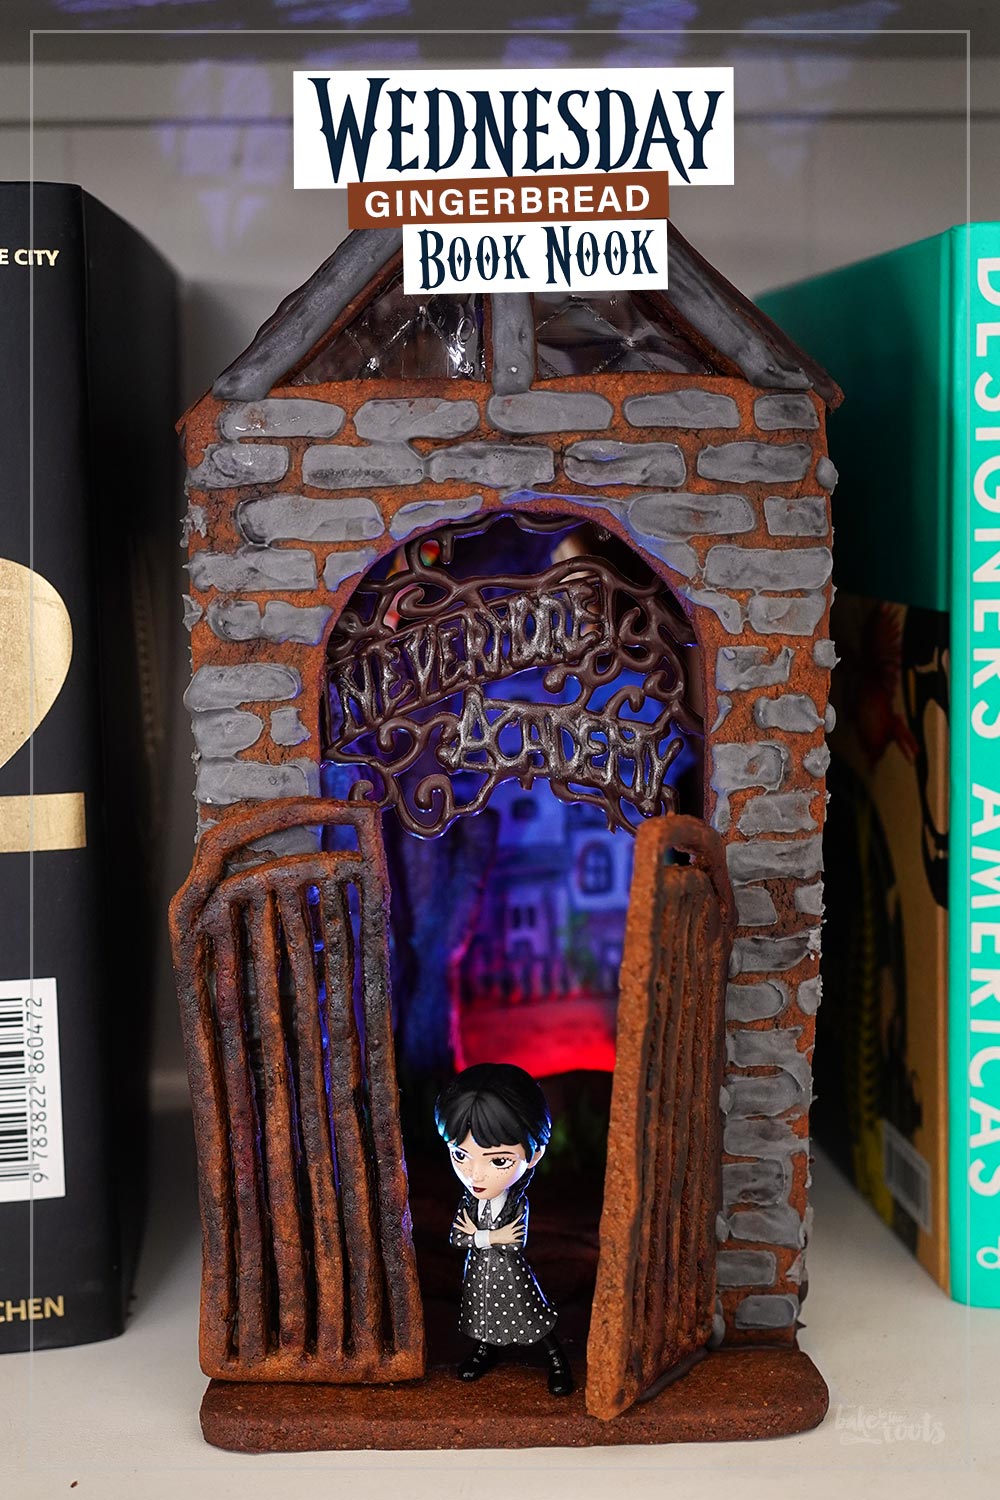
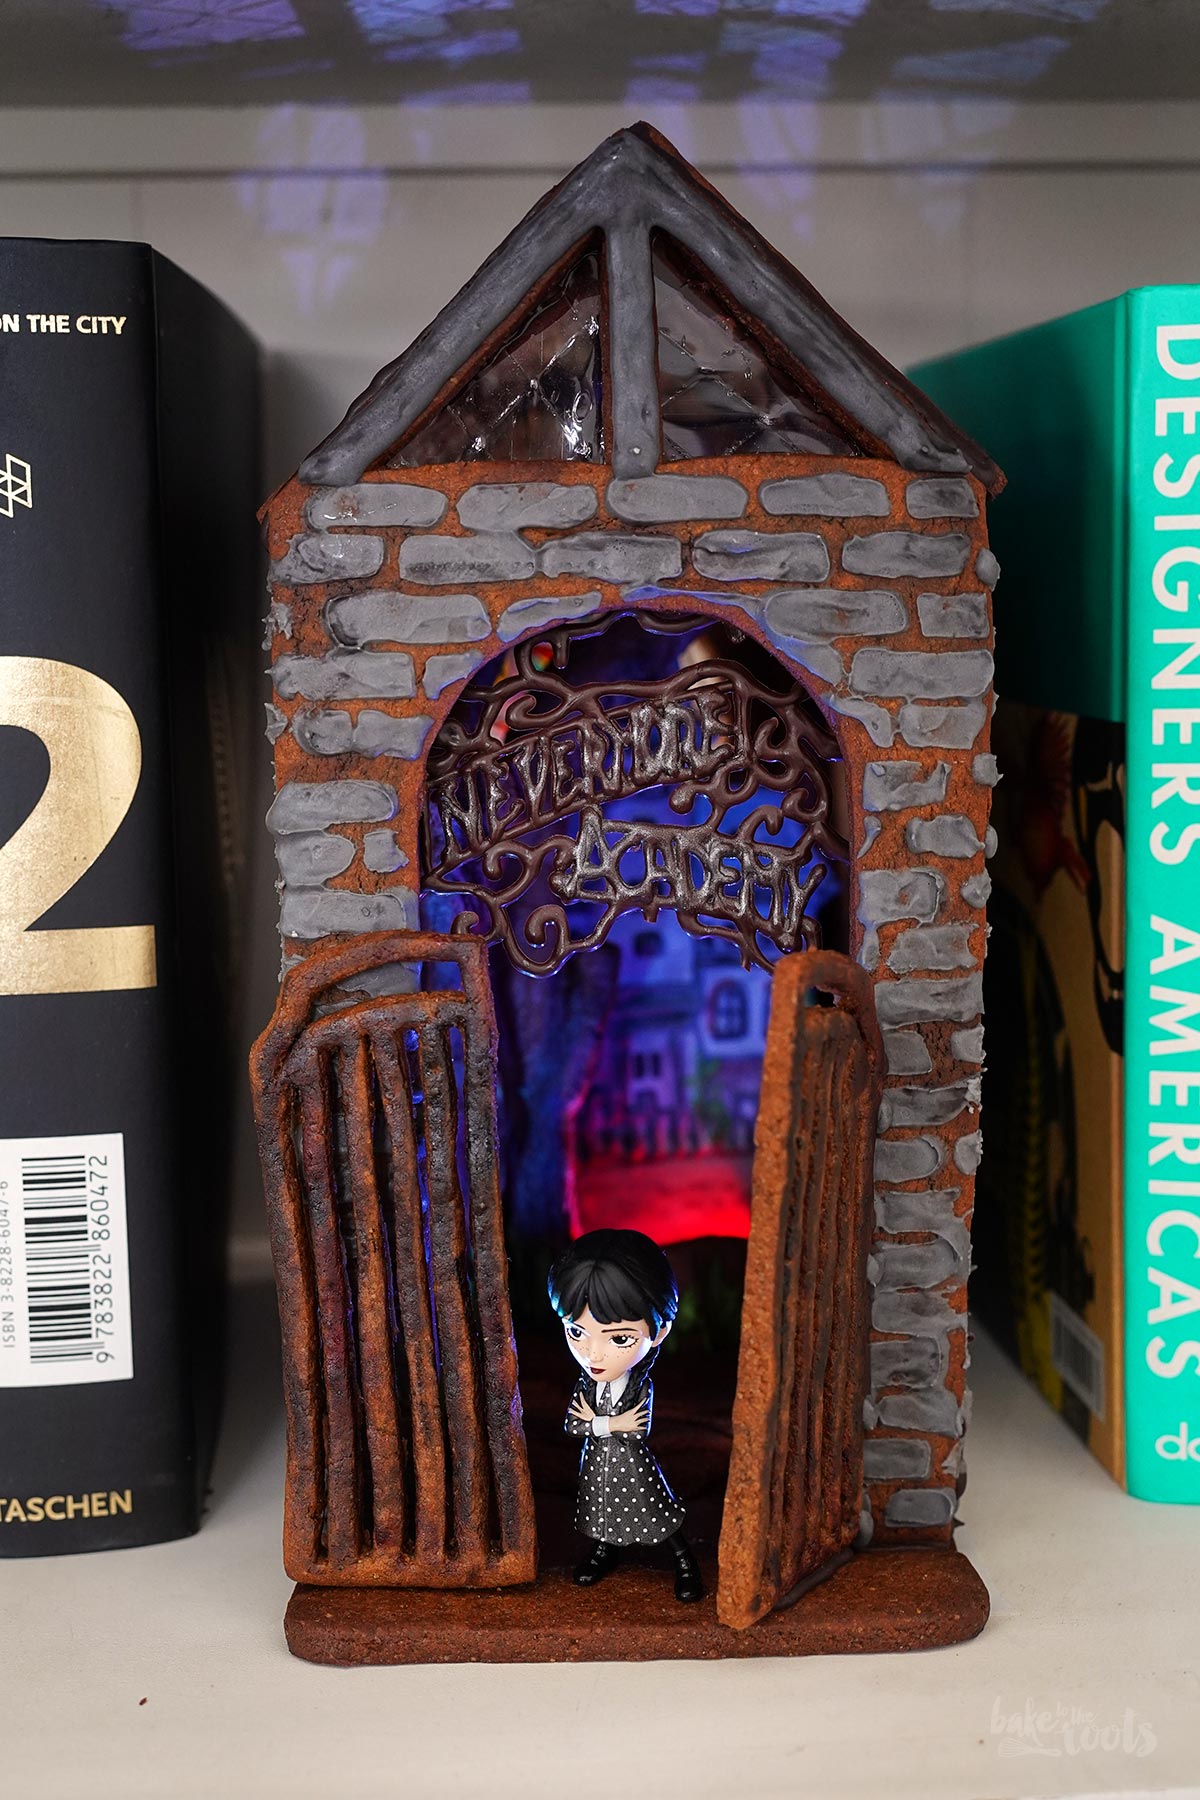
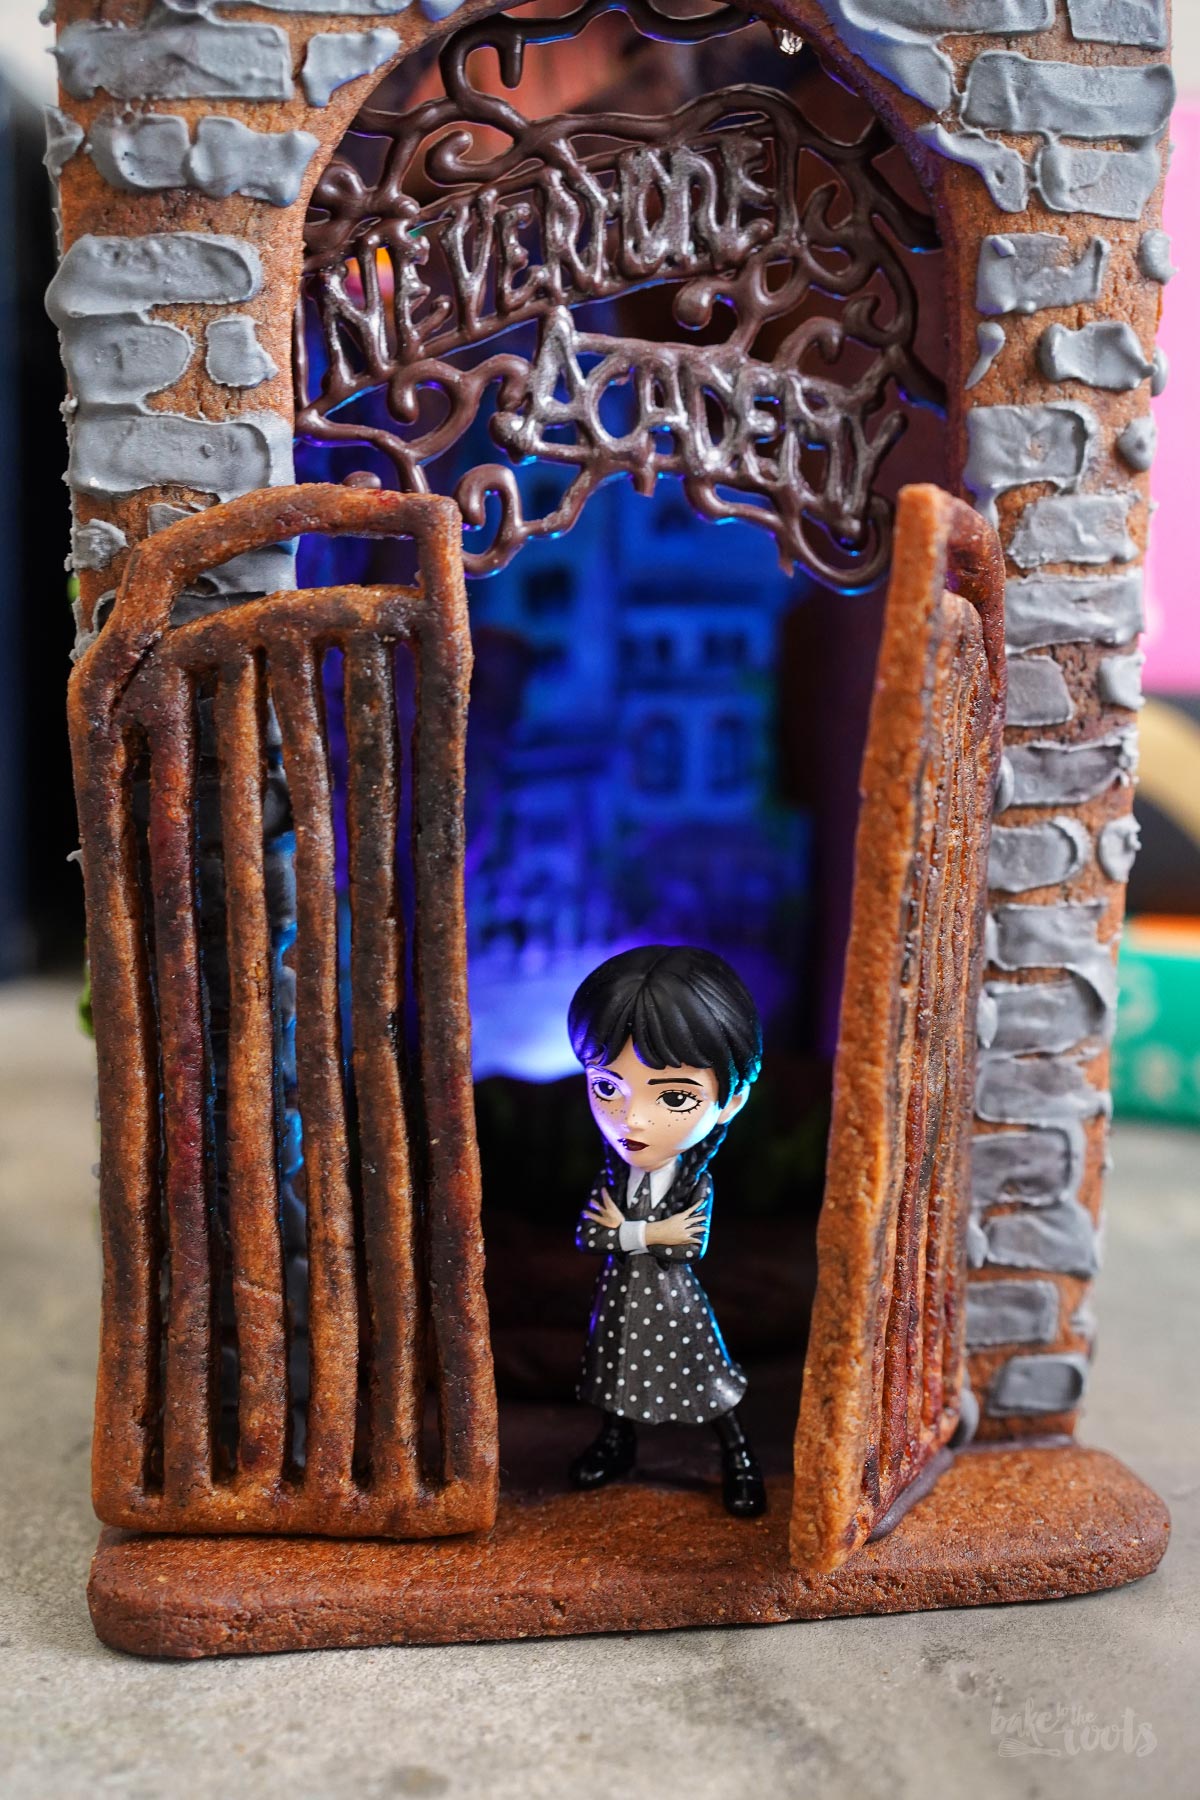
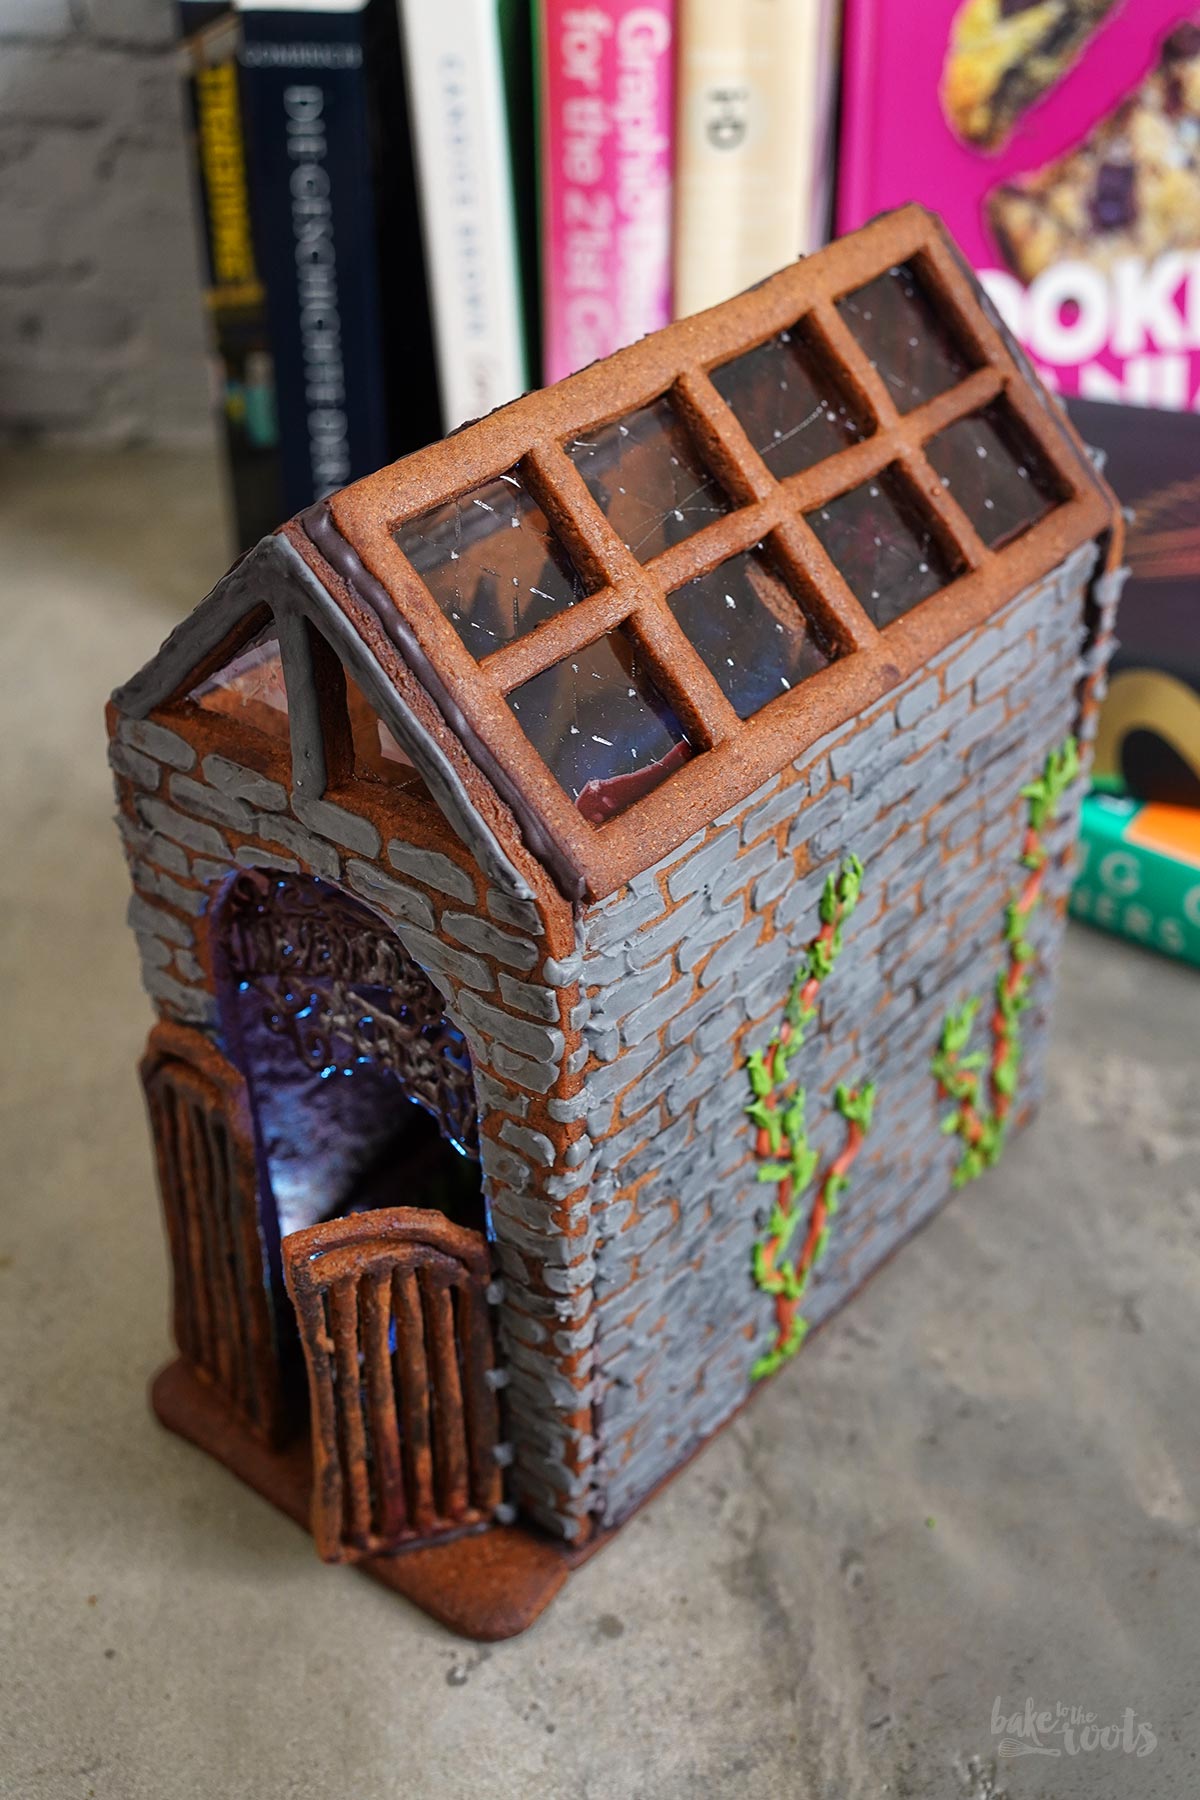
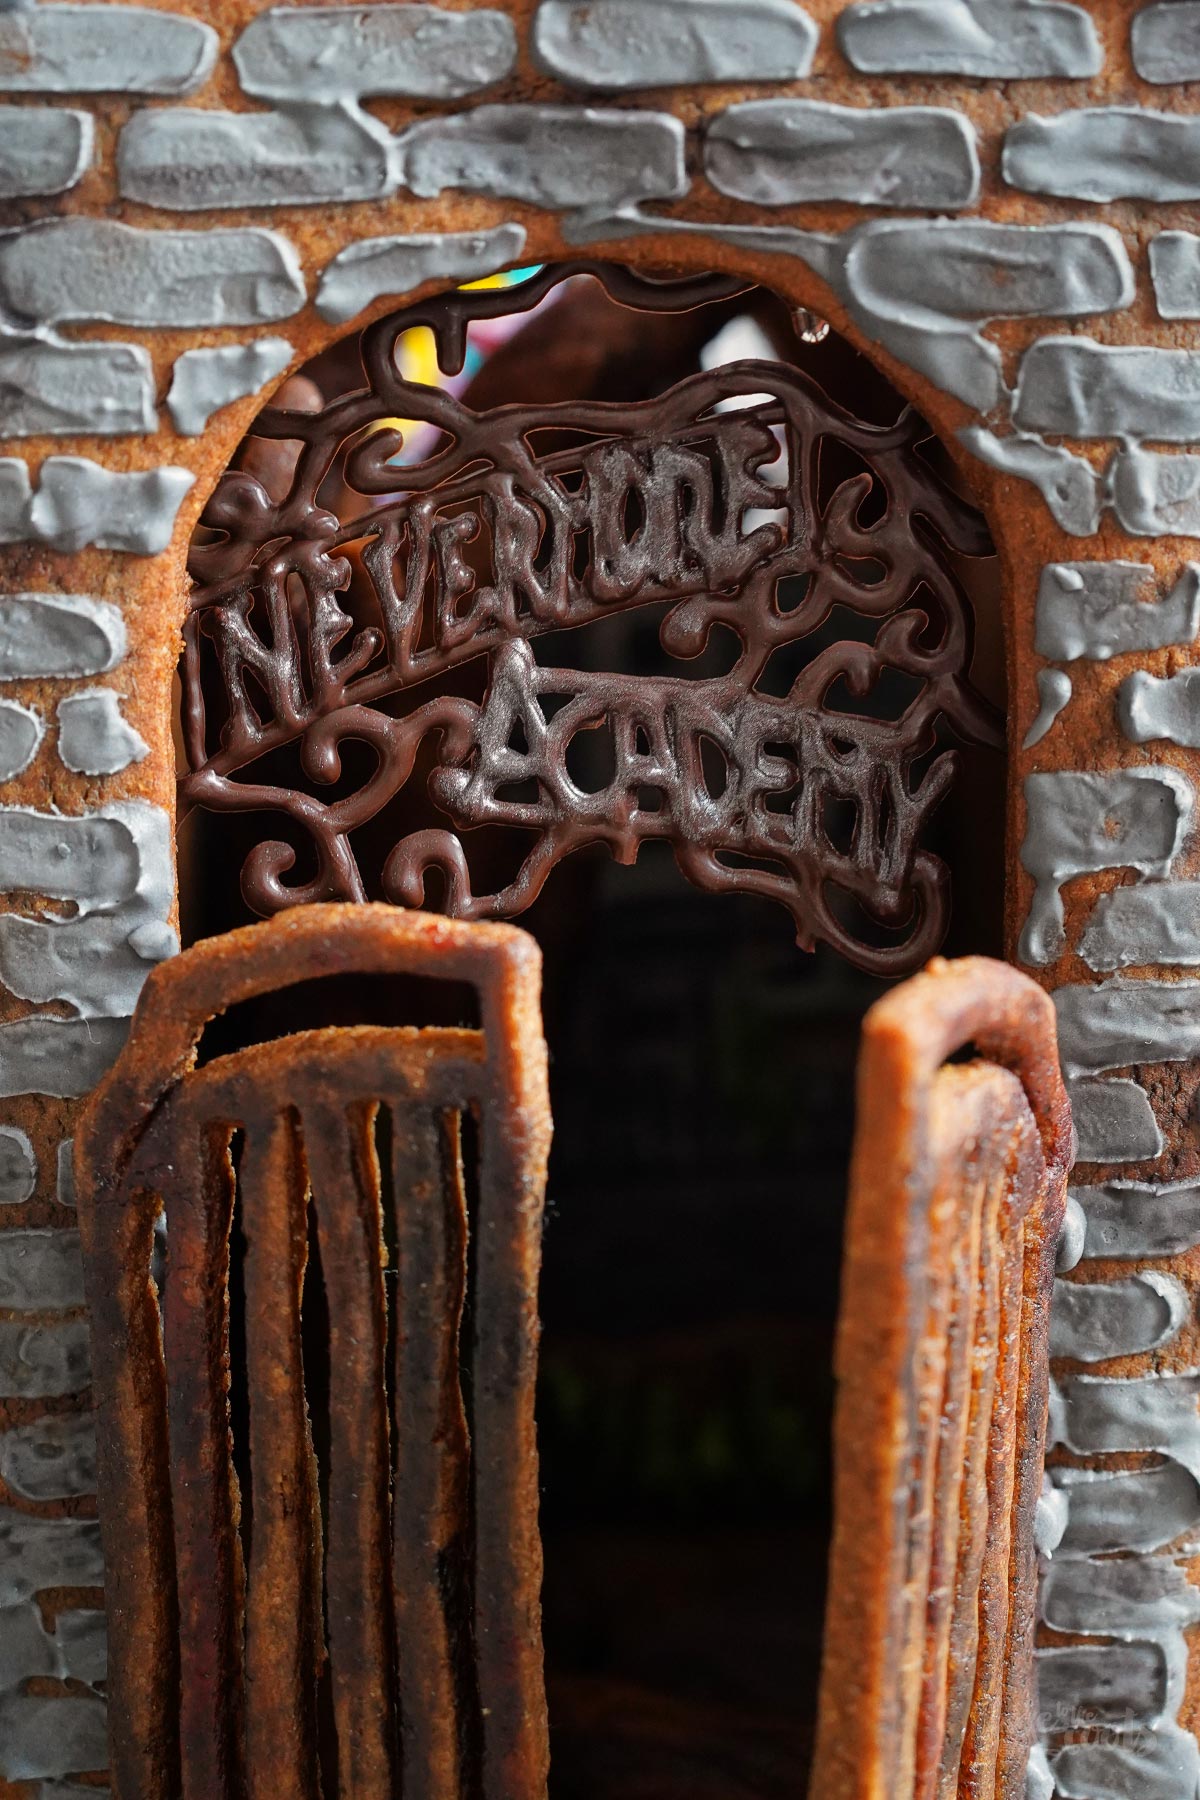
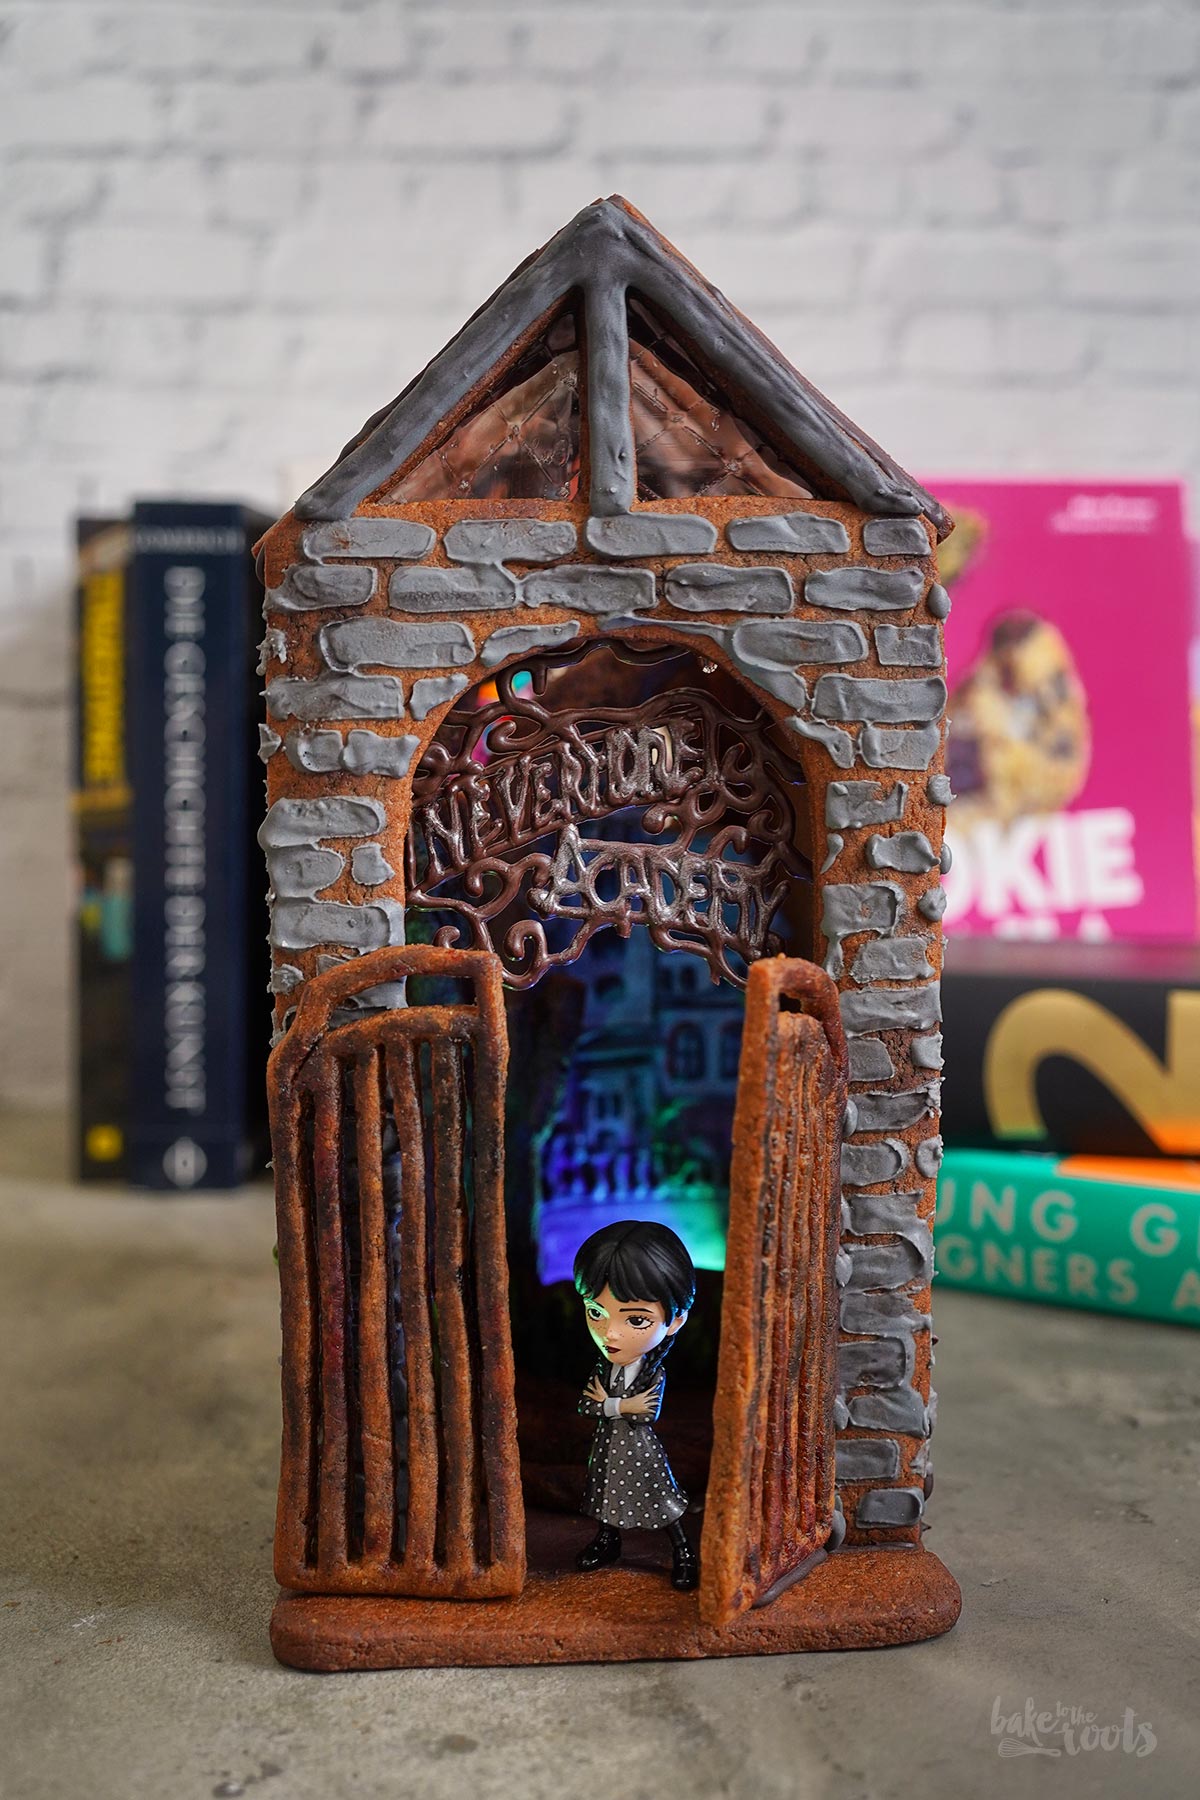
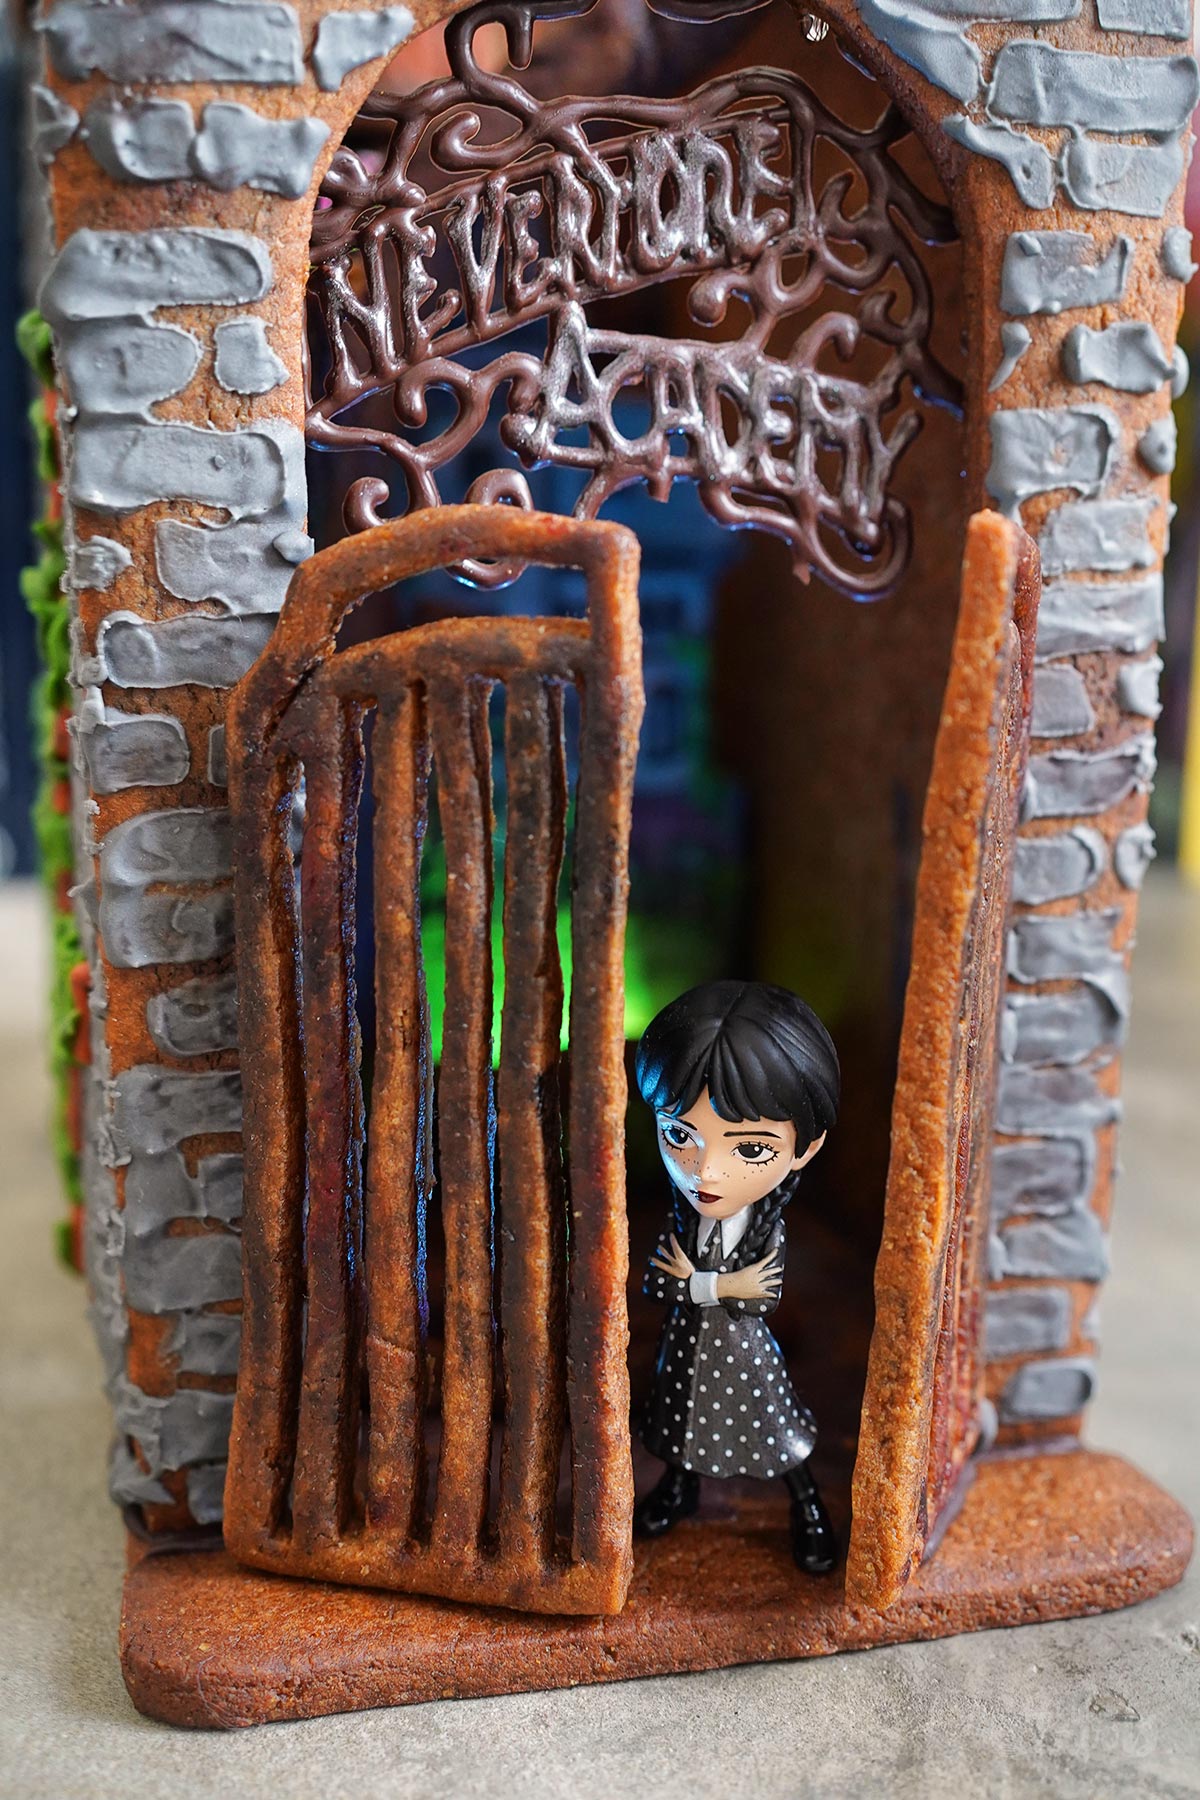
We baked a gingerbread house for the blog a few years ago – that one wasn’t really created and decorated for Christmas, either. Our gingerbread house was a Haunted Gingerbread House for Halloween. In memory of that gingerbread house, we chose a Halloween-inspired theme for the gingerbread Book Nook as well. Since we’re big fans of the Addams Family and Wednesday (the Netflix show), the inspiration for the diorama was quickly found… the Nevermore Academy. A slightly darker, little more mysterious, and whimsical version of a gingerbread house/book nook – and of course, edible!

The idea: A Wednesday Addams-inspired gingerbread house
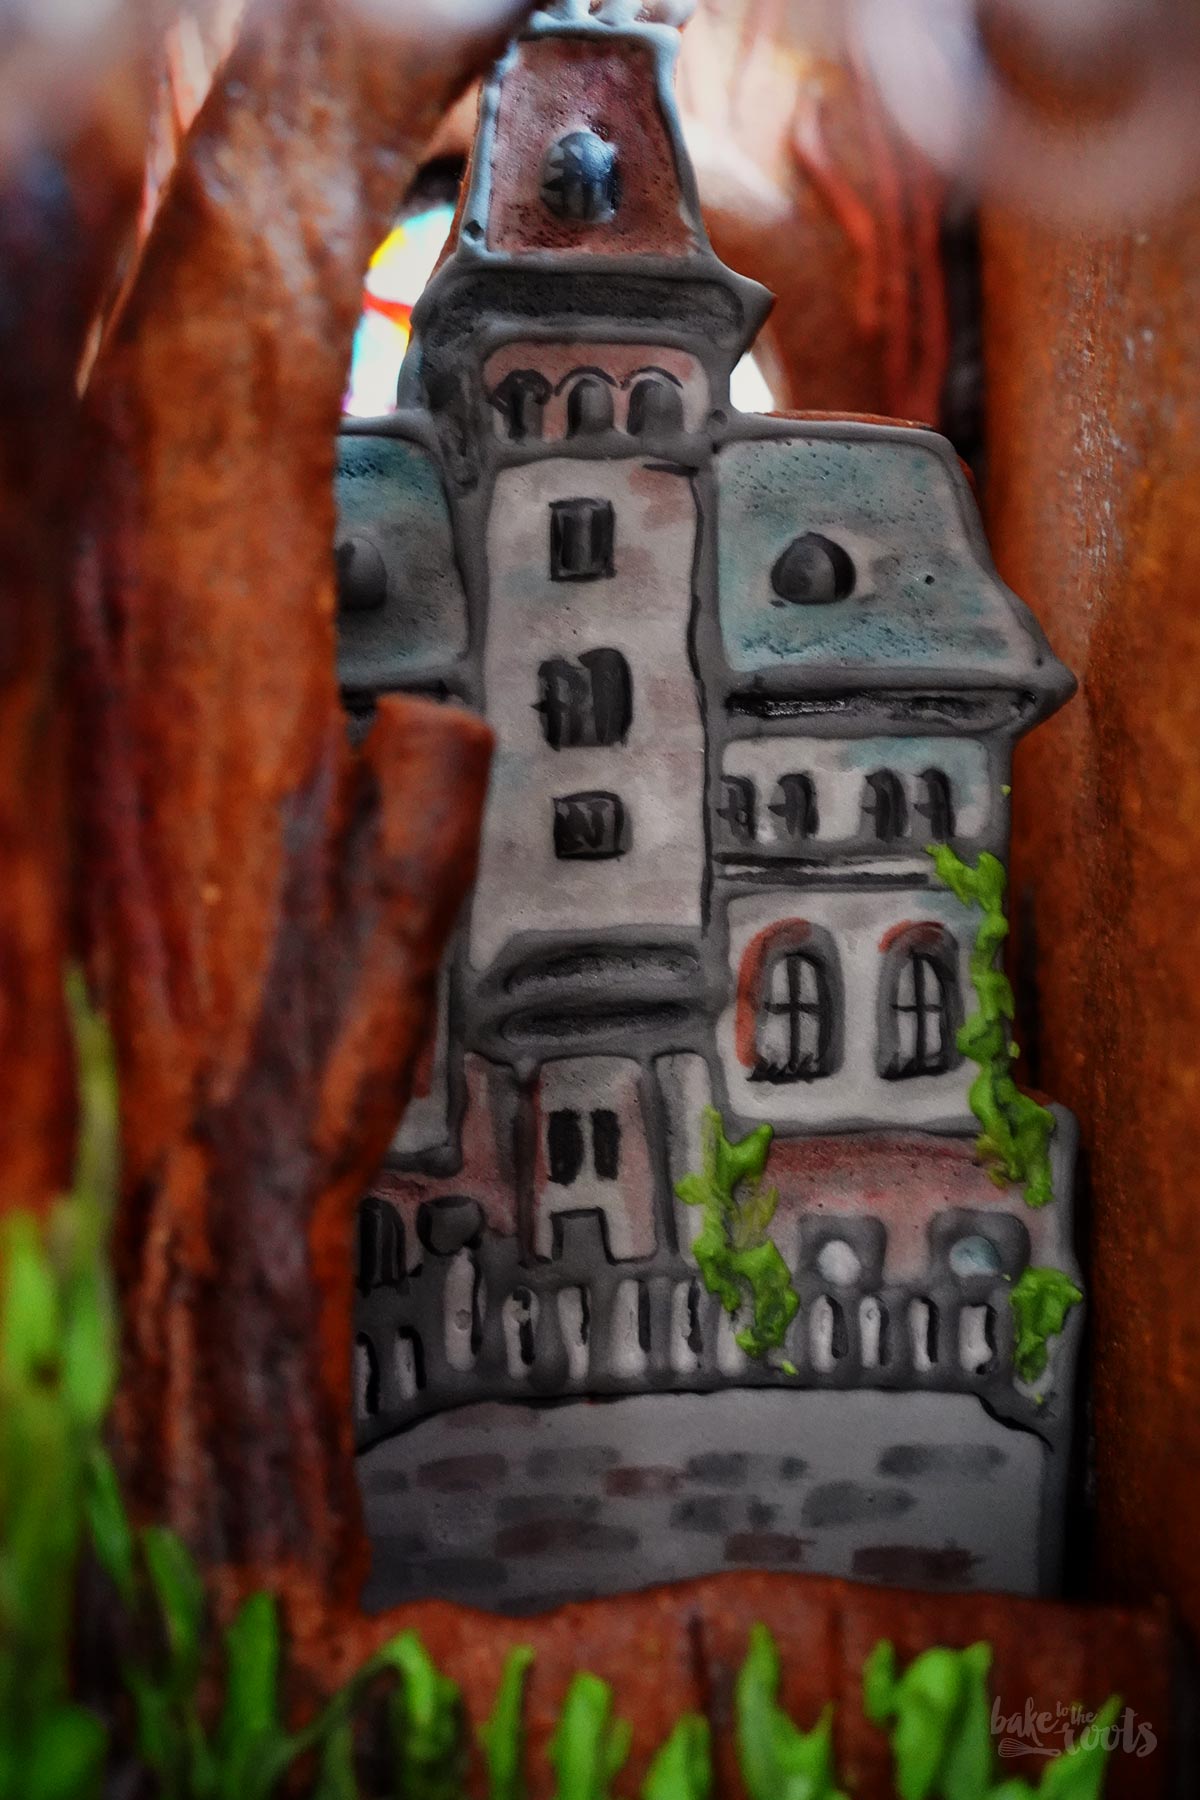
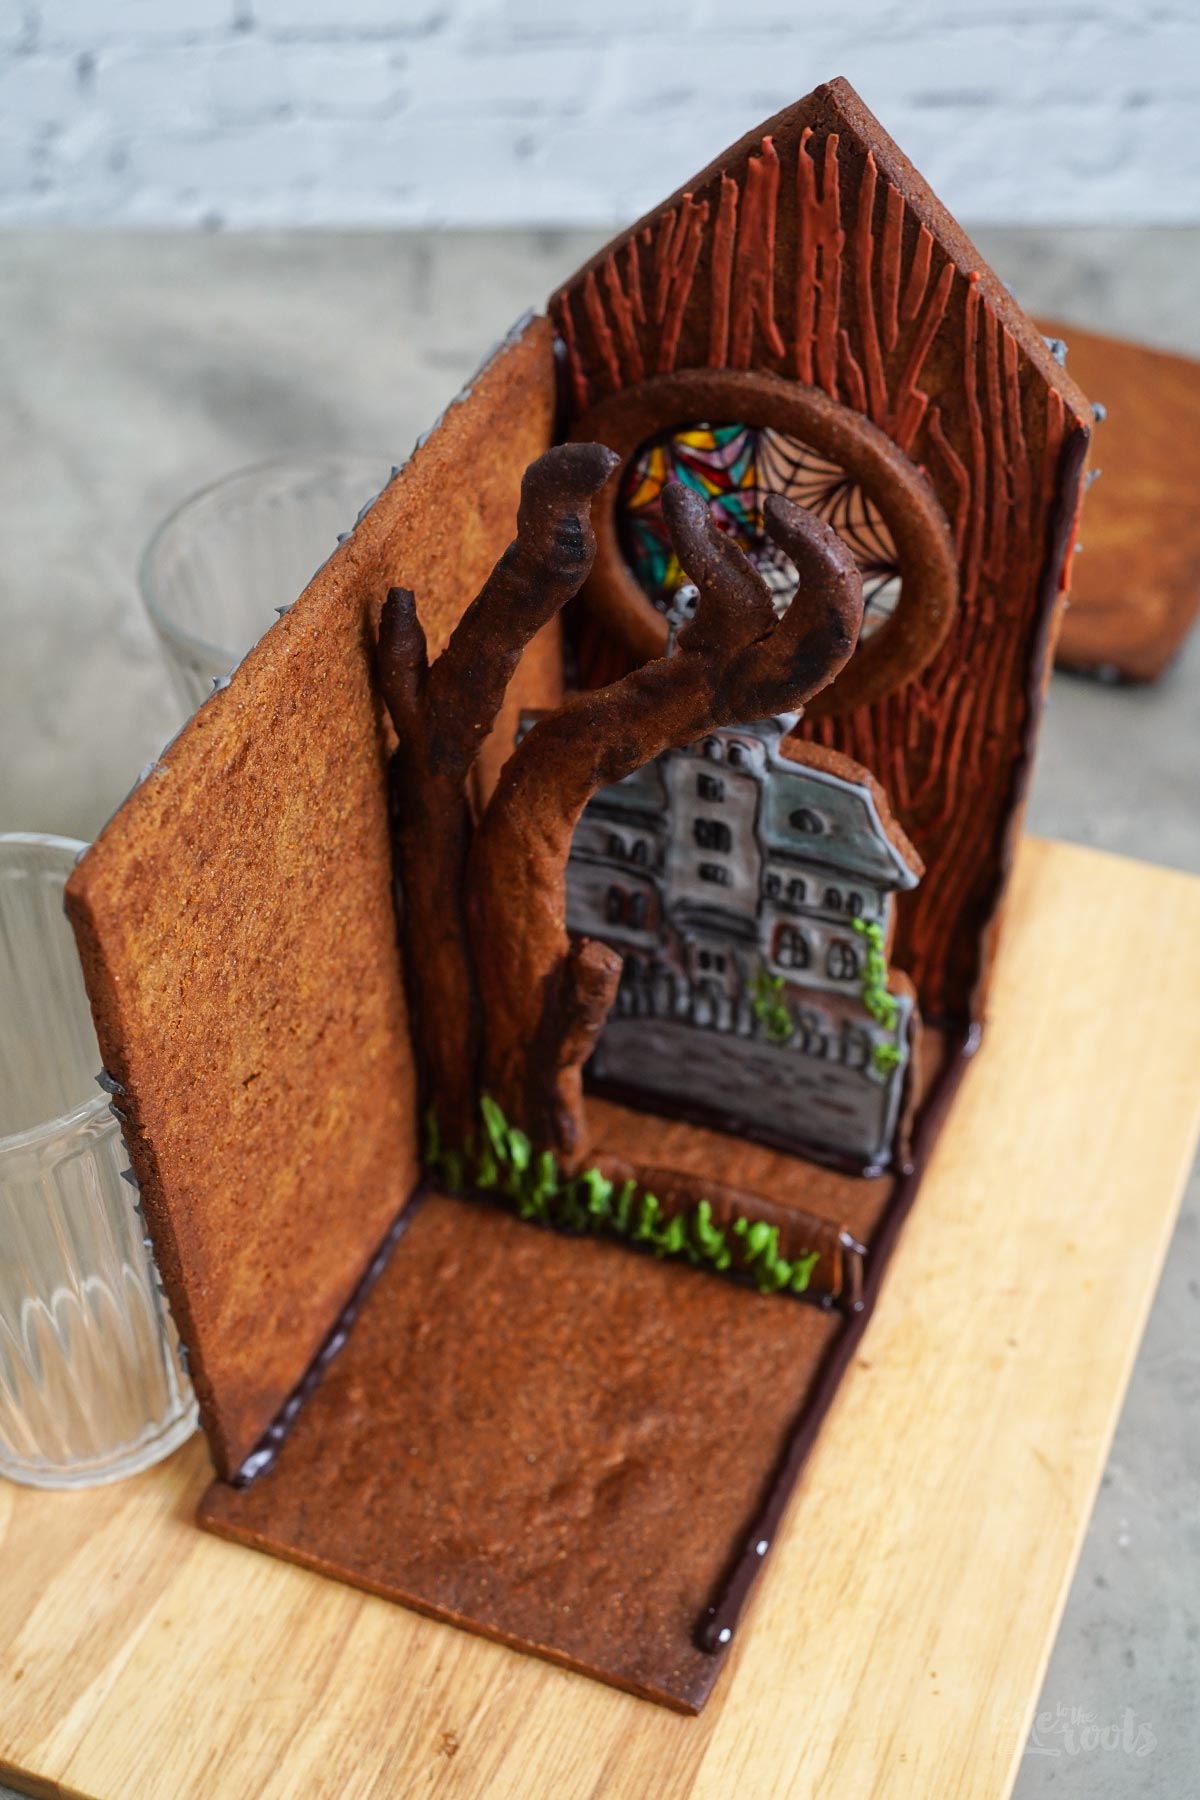
Imagine this – between the novels on your bookshelf, the gate to the Nevermore Academy opens, with a dark path winding between old, gnarled trees to the main building of the academy. In the background, you can see Wednesday and Enid’s attic with its (half) colorful stained-glass window…
That was the idea. Trying to bring this idea to life, something beautiful, cute and spooky, where everything fits perfectly, will bring you back into reality quite quickly. Some might say you might hit rock bottom easily here. When assembling the book nook over the course of two days, I doubted my own sanity several times. But what can you do… give up? Not really.
The how-to-do: Well, you never stop learning!
For a first attempt at building a Book Nook (with my own construction plans and) out of gingerbread, the result wasn’t even that bad, I guess. But a lot could have been improved, tbh. The choice of some materials, proportions, the elements inside meant to tell the story… there is definitely room for improvement!
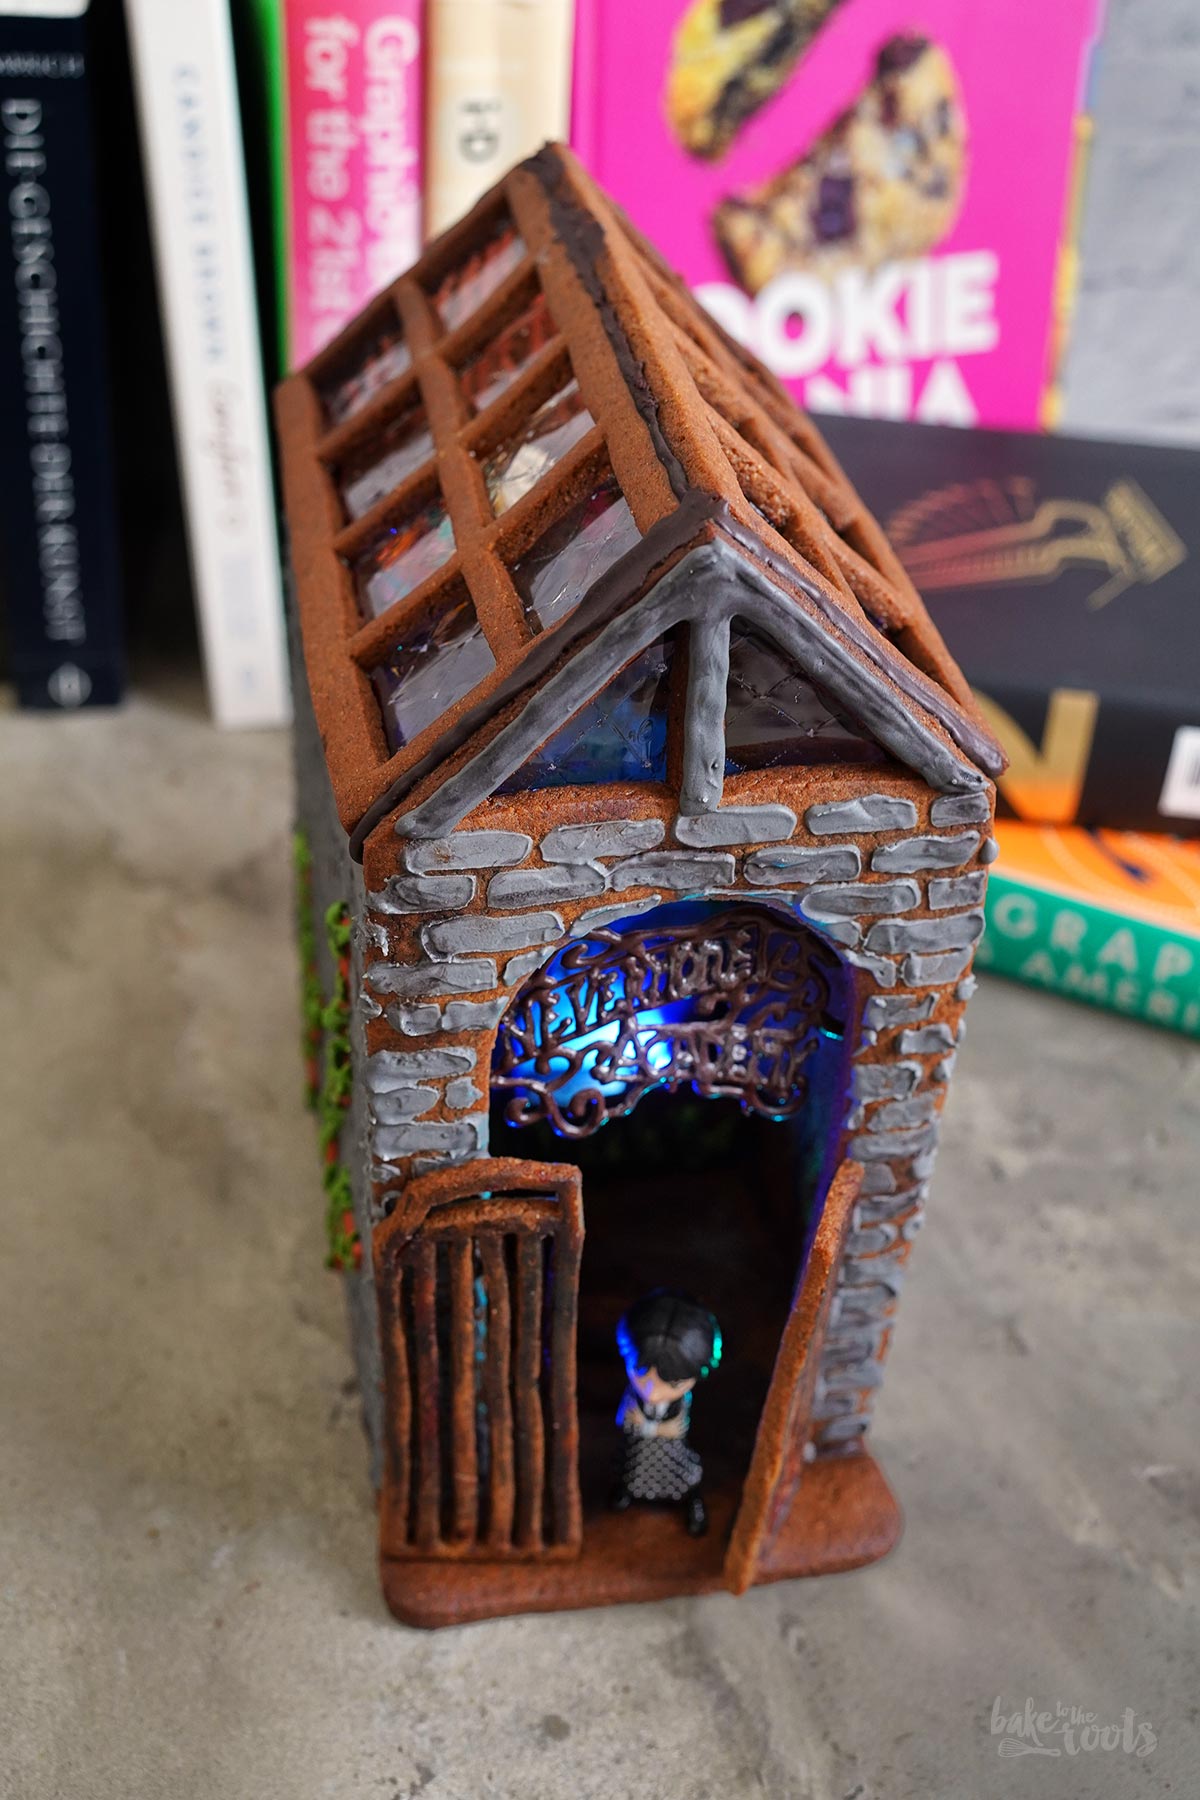
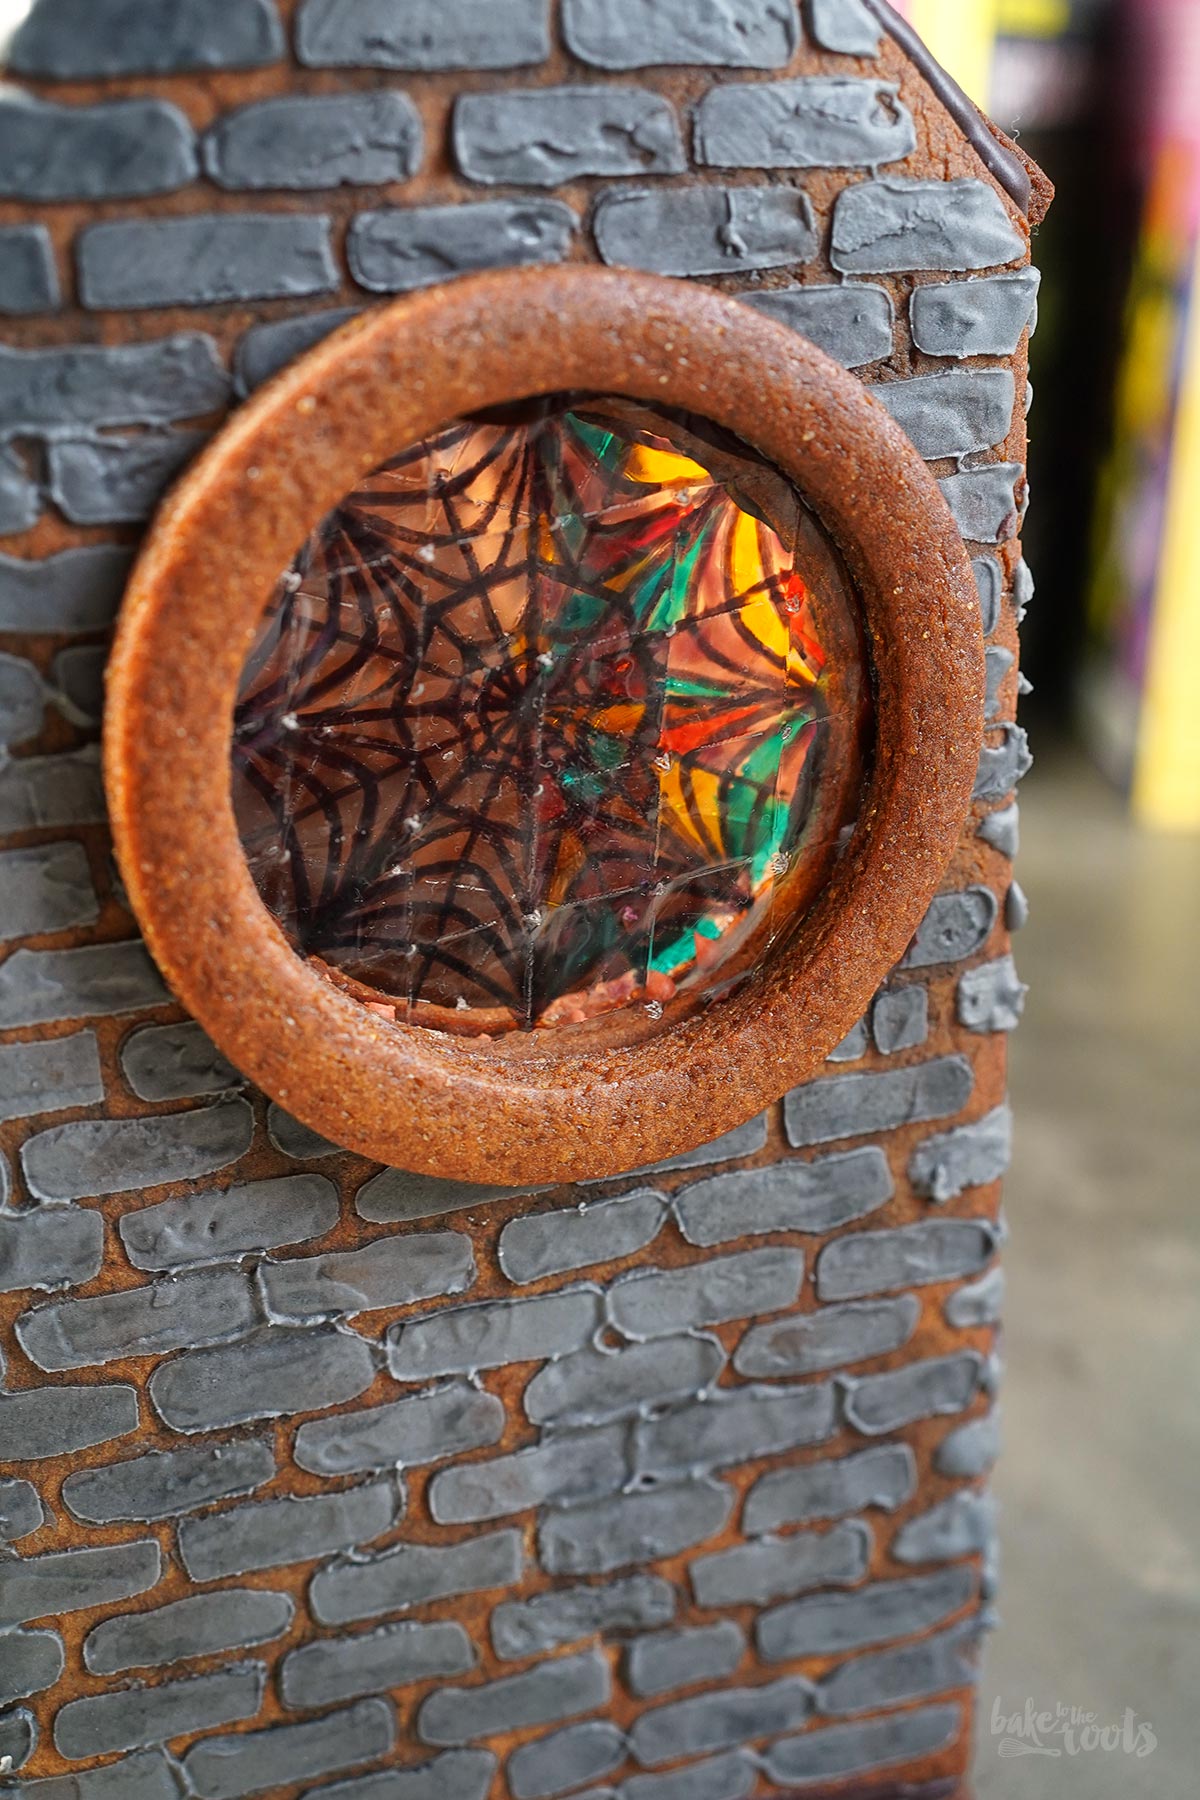
The outer shape of the Book Nook worked quite well – the skylights had to be trimmed a bit after baking to make everything fit snugly. When it came to the interior, the ideas we had in mind and the execution were not matching completely. The academy building was a bit too big for the perspective we had in mind… and the trees obscured the view of the back a bit too much. The stained-glass window in the back of the Book Nook, which should have been a highlight of the whole thing, is (unfortunately) not very visible when looking inside the Book Nook. To see that window properly, you have to turn the entire box. Not very practical when you’re actually going to place it in your bookshelf between books.
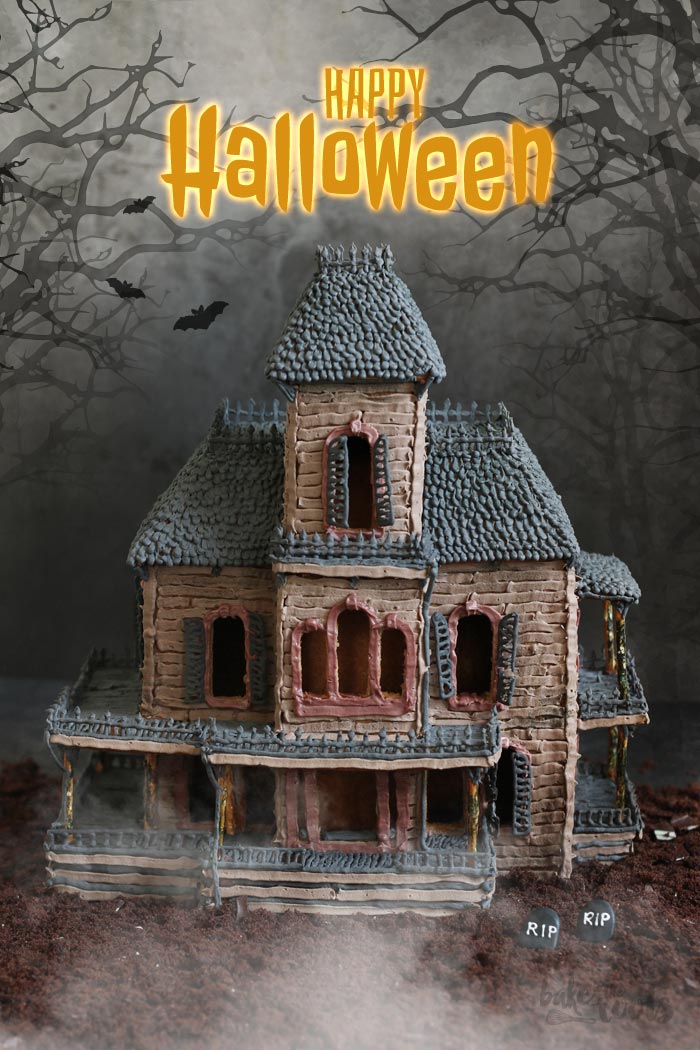

Further down, we’ll explain in more detail how to assemble and decorate the Gingerbread Book Nook. If building this Book Nook is not enough for you, you can also check out the Haunted Gingerbread House we made… but that one takes a little longer, because there’s simply more real estate to decorate.
Of course, we have a lot more Halloween goodies you can bake here on the blog. Not all of them are as elaborate as the gingerbread house(s). Cakes, cupcakes, cookies – we actually have something for everyone and every skill level. Just check out our 13 delicious & spooky Halloween Ideas for baking.
INGREDIENTS / ZUTATEN
For the dough (prepare two times):
3.5 oz. (100g) butter, at room temperature
1/2 cup (100g) brown sugar
8.1 oz. (230g) dark sugar beet syrup*
12.3 oz. (350g) all-purpose flour, plus more for rolling
3 tsp. gingerbread spice*
1 tsp. ground cinnamon
1 pinch of salt
For the icing:
about 17.6 oz. (500g) confectioners’ sugar, plus more if needed
1/2 tsp. cream of tartar*
3 medium egg whites
1 tsp. fresh lemon juice, plus more if needed
gel food colors* (black, brown, red, etc.)
For the decorations:
several gelatin leaves*
several piping bags*
small round piping tips*
texture stencils* for brickwork and wood effect
piping tips for leaves*
edible coloring pencils*
edible glue*
paint brushes (optional)
Für den Teig (2x zubereiten):
100g weiche Butter
100g brauner Zucker
230g Rübensirup (dunkel)*
350g Mehl (Type 550), plus mehr zum Ausrollen
3 TL Lebkuchengewürz*
1 TL Zimt
1 Prise Salz
Für das Icing:
etwa 500g Puderzucker, plus ggf. etwas mehr
1/2 TL reiner Weinstein (Cream of Tartar)*
3 Eiweiß (M)
1 TL frischer Zitronensaft, plus ggf. etwas mehr
Lebensmittelfarben (Gel)* (schwarz, braun, rot, etc.)
Für die Dekoration:
mehrere Blätter Gelatine*
mehrere Spritzbeutel*
kleine runde Tüllen*
Strukturschablonen* für Mauerwerk & Holzoptik
eventuell Spritztüllen für Blätter*
essbare Farben (Stifte)*
essbaren Kleber*
Pinsel zum Malen (optional)


How to bake a Gingerbread Book Nook
In principle, making a gingerbread house is quite simple. You bake your components using gingerbread dough (the templates for the components are available here), then you whip up some sugar icing, and simply assemble everything – one piece after the other. We based our Book Nook on the size of the books on your bookshelf. If you really want to put the Book Nook on a shelf, you might want to measure your shelf beforehand and adjust the templates if necessary.
You can see how to assemble the Book Nook in our little the Making-of video – sorry, it’s a bit sped-up so you don’t have to watch the whole process in full length, which took several hours. There are a few steps to complete, but with some music playing and a hot tea within reach, it’s not so bad. Make yourself comfortable for a few days or evenings.
DIRECTIONS / ZUBEREITUNG
1. Add the butter and brown sugar to a large bowl and mix until light and fluffy. Add the sugar beet syrup and mix until well combined. Combine flour, gingerbread spice, ground cinnamon, and salt, and add it to the bowl. Mix with a rubber spatula or wooden spoon until the dough starts coming together, then knead briefly on a floured surface. Prepare the second batch the same way. Wrap the two both batches in plastic wrap and place them in the fridge for at least 1 hour. The dough can be refrigerated for up to two days if you don’t want to start right away.
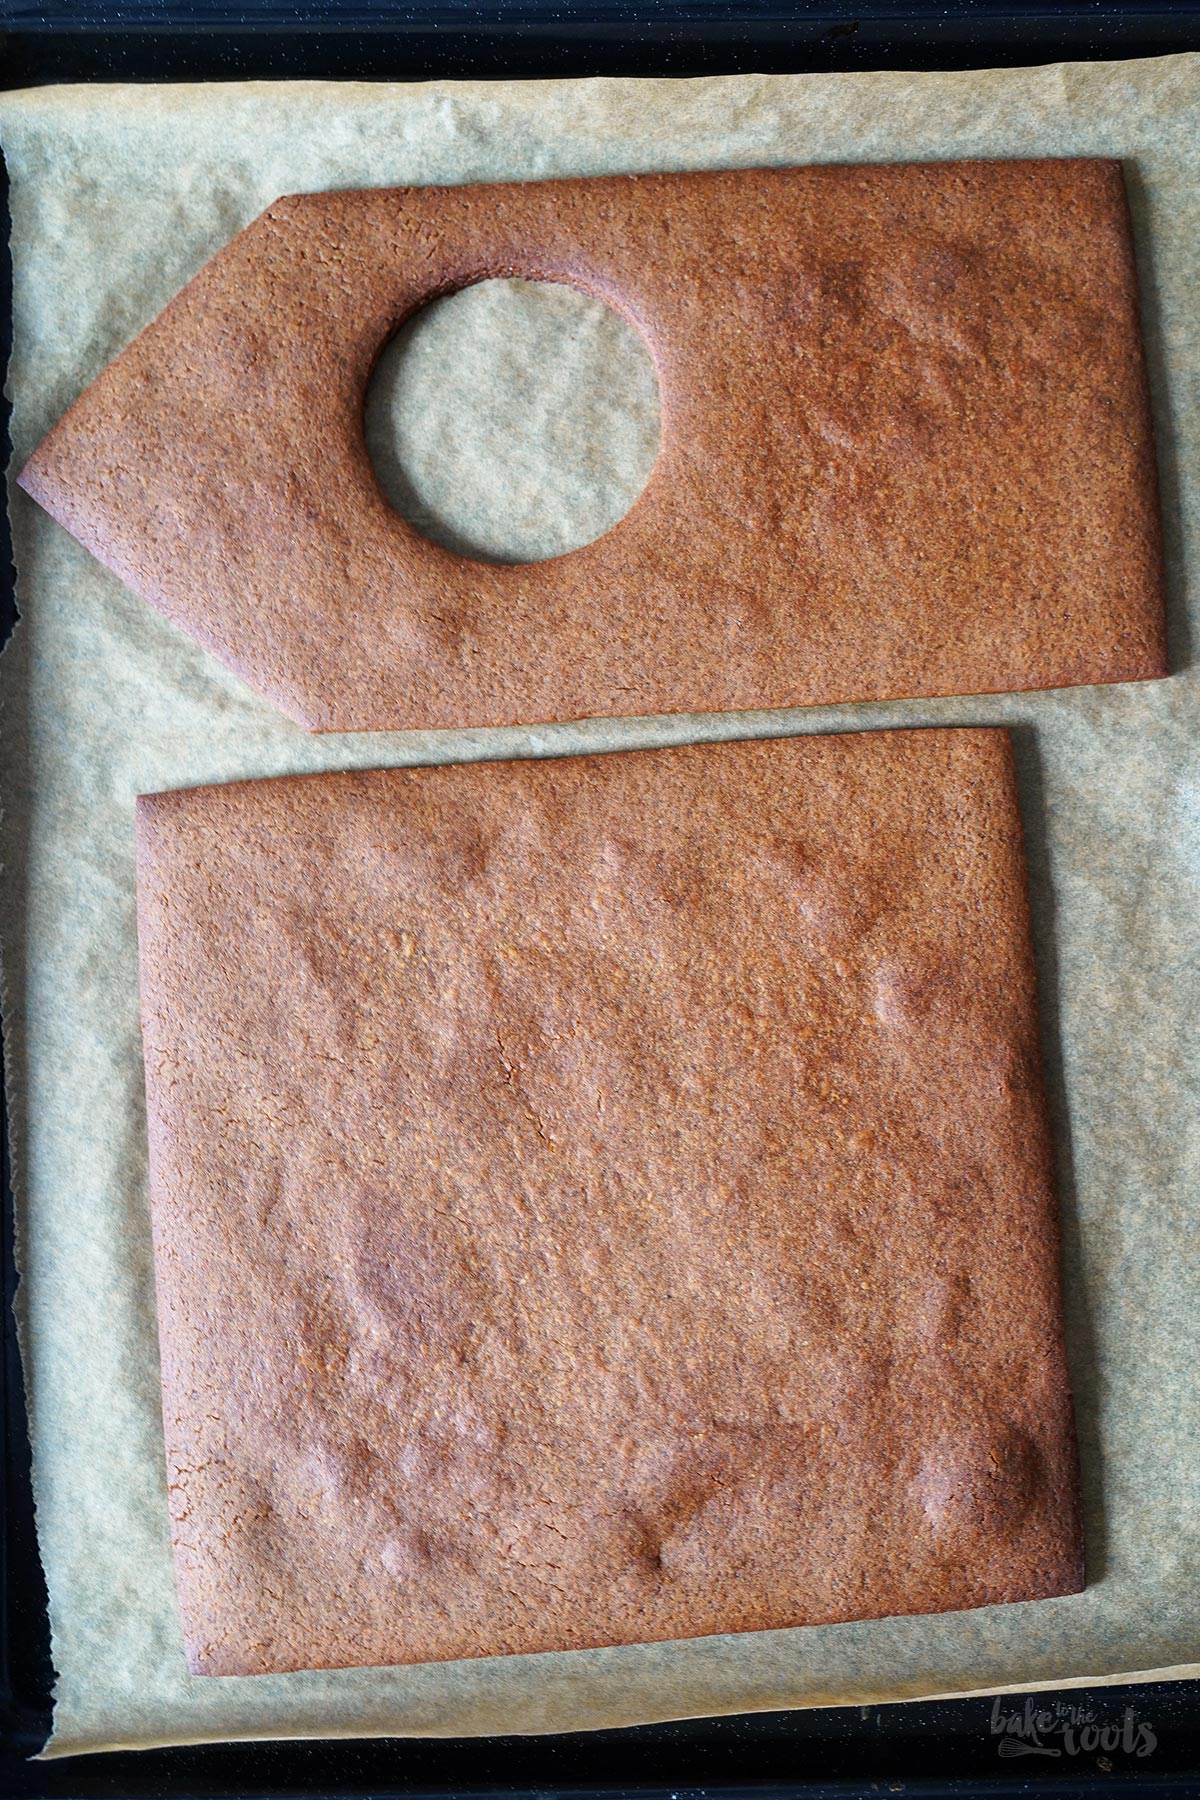
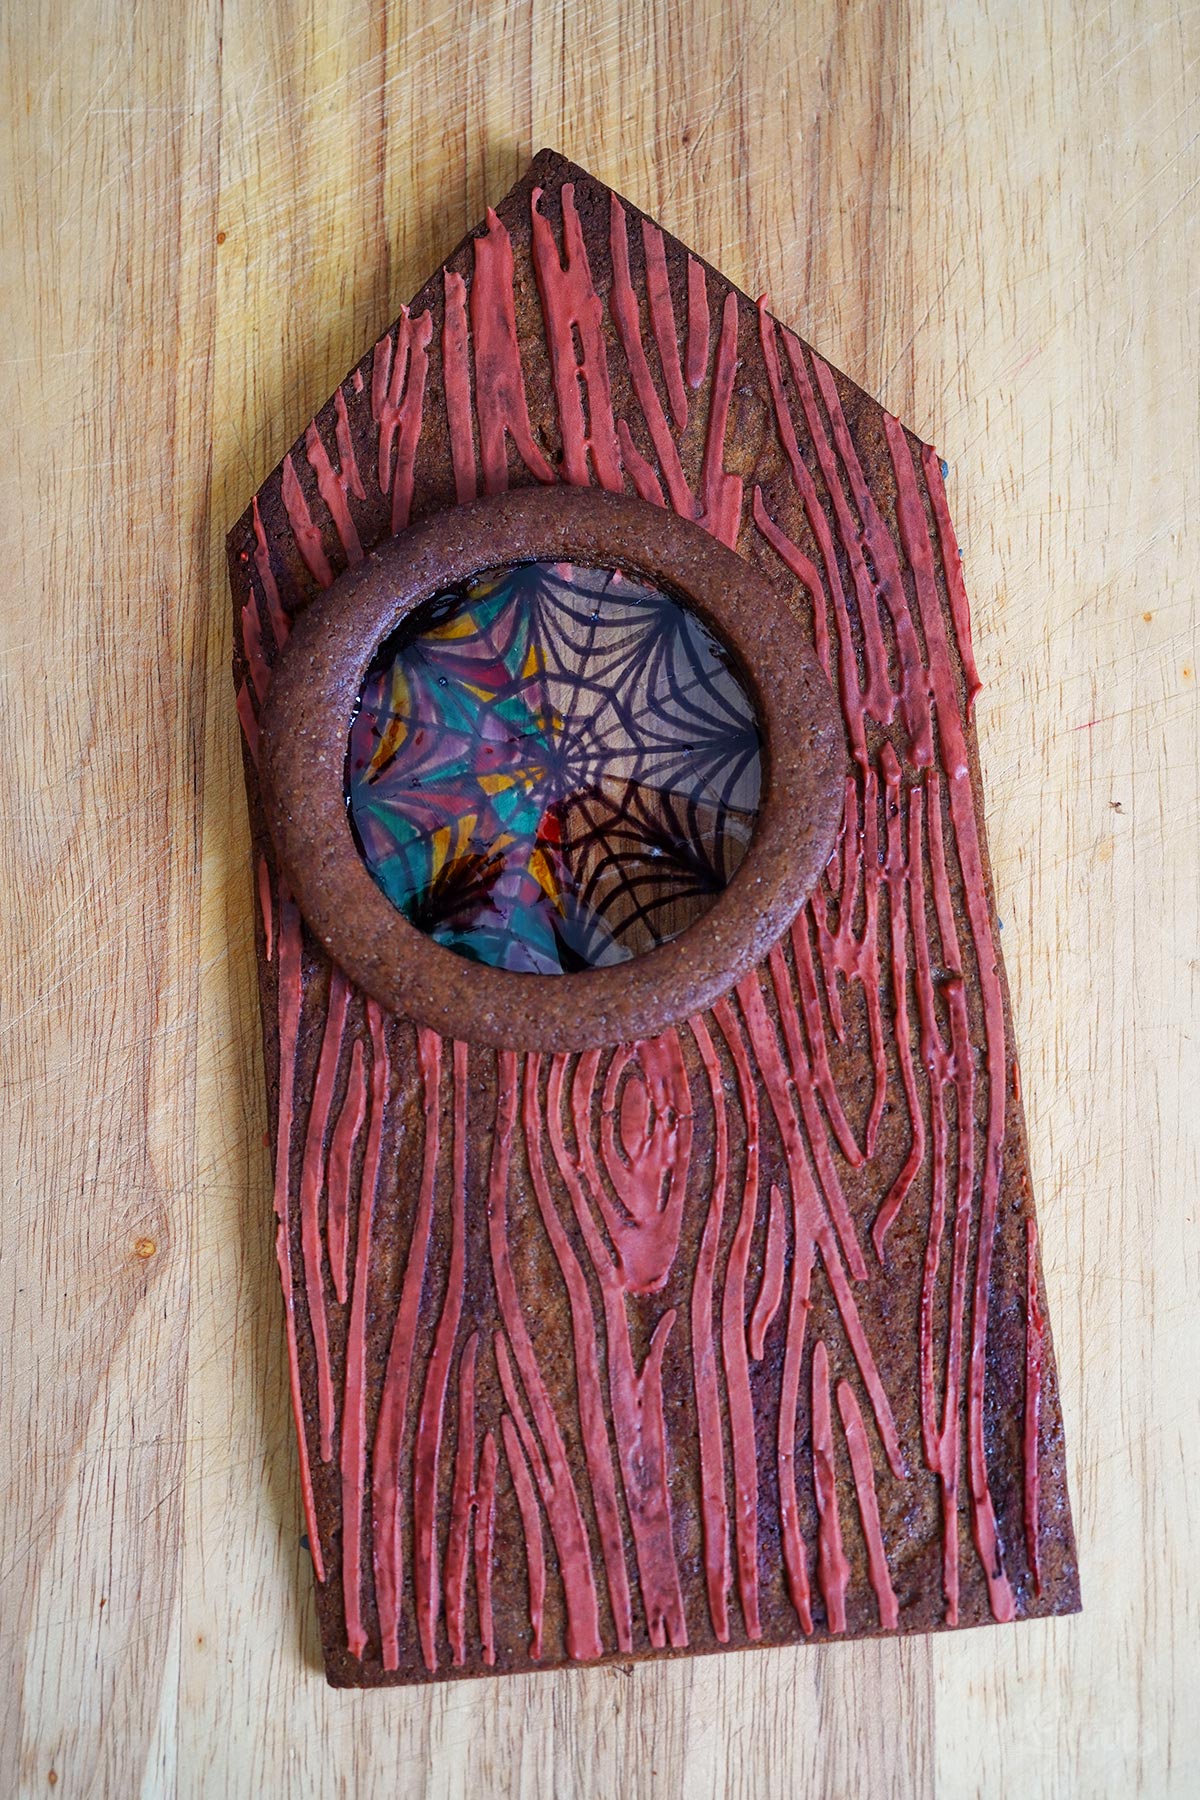
2. Preheat the oven to 180°C (350°F). Place a large piece of parchment paper on your work surface and dust it with some flour. Roll out a portion of the dough on the paper to a thickness about 0.5cm. Place the templates for the components on top and cut them out with a sharp knife. The cut-out pieces shouldn’t be too close together, as the dough will spread slightly. Once the dough pieces are cut, you should move them only with the help of the baking parchment and not drag or lift them otherwise to prevent them from deforming. Once several pieces have been cut out and placed on the baking sheet, they can be baked for about 20-23 minutes in the preheated oven. The gingerbread should look golden brown, but not too dry or even burnt. Remove the gingerbread from the oven, pull the pieces (using the baking parchment again) onto a wire rack and let them cool down completely. Thinner pieces, such as the skylight and the gate, should be baked for a shorter time, as they are prone to burning. The thinner pieces need only about 12-15 minutes. For the window on the back, you’ll need two more rings, which you can cut out with round cookie cutters – a template for those aren’t included. We also shaped and baked a tree for the inside using leftover dough.
3. For the icing, mix the confectioners’ sugar and cream of tartar in a large bowl. Add the egg whites and lemon juice and mix until smooth. The icing for the house construction should be relatively thick, with a consistency similar to buttercream. For the decoration, you might need a slightly softer/thinner consistency – you can easily adjust this with a little more lemon juice (or water).
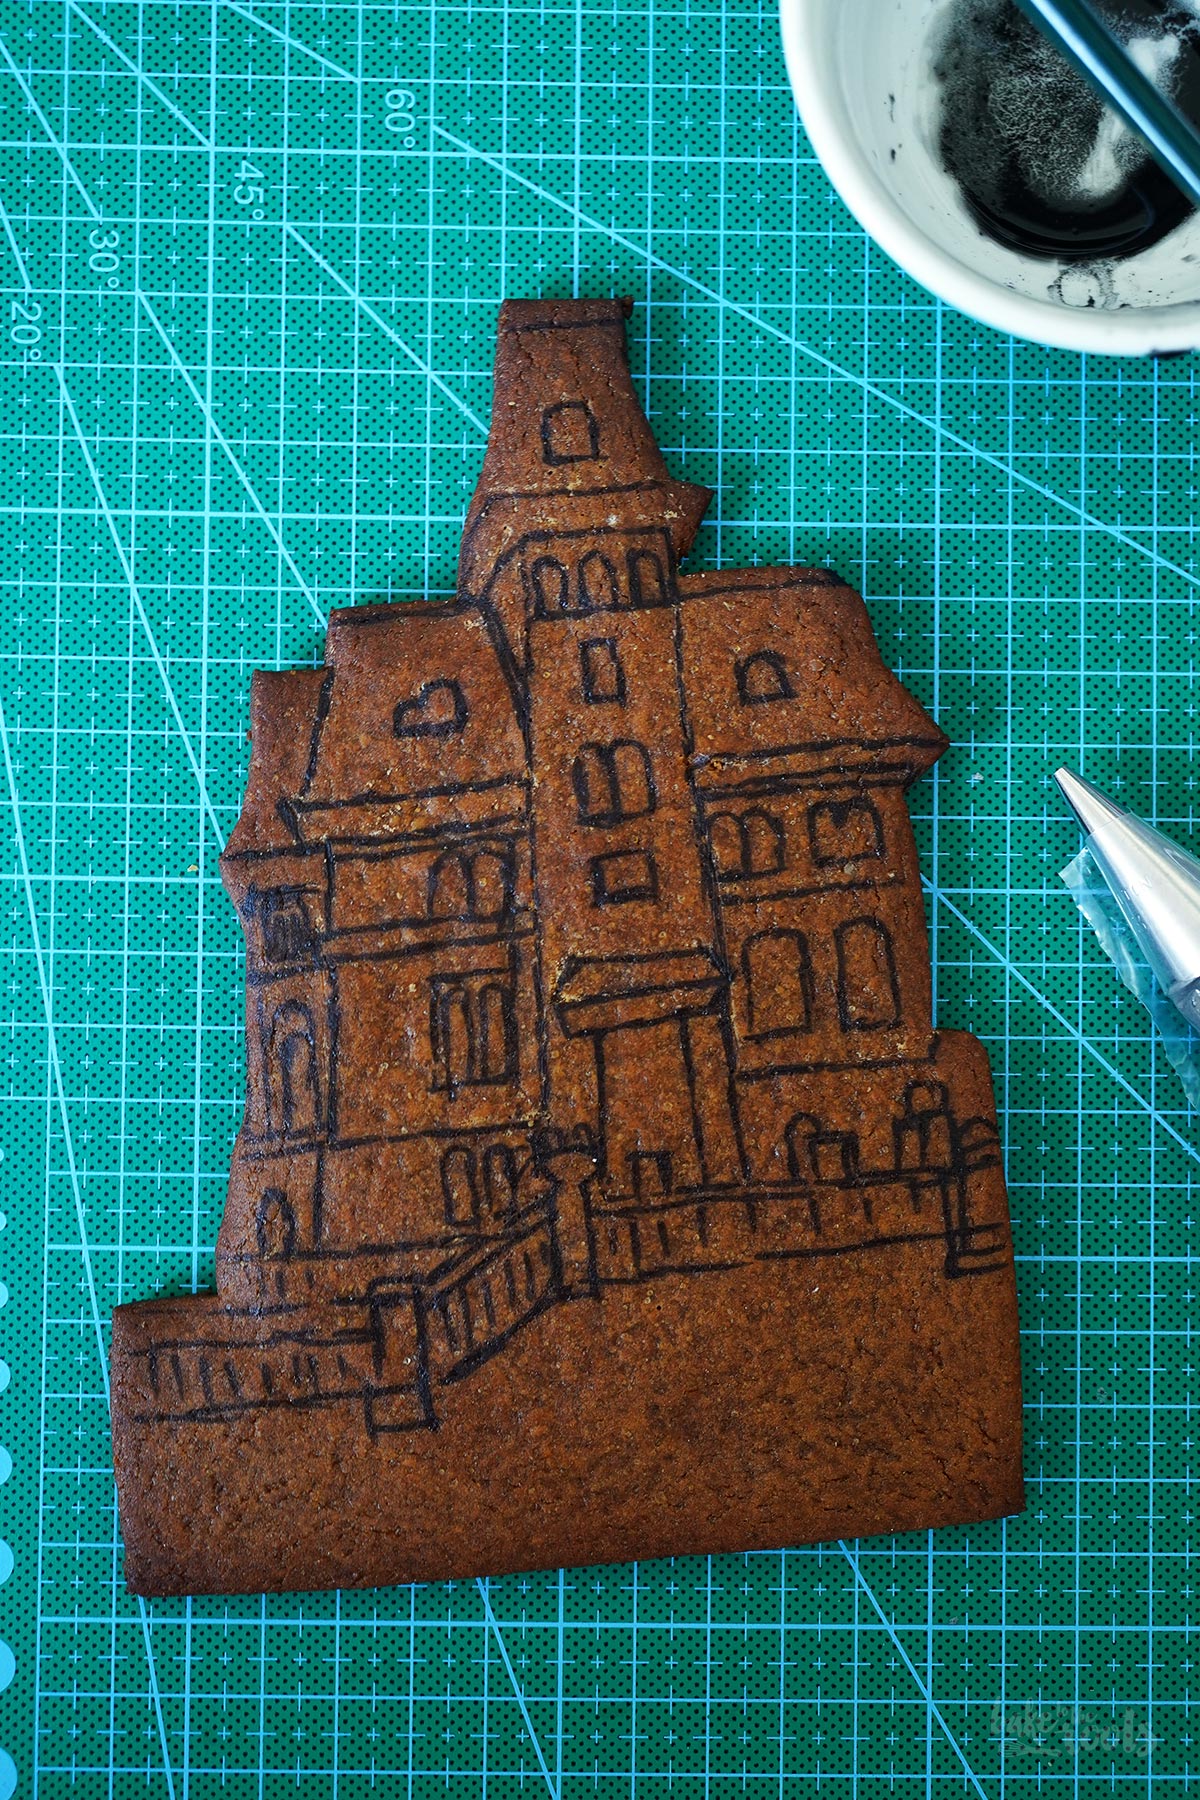
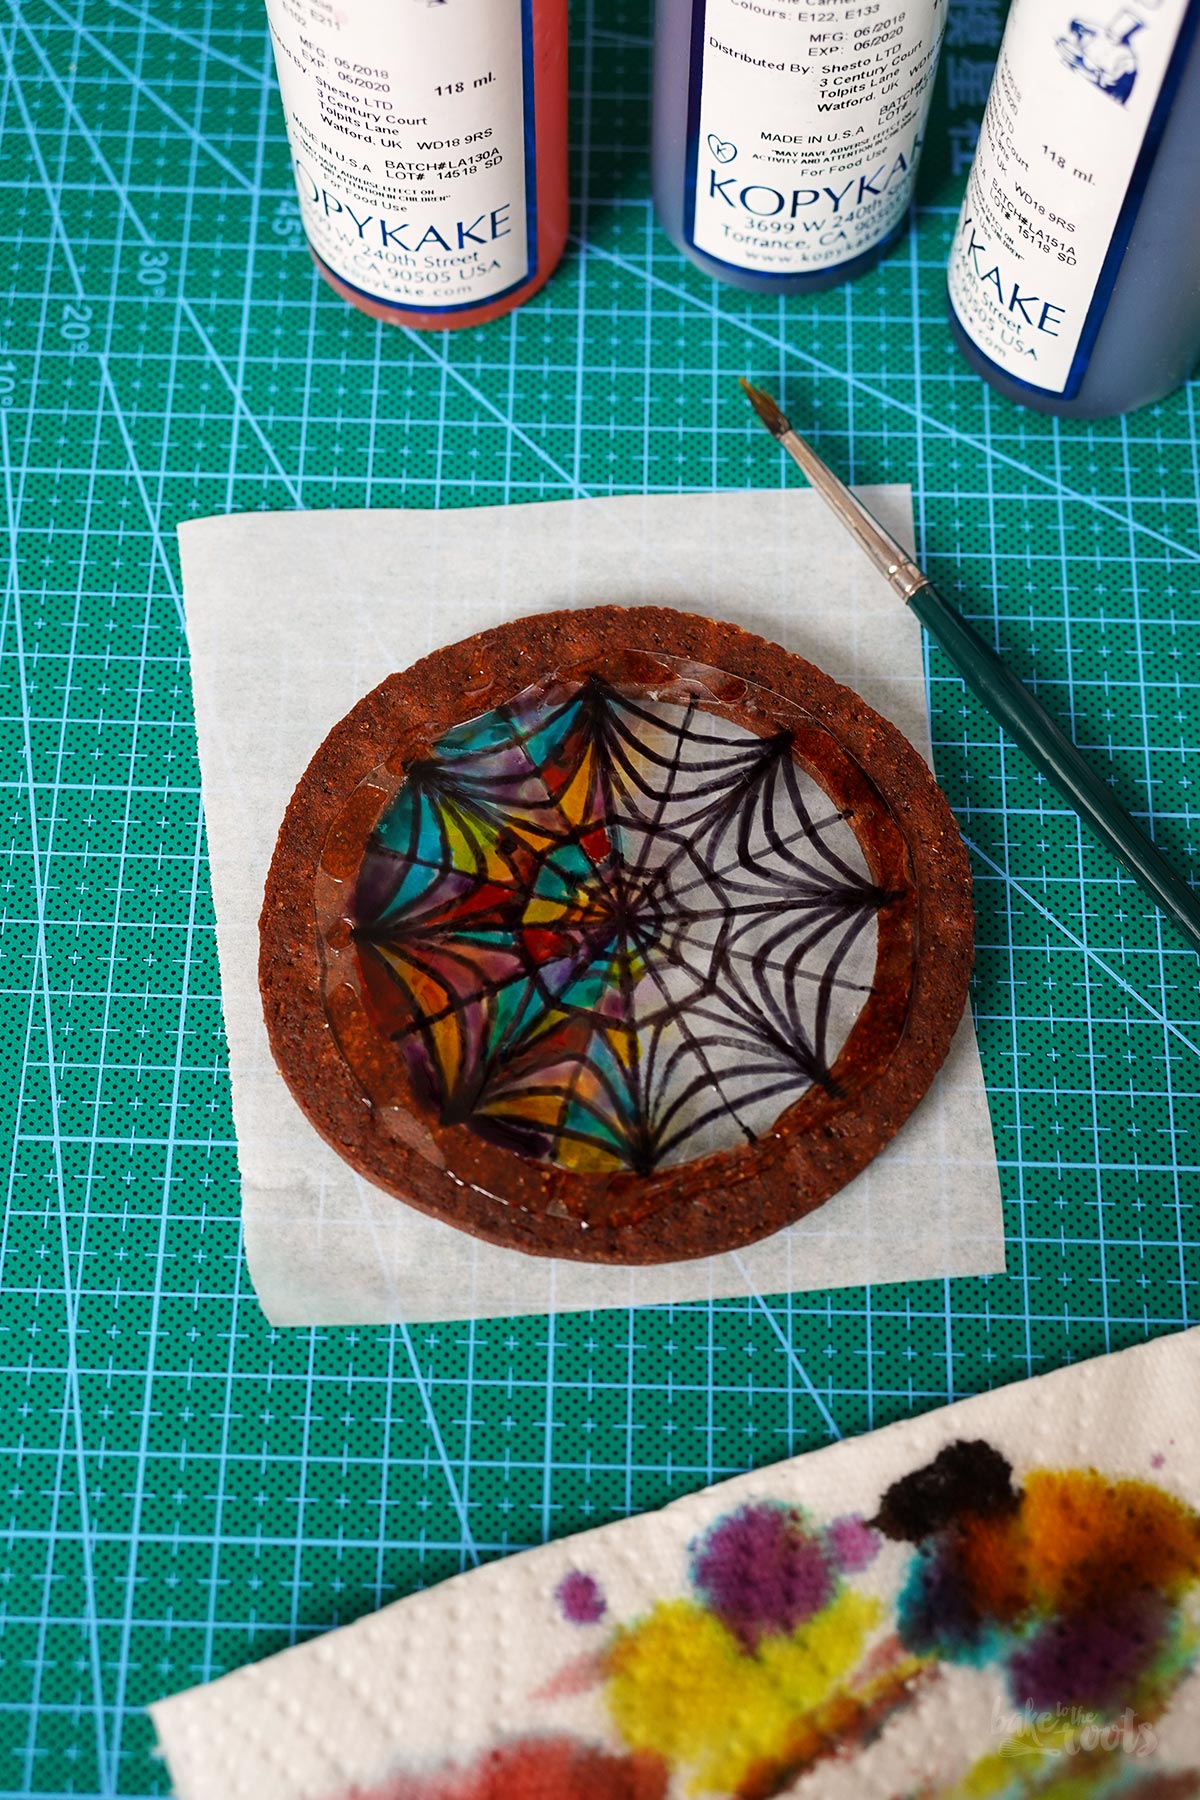
4. The icing for assembling the book nook should be colored brown so it doesn’t stand out too much from the gingerbread. You’re free to choose colors for the rest of the decoration – for the exterior walls (brickwork), we used gray icing as well as some brown and green icing for the vines. We decorated the cookie house inside the book nook with slightly softer icing and added shadows or accents with edible markers. The same applies to the glass window on the back – you can use markers here, or dilute the gel food coloring with a little water and use a paint brush. To give the whole construction a slightly weathered look, you can also age the icing and gingerbread with some dark food coloring. However, you shouldn’t use too much here – neither icing nor gingerbread tolerate too much moisture.
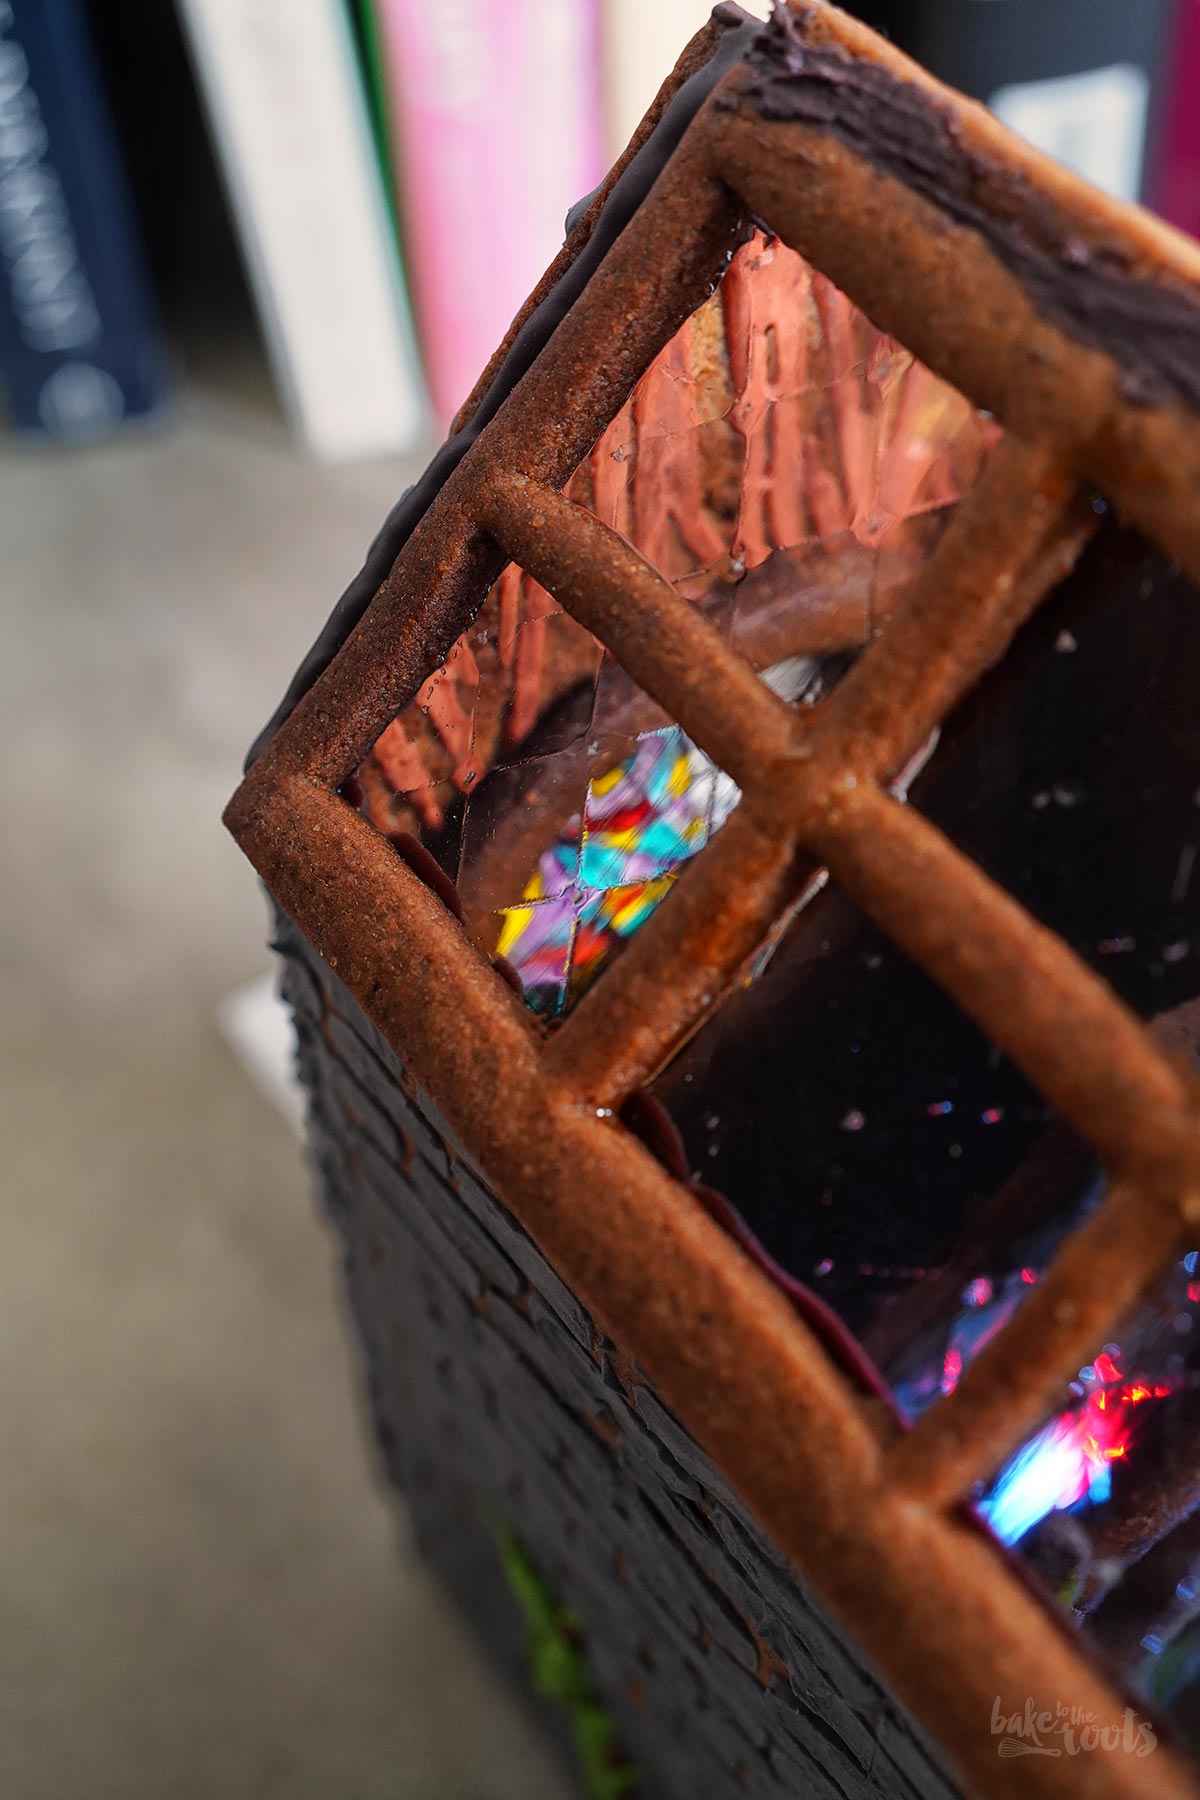
5. We recommend decorating the individual components with icing first – once everything is assembled, many of the parts inside the book nook will be inaccessible. For the skylights, cut gelatin sheets and then glue them to the gingerbread frames with a little icing or edible glue.
6. Once all the components and decorations are ready, you can start assembling. To do this, place the baseplate on a flat surface – preferably a board, which you will later use as a base/stand. Attach one side wall and the back wall to the baseplate with icing and secure them – e.g., with glasses or other objects that will press slightly against the components and hold them in place. Once everything has dried a little, you can place and secure the interior and the front, then add the second side wall and thus enclose the interior. Finally, the skylights go on top and then the gate at the front, and you’re done.
1. Butter und braunen Zucker in eine große Schüssel geben und hell und luftig aufschlagen. Den Rübensirup dazugeben und gut unterrühren. Das Mehl mit Lebkuchengewürz, Zimt und Salz vermischen und dann zur Schüssel dazugeben – mit einem Gummispatel oder Kochlöffel untermengen, bis der Teig anfängt zusammenzuhalten, dann auf einer leicht bemehlten Fläche kurz verkneten. Die zweite Portion Teig ebenfalls zubereiten. Beide Teigportionen in Klarsichtfolie einschlagen und dann für mindestens 1 Stunde in den Kühlschrank legen. Der Teig kann bis zu zwei Tage im Kühlschrank aufbewahrt werden, wenn man nicht sofort loslegen möchte.
2. Den Ofen auf 180°C (350°F) Ober-/Unterhitze vorheizen. Ein großes Stück Backpapier auf die Arbeitsfläche legen und mit ein wenig Mehl bestäuben. Einen Teil des Teiges auf dem Papier etwa 0,5cm dick ausrollen. Die Vorlagen für die Bauteile auflegen und den Teig mit einem scharfen Messer zuschneiden. Die ausgeschnittenen Teile sollten nicht zu nah beieinander liegen, weil der Teig ein wenig auseinander läuft. Sobald die Teigstücke zugeschnitten sind, sollte man sie nur noch mit dem Backpapier bewegen und vorsichtig behandeln, damit sich nichts verzieht. Sind mehrere Teile ausgeschnitten und auf dem Blech platziert, kann man sie für etwa 20-23 Minuten backen. Die Lebkuchen sollten goldbraun aussehen, aber nicht zu trocken oder verbrannt. Aus dem Ofen nehmen und die Lebkuchen mit dem Backpapier auf ein Kuchengitter ziehen und komplett abkühlen lassen. Dünnere Bauteile, wie die Dachfenster und das Tor sollte man etwas kürzer backen, da sie sonst gerne mal verbrennen. Die dünneren Teile brauchen nur etwa 12-15 Minuten. Für das Fenster auf der Rückseite braucht man noch zwei Ringe, die man mit runden Ausstechern ausstechen kann – eine Vorlage dafür ist nicht mit dabei. Wir haben auch noch einen Baum für das Innere mit Teigresten geformt und gebacken.
3. Für das Icing den Puderzucker mit dem Weinstein in einer großen Schüssel vermischen. Das Eiweiß und den Zitronensaft dazugeben und glatt rühren. Das Icing für die Konstruktion des Hauses sollte relativ dick sein, von der Konsistenz her eher wie eine Buttercreme. Für die Dekoration braucht man manchmal eine etwas weichere Konsistenz – mit etwas mehr Zitronensaft (oder Wasser) kann man hier schnell nachjustieren.
4. Das Icing für den Zusammenbau des Book Nooks sollte man braun einfärben, damit es sich nicht zu stark vom Lebkuchen abhebt. Bei der restlichen Dekoration ist man frei – für die Außenwände (Mauerwerk) war der Großteil des Icing bei uns hier grau, sowie ein wenig davon braun und grün für die Ranken. Das Kekshaus im Inneren des Book Nooks haben wir mit etwas weicherem Icing dekoriert und Schatten bzw. Akzente in der Dekoration mit Lebensmittelstiften eingezeichnet. Gleiches gilt auch für das Glasfenster auf der Rückseite – hier kann man mit Stiften arbeiten oder die (Gel) Lebensmittelfarbe mit etwas Wasser verdünnen und dann mit einem Pinsel malen. Um dem Ganzen ein etwas verwitterten Look zu verpassen, kann man Icing und Lebkuchen auch mit etwas dunkler Lebensmittelfarbe altern. Hier sollte man allerdings nicht zu viel verwenden – weder Icing noch Lebkuchen vertragen zu viel Feuchtigkeit.
5. Es empfiehlt sich, die einzelnen Bauteile vorab mit dem Icing zu dekorieren – wenn alles zusammengebaut ist, kommt man an viele Teile im Inneren des Book Nooks nicht mehr heran. Für die Dachfenster schneidet man sich Gelatineblätter zurecht und klebt sie dann mit ein wenig Icing oder essbarem Kleber auf die Lebkuchenrahmen.
6. Wenn alle Bauteile und Dekorationen fertig sind, kann man mit dem Zusammenbau starten. Dazu die Bodenplatte auf eine gerade Fläche setzen – am besten ein Brett, das man dann später als Unterlage verwendet). Eine Seitenwand und die Rückwand mit Icing auf der Bodenplatte befestigen und absichern – z.B. mit Gläsern oder anderen Gegenständen, die ein wenig gegen die Bauteile drücken bzw. die sie an Ort und Stelle halten. Wenn alles ein wenig angetrocknet ist, kann man das Innenleben und die Vorderseite platzieren und fixieren, danach dann die zweite Seitenwand und damit das Innenleben einschließen. Zum Schluss kommen die Dachfenster obendrauf und dann noch das Tor vornedran und schon ist man fertig.
Tips & tricks for construction and storage
Durability. The icing with lemon juice and egg white hardens nicely when it dries and also protects the surface of the gingerbread. However, you still have to be careful when transporting it so that finer icing decorations don’t break off.
It’s best not to leave it in the sun. In autumn and winter, the sun is never particularly bright, but if possible, you should keep the gingerbread out of direct sunlight. A dry, dust-free place is ideal.
Lighting. To see the interior properly, we recommend providing some lights inside the Book Nook. We used small LED lights*, which are normally used for dioramas and DIY projects. They were ideal because they change color and were small enough to fit everywhere. For constant light, a string of lights or something similar with batteries would probably be better. The small ones only last for a few hours.
Preserving. If you don’t want to eat the gingerbread, you can simplify the decoration process and use, for example, colors that aren’t food-safe. A little clear (spray) varnish will make the whole construction last even longer. It also helps to bake the gingerbread a little drier for a longer lifespan. But don’t overdo it, otherwise you could have problems assembling it. Either way… the house or the Book Nook will unfortunately deteriorate at some point. So you should be able to part with it at some point.
Craving more? Keep in touch on Facebook, Instagram and Pinterest for new post updates and more. You can also contact me with any questions or inquiries!
Here is a version of the recipe you can print easily.
Print
Wednesday Gingerbread Book Nook
- Prep Time: 00:20
- Cook Time: 00:23
- Total Time: 48:00
- Yield: 1 1x
- Category: Christmas
- Method: -
- Cuisine: International
Description
If you’ve got some space on your bookshelf and love the Addams Family, you should bake yourself a Wednesday Gingerbread Book Nook.
Ingredients
For the dough (prepare two times):
3.5 oz. (100g) butter, at room temperature
1/2 cup (100g) brown sugar
8.1 oz. (230g) dark sugar beet syrup*
12.3 oz. (350g) all-purpose flour, plus more for rolling
3 tsp. gingerbread spice*
1 tsp. ground cinnamon
1 pinch of salt
For the icing:
about 17.6 oz. (500g) confectioners’ sugar, plus more if needed
1/2 tsp. cream of tartar*
3 medium egg whites
1 tsp. fresh lemon juice, plus more if needed
gel food colors* (black, brown, red, etc.)
For the decorations:
several gelatin leaves*
several piping bags*
small round piping tips*
texture stencils* for brickwork and wood effect
piping tips for leaves*
edible coloring pencils*
edible glue*
paint brushes (optional)
Instructions
1. Add the butter and brown sugar to a large bowl and mix until light and fluffy. Add the sugar beet syrup and mix until well combined. Combine flour, gingerbread spice, ground cinnamon, and salt, and add it to the bowl. Mix with a rubber spatula or wooden spoon until the dough starts coming together, then knead briefly on a floured surface. Prepare the second batch the same way. Wrap the two both batches in plastic wrap and place them in the fridge for at least 1 hour. The dough can be refrigerated for up to two days if you don’t want to start right away.
2. Preheat the oven to 180°C (350°F). Place a large piece of parchment paper on your work surface and dust it with some flour. Roll out a portion of the dough on the paper to a thickness about 0.5cm. Place the templates for the components on top and cut them out with a sharp knife. The cut-out pieces shouldn’t be too close together, as the dough will spread slightly. Once the dough pieces are cut, you should move them only with the help of the baking parchment and not drag or lift them otherwise to prevent them from deforming. Once several pieces have been cut out and placed on the baking sheet, they can be baked for about 20-23 minutes in the preheated oven. The gingerbread should look golden brown, but not too dry or even burnt. Remove the gingerbread from the oven, pull the pieces (using the baking parchment again) onto a wire rack and let them cool down completely. Thinner pieces, such as the skylight and the gate, should be baked for a shorter time, as they are prone to burning. The thinner pieces need only about 12-15 minutes. For the window on the back, you’ll need two more rings, which you can cut out with round cookie cutters – a template for those aren’t included. We also shaped and baked a tree for the inside using leftover dough.
3. For the icing, mix the confectioners’ sugar and cream of tartar in a large bowl. Add the egg whites and lemon juice and mix until smooth. The icing for the house construction should be relatively thick, with a consistency similar to buttercream. For the decoration, you might need a slightly softer/thinner consistency – you can easily adjust this with a little more lemon juice (or water).
4. The icing for assembling the book nook should be colored brown so it doesn’t stand out too much from the gingerbread. You’re free to choose colors for the rest of the decoration – for the exterior walls (brickwork), we used gray icing as well as some brown and green icing for the vines. We decorated the cookie house inside the book nook with slightly softer icing and added shadows or accents with edible markers. The same applies to the glass window on the back – you can use markers here, or dilute the gel food coloring with a little water and use a paint brush. To give the whole construction a slightly weathered look, you can also age the icing and gingerbread with some dark food coloring. However, you shouldn’t use too much here – neither icing nor gingerbread tolerate too much moisture.
5. We recommend decorating the individual components with icing first – once everything is assembled, many of the parts inside the book nook will be inaccessible. For the skylights, cut gelatin sheets and then glue them to the gingerbread frames with a little icing or edible glue.
6. Once all the components and decorations are ready, you can start assembling. To do this, place the baseplate on a flat surface – preferably a board, which you will later use as a base/stand. Attach one side wall and the back wall to the baseplate with icing and secure them – e.g., with glasses or other objects that will press slightly against the components and hold them in place. Once everything has dried a little, you can place and secure the interior and the front, then add the second side wall and thus enclose the interior. Finally, the skylights go on top and then the gate at the front, and you’re done. ;)
Notes
Happy baking!
Links marked with an asterisk (*) are affiliate links (advertising/Werbung) to Amazon Germany. If you click on one of those links and buy something via this link, I will get a commission for that sale. The price of whatever you buy is not affected in any way by this.