
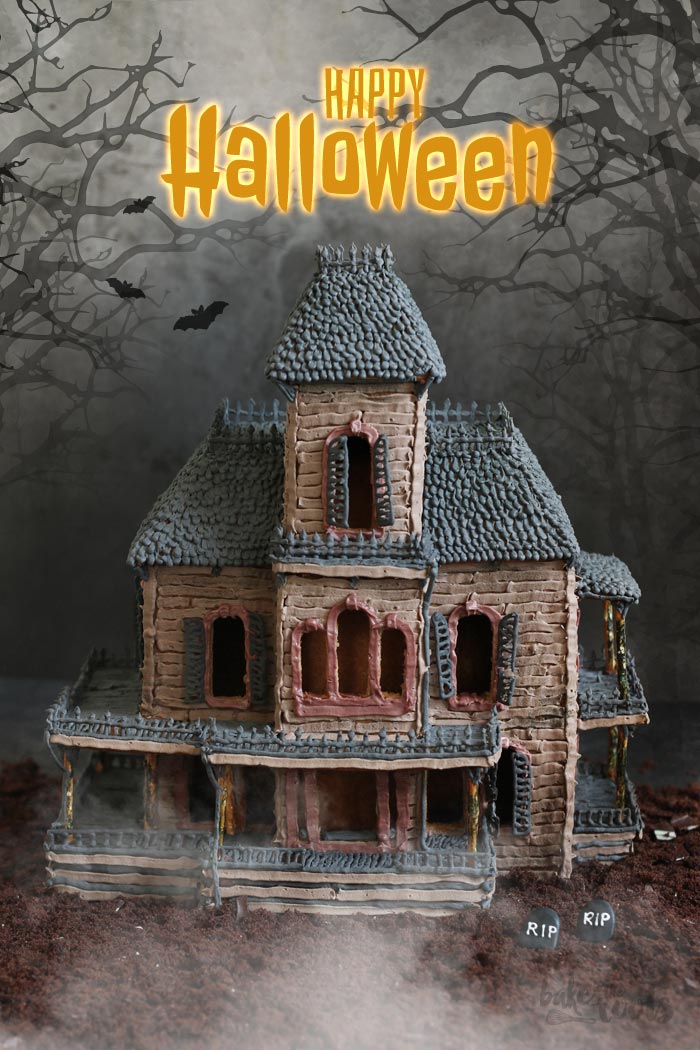
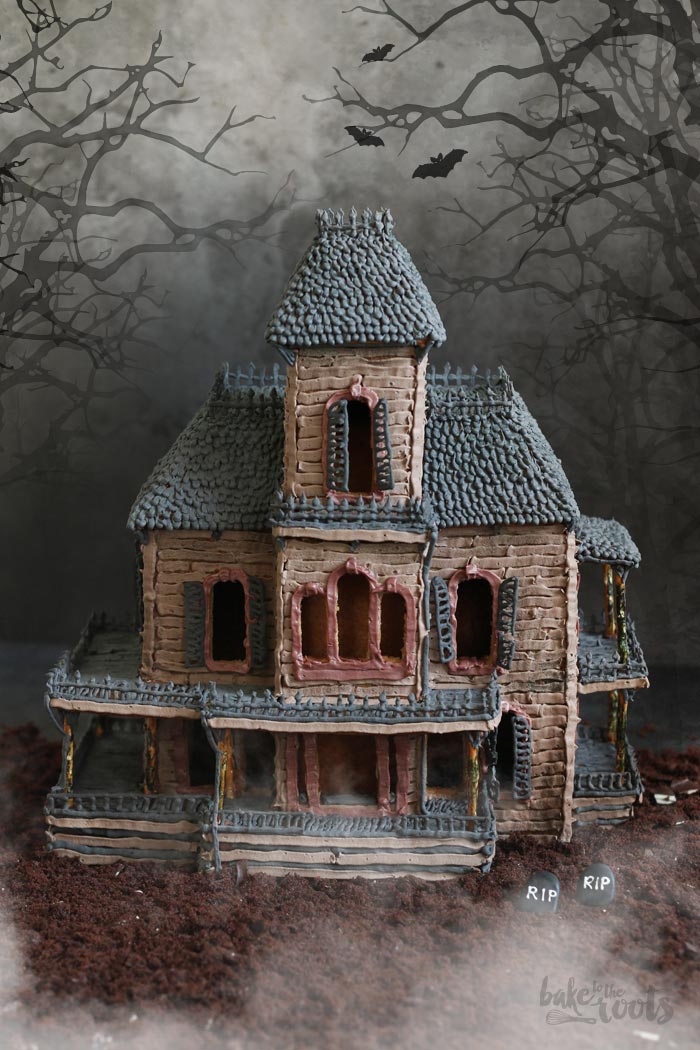
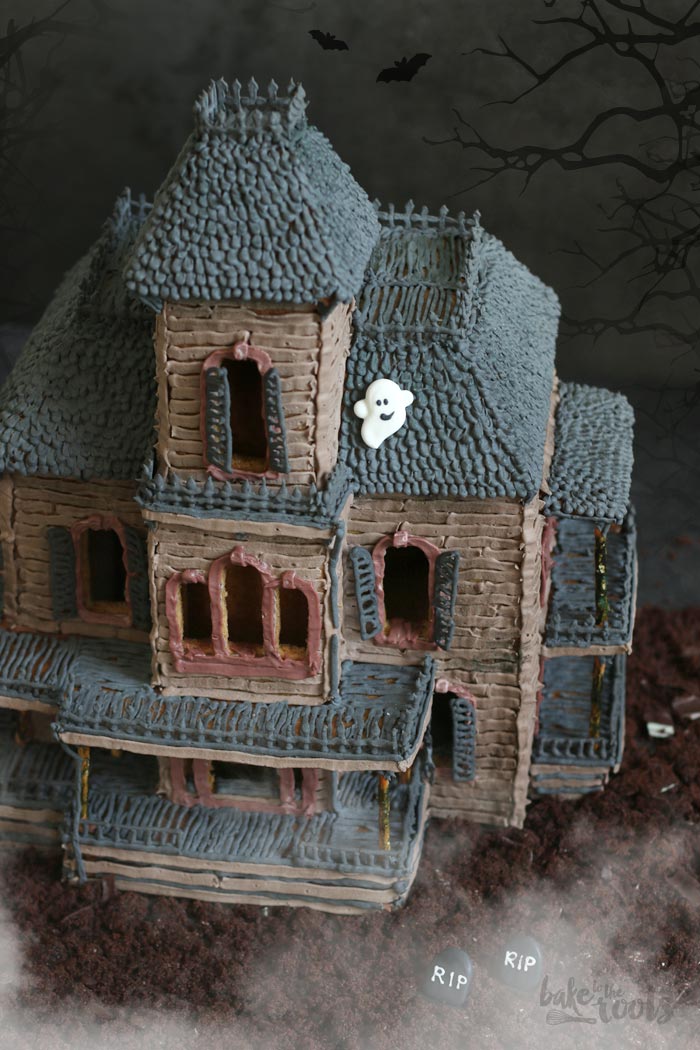
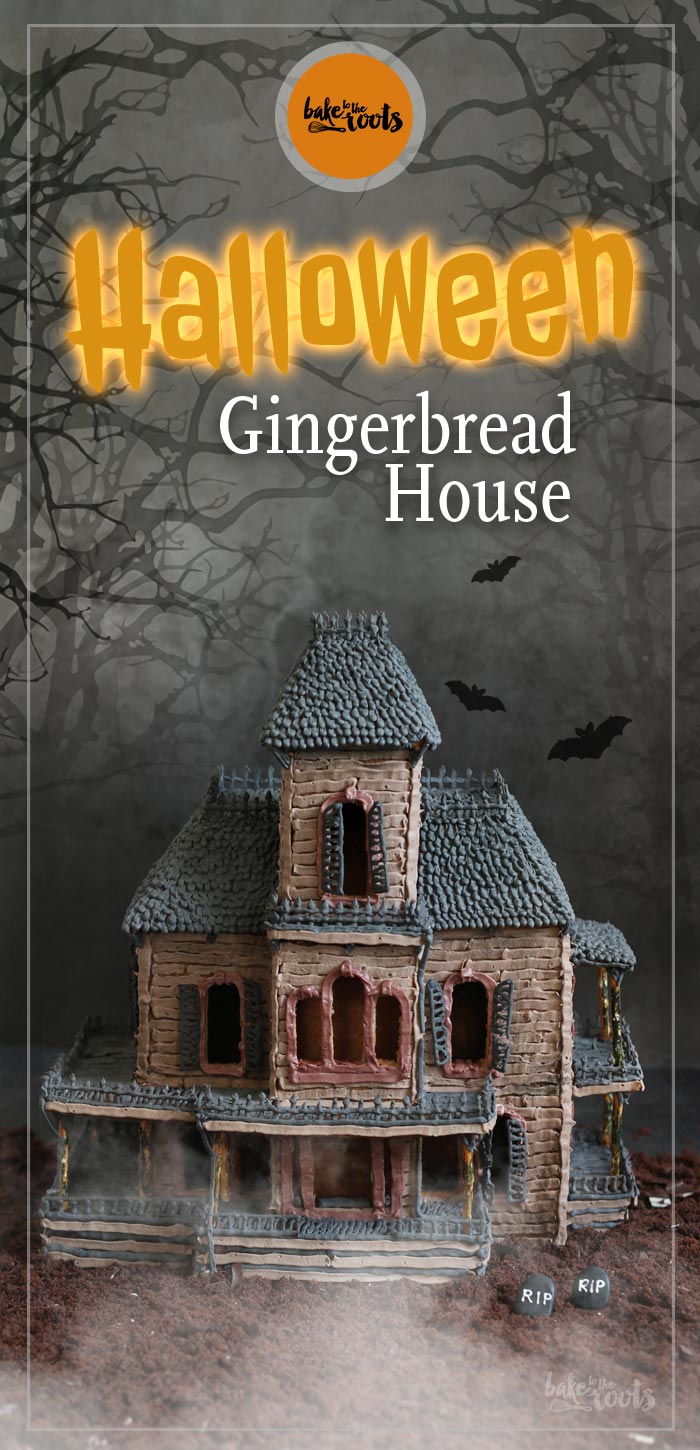
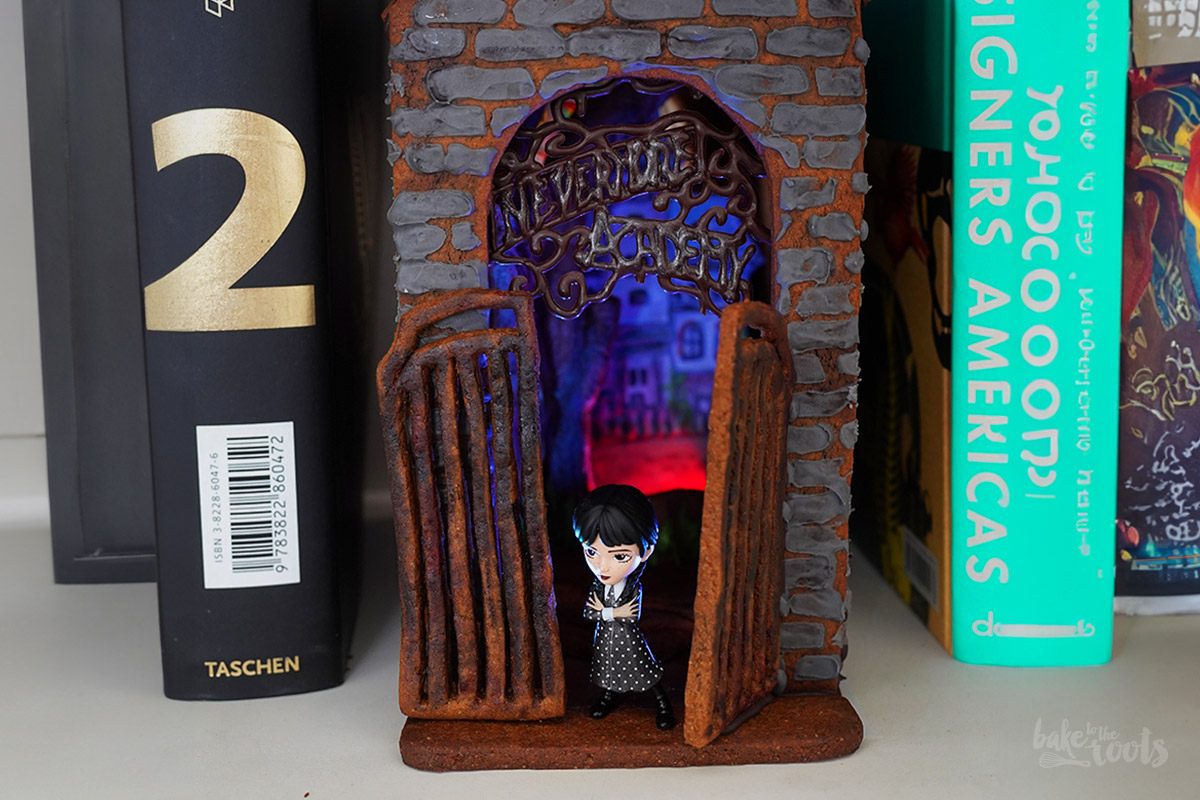
Happy Halloween! I wished you would be frightened looking at my Halloween Haunted Gingerbread House, but I think it is not really frightening or scary ;) It looks kind of cute – all I would need are some little people around it to make it more real looking… well. In case you want to bake this house for Halloween – you might want to think a bit more into the future and plan this one for next year. It takes a while and making this for tomorrow would be quite challenging… ;)
I wanted to build a haunted gingerbread house for sooooo long. Basically, since I was born. Just kidding. But it has been a while. Probably because I really like architecture. Did you know I studied architecture? Well… not for long :P But I still like projects where I can actually build something. I am not the most talented person when it comes to doing something with royal icing, but I tried to do my best. So making this house was somewhat nerve-wracking – especially with the royal icing I had to use. Will the walls stick together? Will the roof stay where it is supposed to be? All the decorative pieces – will they stay in place or not? Simple gingerbread houses are sometimes already tricky, but if you add balconies and little towers it gets worse. Just sayin’ :P
I already made several gingerbread houses for Christmas – basic ones that had four walls and a roof. Nice but also a bit boring. You can go to the extreme, of course, like my blogger colleague Markus aka. Backbube – he made a gingerbread house for Christmas which was actually the Ulmer Münster. The church with the tallest tower in the world ;) Almost original size as it looks like on the pictures. Really cool, but that would have been tooo much work. Making a little haunted house for Halloween was much more up my alley…
One good thing about the internet – you basically get everything you can imagine from the internet. For example, plans for a haunted gingerbread house! Yeah, people do all kinds of crazy things and share them. Love it! I found the plans for this haunted house several years ago on this site but was never able to actually make the house – there was never enough time to do it… until now ;) So in case you want to build this house, you need the template you can download there as a PDF.
Apropos assembling the house… it takes a while, so be warned. I was working for several days to finish everything. Not 24h a day, but you need time in between where stuff has to dry and everything… so keep that in mind. I made the dough in several batches and baked the parts separately. If you have a big kitchen machine that can handle a larger amount of dough, you might do not have to do it in batches. But extending the baking over several days is not a problem at all – you can do a little bit here and there when you come home from work and assemble everything on another day. Since I did not plan to eat the house at the end, it does not matter if everything gets dry… it is actually better if you want to keep the house for longer.
INGREDIENTS / ZUTATEN
For the dough (make 3 times):
3.5 oz. (100g) butter, at room temperature
1/2 cup (100g) brown sugar
3 tsp. gingerbread spice
1 tsp. ground cinnamon
pinch of salt
8 oz. (230g) light beet syrup
1 tsp. vanilla extract
2 2/3 cups (350g) all-purpose flour, plus more for dusting
For the icing (make about 1 1/2 times):
4-5 cups (520g-650g) confectioners’ sugar
1/2 tsp. cream of tartar
3 medium egg whites, plus more if needed
1 tsp. fresh lemon juice, plus more if needed
food coloring (black, brown, red, etc.)
For the decoration:
salted pretzel sticks
piping bags
small round piping tips
small flat piping tips
Für den Teig (3 mal zubereiten):
100g weiche Butter
100g brauner Zucker
3 TL Lebkuchengewürz
1 TL Zimt
Prise Salz
230g Rübensirup (hell oder dunkel)
1 TL Vanille Extrakt
350g Mehl (Type 550), plus mehr zum ausrollen
Für das Icing (braucht man etwa 1 1/2 mal):
520g-650g Puderzucker
1/2 TL reiner Weinstein (Cream of Tartar)
3 Eiweiß (M), plus ggf. mehr
1 TL frischer Zitronensaft, plus ggf. mehr
Lebensmittelfarben (schwarz, braun, rot, etc.)
Für die Dekoration:
Salzbrezelstangen
Spritzbeutel
kleine runde Tüllen
kleine abgeflachte Tüllen
I tried to write down what you got to do in the recipe and in which order, but you need to channel your inner structural engineer to actually build the house properly. If your house crashes and your insurance is not paying… don’t come to me! ;P I made a small change to the template you can download – the instruction notes say to cut and bake the porch and the base of the balcony one time, but I actually cut that parts three times to have the porch and balcony at the right hight without using wafers (as recommended in the instructions). So keep that in mind. Besides that – feel free to decorate the house the way you want. I tried to come as close as possible to the original Haunted House which is located in Disneyland Paris. I love this attraction! ;)
Well… there is not much more to say. If you are patient and skip the cocktails for once to have a steady hand, this should be easy to make. In case you have problems don’t hesitate to write me – maybe I can help a bit. Besides that – Happy Halloween!
DIRECTIONS / ZUBEREITUNG
1. For the dough add the butter to a large bowl and mix until softened. Add the brown sugar, gingerbread spice, ground cinnamon, and salt and mix until light and fluffy. Add the beet syrup and vanilla extract and mix it in. Add the flour and mix/knead until you get a nice smooth dough. Place the dough on your work surface, sprinkle with some more flour and knead for some time with your hands, shape into a disk and wrap in plastic wrap. Place in the fridge for 30 minutes. I made three batches of dough because it was easier for my kitchen machine to process – if you have a larger one, make all at once, but divide it into three batches and then let it rest in the fridge. You can store the dough overnight if you need to prepare it in advance.
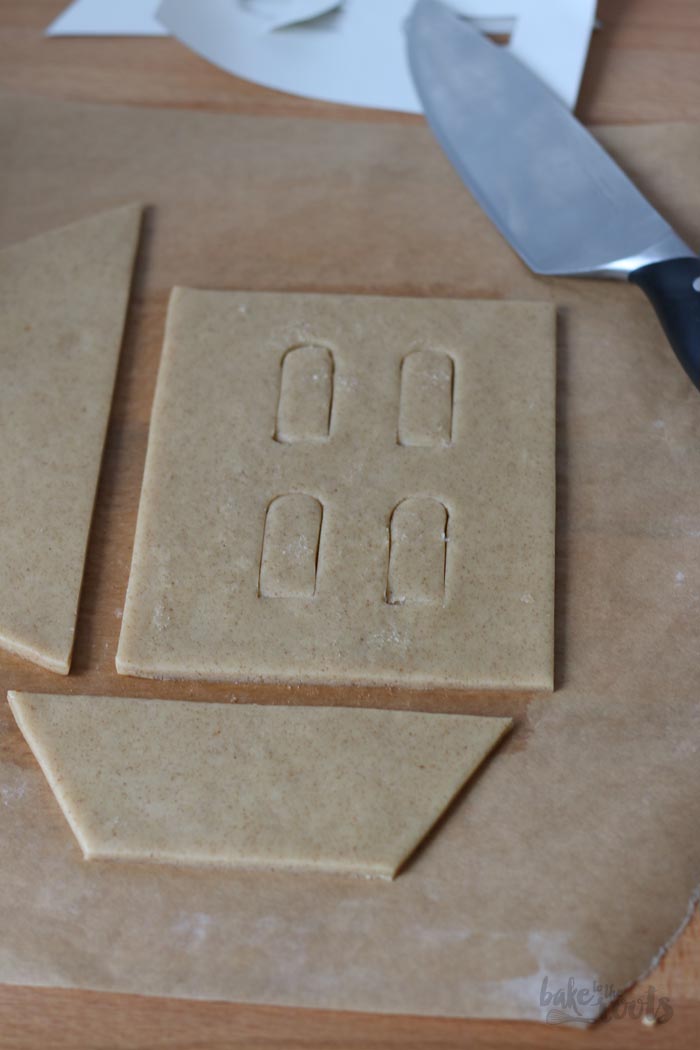
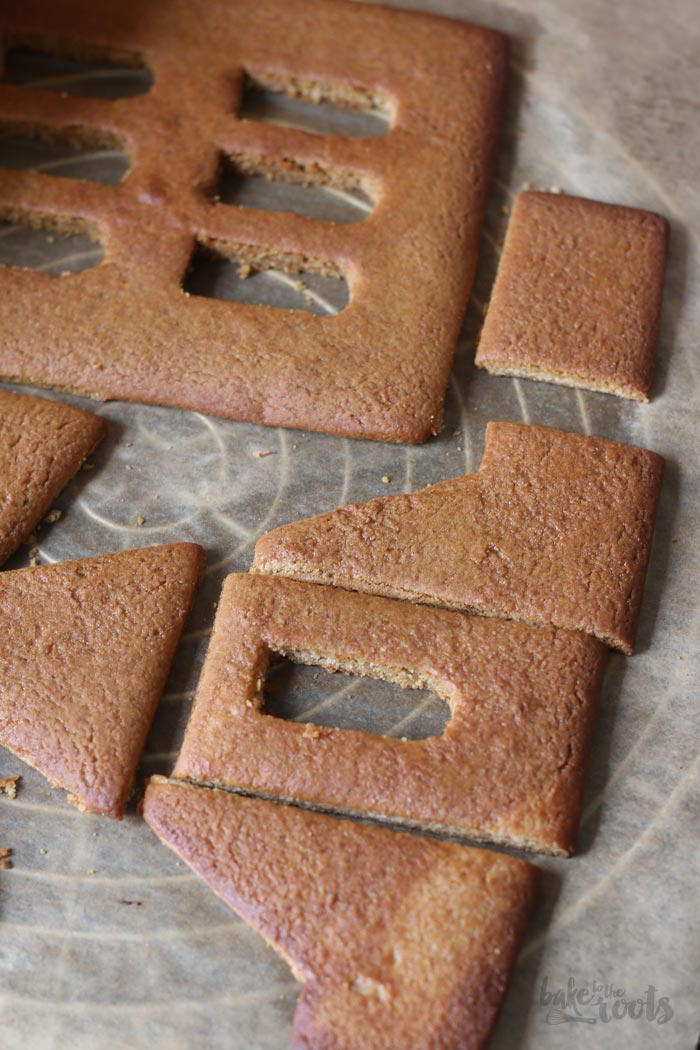
2. Preheat the oven to 350°F (175°C). Place a large piece of baking parchment on your work surface and sprinkle with some flour. Take the first batch of dough and roll out on the paper – about 0.2 inches thick. Place the template pieces on the dough and cut out with a sharp knife. Try not to place the template pieces too close to each other since the dough tends to spread. For windows and doors cut the shapes, but do not remove the windows/doors – you have to remove those parts right after baking. When you have enough parts on your baking parchment, slide onto your baking sheet and bake for about 20-23 minutes. The gingerbread should have a nice golden brown color, but not look burned. Take out and pull the baking parchment with the gingerbread pieces off the baking sheet. If you need to trim the pieces because they spread too much, you have couple minutes where it is easy to cut the gingerbread – when it is cooled and dry, cutting the gingerbread will get more difficult and in some cases, it can break. Be careful ;) Continue cutting and baking the gingerbread until you got all the pieces you need. Let them cool completely before assembling the house.
3. For the icing add about 4 cups of the confectioners’ sugar and the cream of tartar to a large bowl and mix until well combined. Add the egg whites and lemon juice and mix until you get a smooth and shiny icing. The icing for the construction of the house should be thicker, the one to pipe railings, for example, should be not too thick, so you have to adjust depending on the usage of the icing. The icing to build the house should also have a similar color to the gingerbread, the icing for the wood panels should be on the grey-brownish side, the icing for the railings dark grey and the icing for the roof even darker – so adjust accordingly.
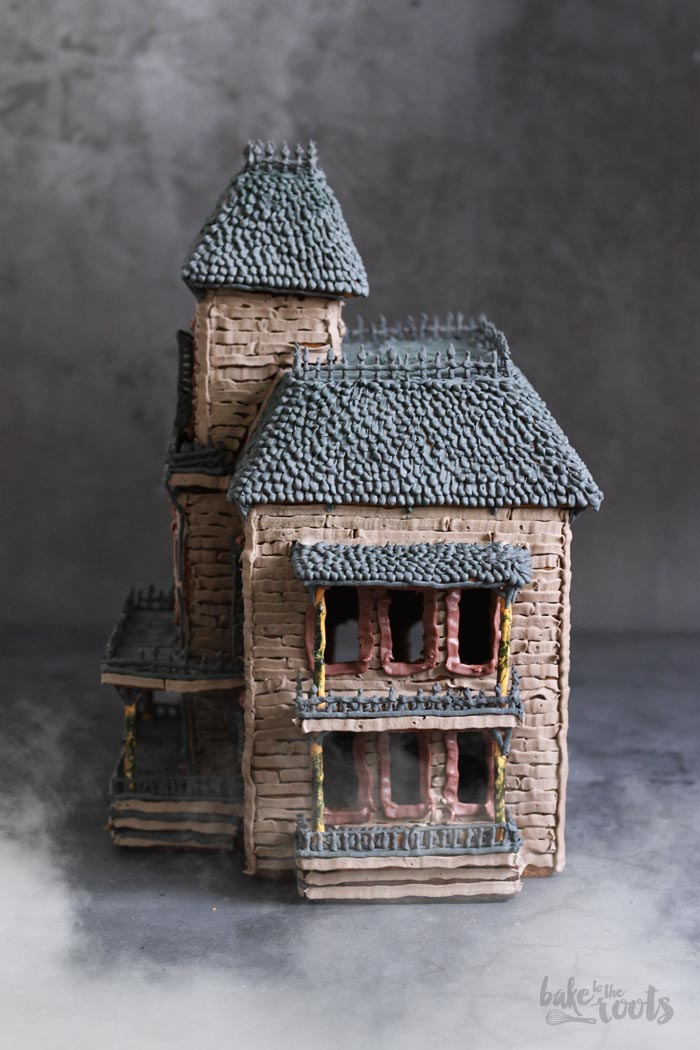
4. I recommend starting with the main part of the building. To perfectly fit two sides together, you should cut the edges at a 45° angle. Use the thicker icing to keep all parts together and let dry for at least 1 hour before moving. For the roofs you should start with the sides and put them together – use glasses or other heavy objects to hold everything in place, then the sides are dry, add the top of each roof. To assemble the parts, place the main part of the building on a board, attach the entrance, the porch, and balcony (with the pretzel sticks as pillars), as well ass the balconies on the side, the main roof and the little tower. Let dry overnight.
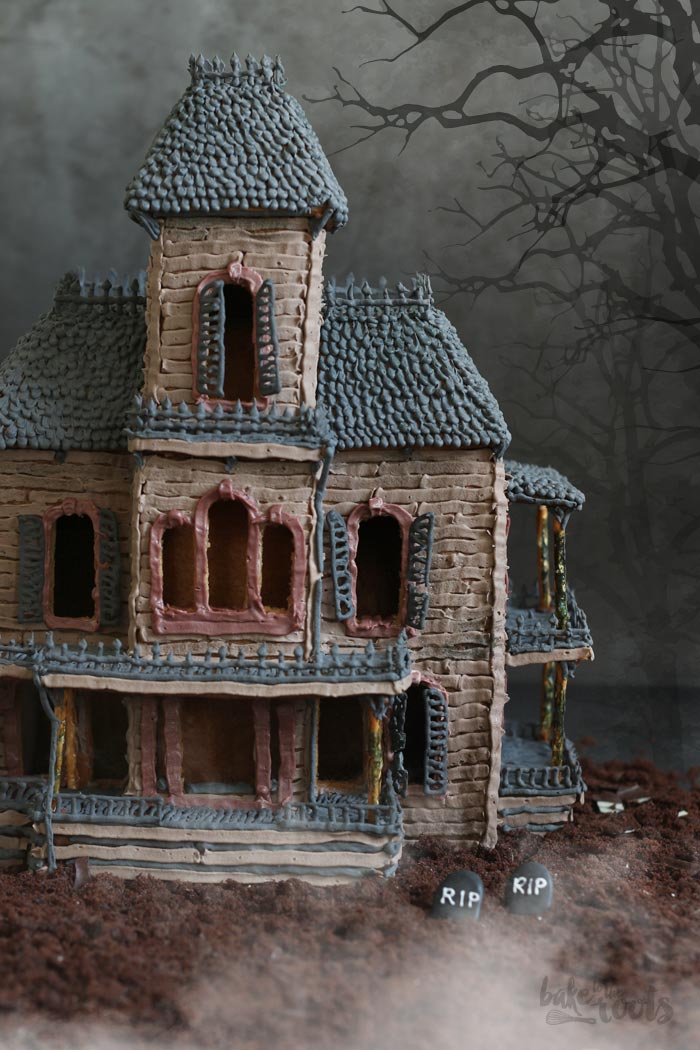
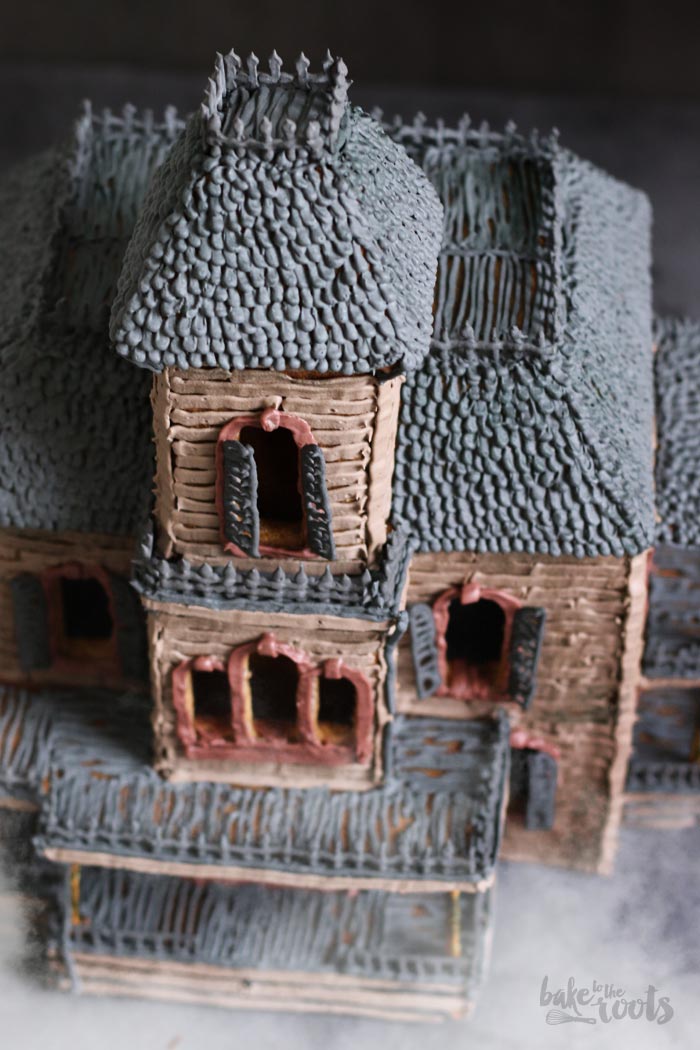
5. To achieve the wooden look of the house, use a flat piping tip and use a greyish-brownish icing. For the roof use dark, almost black icing and use a round tip to get the pattern of roof tiles. To create the railings and shutters use dark icing and pipe the railings/ stutters on a piece of baking parchment and let dry. The pieces are quite delicate to handle, so be careful and let them dry really good. Add the railings and more decorations with icing on the house and let dry.
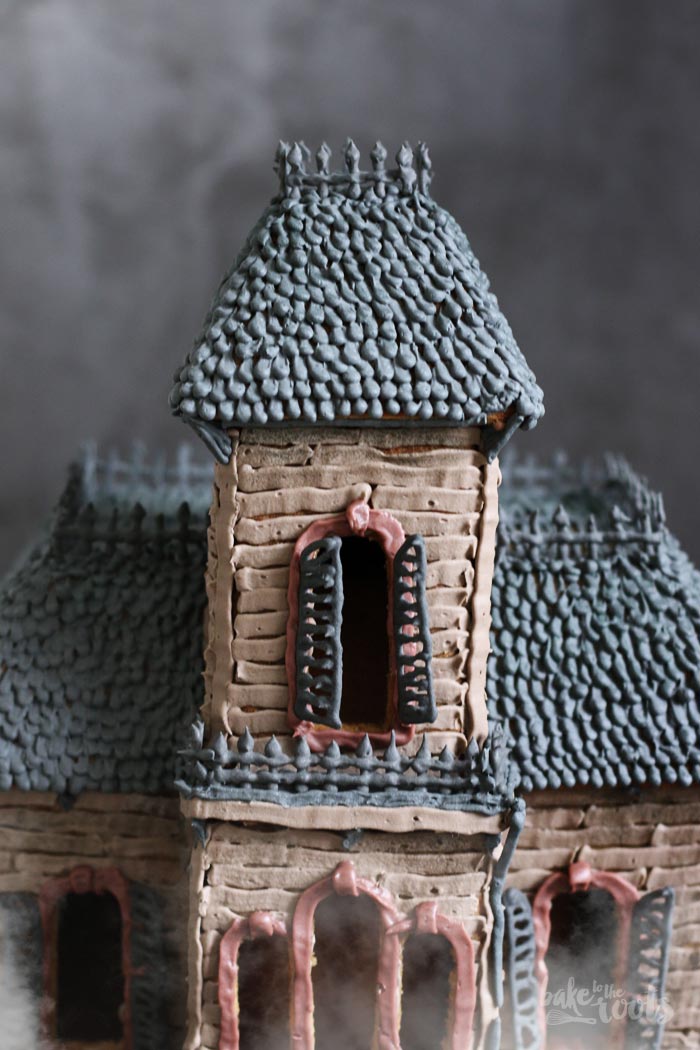
6. To make the house look even more real, you can brush the house with some food color to make it look more decayed.
1. Für den Teig die Butter in eine große Schüssel geben und aufschlagen, bis sie weich und cremig ist. Braunen Zucker, Lebkuchengewürz, Zimt und Salz dazugeben und luftig aufschlagen. Rübensirup und Vanille Extrakt dazugeben und unterrühren. Mehl dazugeben und unterrühren/kneten, bis ein glatter Teig entsteht. Den Teig auf die Arbeitsplatte geben, mit etwas Mehl bestäuben und noch einmal kurz mit den Händen durchkneten. Teig zu einer Scheibe formen und in Klarsichtfolie einschlagen. Für etwa 30 Minuten in den Kühlschrank legen. Ich hab den Teig in drei Portionen zubereitet, weil meine Küchenmaschine nicht alles auf einmal geschafft hätte. Wer eine große Maschine hat, kann natürlich alles in eine Schüssel werfen – trotzdem in mehreren Portionen in den Kühlschrank legen, weil man nicht alles auf einmal benötigt. Der Teig kann auch über Nacht im Kühlschrank lagern, falls jemand vorarbeiten möchte.
2. Den Ofen auf 175°C (350°F) vorheizen. Ein großes Stück Backpapier auf die Arbeitsplatte legen und mit etwas Mehl bestäuben. Einen Teil des Teiges auf dem Papier ausrollen – etwa 0,5cm dick. Die Vorlagen für das Haus auflegen und mit einem scharfen Messer den Teig zuschneiden. Die einzelnen Teile sollten nicht zu nah beieinander liegen, da der Teig etwas auseinander läuft. Bei Fenstern und Türen die Teilstücke, die eigentlich raus müssen, beim Backen dort belassen, wo sie sind, damit der Teig dort nicht zusammenläuft. Direkt nach dem Backen müssen diese Teile dann erneut geschnitten und entfernt werden. Wenn genügend Hausteile für ein Blech zusammengekommen sind, das Backpapier mit den Teigstücken auf ein Backblech ziehen und für etwa 20-23 Minuten backen. Der Lebkuchen sollte goldbraun aussehen, aber nicht zu trocken oder verbrannt sein. Aus dem Ofen holen und das Backpapier mit dem Lebkuchen vom Backblech ziehen. Wenn die Lebkuchenstücke arg auseinander gelaufen sind, hat man jetzt noch die Chance zu korrigieren und zurechtzuschneiden – je länger der Lebkuchen aus dem Ofen ist, umso schwieriger und gefährlicher wird es, die Stücke zuzuschneiden, weil trockener Lebkuchen schneller bricht. Hier also schnell und vorsichtig arbeiten, falls notwendig. Wenn alle Bestandteile des Hauses gebacken wurden, sollten sie komplett abkühlen, bevor man anfängt das Haus zusammenzubauen.
3. Für das Icing etwa 500g Puderzucker und den reinen Weinstein in eine große Schüssel geben und vermischen. Das Eiweiß und den Zitronensaft dazugeben und glatt rühren. Das Icing für die Konstruktion des Hauses sollte relativ dick sein, von der Konsistenz her eher wie eine Buttercreme. Für Geländer braucht es ein etwas weniger festes Icing – entsprechend muss man hier etwas anpassen, je nachdem für was man das Icing gerade braucht. Das Icing für die Konstruktion sollte in etwa die Farbe des Lebkuchens haben, das Icing für die Holzverkleidung des Hauses leicht braun-grau sein und das Icing für das Dach und die Geländer relativ dunkel, fast schwarz sein – die Farben also entsprechend anpassen.
4. Ich würde empfehlen mit dem Hauptteil des Gebäudes anzufangen. Damit die Seiten perfekt zusammenpassen, kann man Ränder in einem 45° Winkel anschneiden und dann mit dem dickeren Icing zusammenfügen. Für mindestens 1 Stunde trocknen lassen, bevor man zusammengebaute Teile bewegt. Bei den Dächern fängt man am Besten mit den Dachschrägen an und platziert den oberen Teil des Daches, sobald die Seiten trocken und fest sind. Das Haus auf eine Platte stellen und dann den Vorbau für den Eingang anbauen, die Veranda anfügen, die Terrasse mit zurechtgeschnittenen Salzbrezelstangen befestigen und dann die Balkone an der Seite, das Dach und den kleinen Turm befestigen. Über Nacht trocknen lassen.
5. Für die Holzverkleidung des Hauses eine abgeflachte Spritztülle verwenden mit einem braun-grauen Icing. Für das Dach das dunkle Icing und eine runde Spritztülle verwenden, um die Dachziegel-Optik zu bekommen. Für die Geländer/Fensterläden dunkles Icing auf ein Stück Backpapier in den entsprechenden Formen aufspritzen und komplett trocknen lassen. Diese Verzierungen brechen recht schnell, deshalb vorsichtig arbeiten und wirklich gut trocknen lassen. Die Verzierungen mit Icing am Haus anbringen und trocknen lassen.
6. Um das Haus noch etwas verwitterter und echter aussehen zu lassen, kann man mit etwas Lebensmittelfarbe auf dem Icing Schatten und Bruchstellen aufmalen.
Craving more? Keep in touch on Facebook, Twitter, Instagram and Pinterest for new post updates and more. You can also contact me with any questions or inquiries!
Here is a version of the recipe you can print easily.
Print
Halloween Haunted Gingerbread House
- Prep Time: 10h
- Cook Time: 20m
- Total Time: 24h
- Yield: 1 1x
- Category: Cookies
- Cuisine: German
Description
Every Halloween party needs a highlight – this Halloween Haunted Gingerbread House will definitely do the trick ;)
Ingredients
Instructions
Notes
Enjoy baking and decorating! Take your time ;)


Super Beitrag! Mach weiter so!