
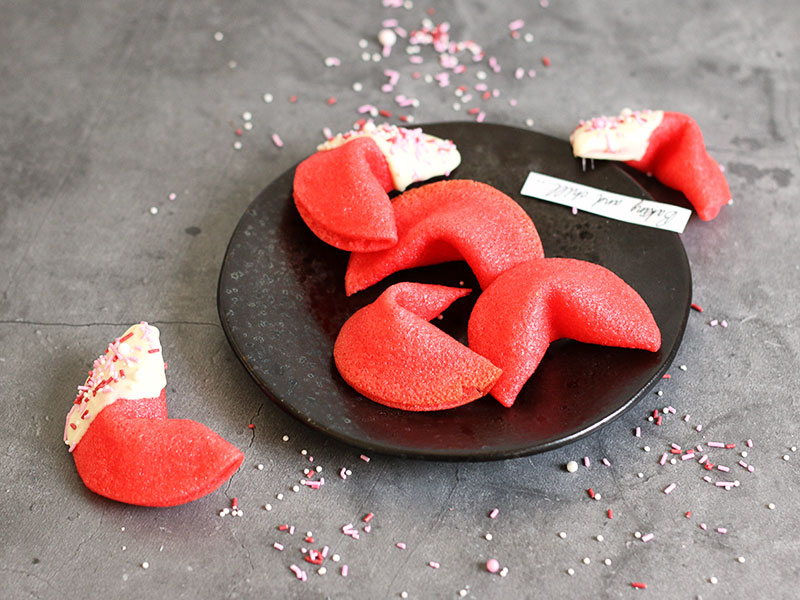
Happy Valentine’s Day! Well… that actually depends on the day you are reading this. The day I publish this recipe is not on Valentine’s Day and there are 364 days a year that are also not Valentine’s Day… so the chances are slim that today is Valentine’s Day. Aaaanyway. If you want to surprise a loved one with something nice (and I don’t mean flowers) you might want to think about to show your love in the shape of a Chocolate Heart Cake. Sounds obvious, right?!
I am just messing with you. Let’s celebrate the day of the lovers with some cake! That’s much better than giving out flowers. Unless you are gifting a plant in a pot that can survive longer than some flowers in a vase. That would be OK. Cake is always a good idea. Not only because it shows much more how much you care about a person (food equals love) – you can also show more than one person some love with your cake. Unless you bake a tiny tiny cake that is basically bite-size. This cake is baked with love for many people. If you are not 100% a »heart cake« person try these Mini Red Velvet Cupcakes – they also fit with the theme of the day but are less obvious. Love in disguise? You could say so…
The recipe for his heart cake is based on one of my basic cake recipes for a quick and easy chocolate cake. It can be used in many different ways. If you don’t want to bake a heart you can use a round or rectangular baking tin. If you use small springform tins you can bake two layers and make a taller layered cake with the filling and buttercream that are also in the recipe here. If the filling is not your favorite you can change that to a chocolate ganache, dulce de leche or some other fruit filling if you like. There are actually a lot of ways to adapt this recipe here. There is no need to stick to the heart.
Well… those who still want to bake the heart – get your oven heated up and get the ingredients ready now! I used a heart-shaped baking frame* for this cake here that can be shaped into different sized hearts. It is not ideal because there are little slits where the cake batter can get through – so using one of these baking frames will most likely lead to some cake spilling, but it is not that much and the cake still turns out fine in my opinion.
If you want to be a messy baker I recommend using a regular heart-shaped baking tin* – I think you can find many offers for those online or in shops for baking supplies. If you don’t want to buy a baking tin just for this cake you can use a regular round baking tin and cut out a heart – that would be the easiest way I guess. The cake that you cut off in this case you can use to make cake pops.
INGREDIENTS / ZUTATEN
For the cake:
2 cups (260g) stronger all-purpose flour*
1 cup (200g) brown sugar
2/3 cup (80g) cocoa powder*
1 tbsp. instant espresso powder*
1 1/2 tsp baking powder
1 tsp. baking soda
1/4 tsp. salt
2 medium eggs
1 tsp. vanilla extract*
1/2 cup (120ml) vegetable oil (e.g. sunflower oil)
1 cup (240ml) milk
1/2 cup (180ml) hot water
For the berry filling:
14 oz. (400g) mixed berries (fresh or frozen and thawed)
1/4 cup. (50g) sugar
0.4 oz. (10g) cornstarch
3 tbsp. water
1 tbsp. lemon juice
1/2 tsp. vanilla extract*
For the buttercream:
4 medium egg whites
1 cup (200g) sugar
1/4 tsp. salt
1 1/4 cups (290g) butter, at room temperature
1 tsp. vanilla extract*
3.5 oz. (100g) confectioners‘ sugar
some food color* (pink, red)
some sprinkles* for decoration
Für den Kuchen:
260g Mehl (Type 550)*
200g brauner Zucker
80g Kakaopulver*
1 EL Instant Espresso-Pulver*
1 1/2 TL Backpulver
1 TL Natron
1/4 TL Salz
2 Eier (M)
1 TL Vanille Extrakt*
120ml Pflanzenöl (z.B. Sonnenblumenöl)
240ml Milch
180ml heißes Wasser
Für die Füllung:
400g gemischte Beeren (frisch oder TK aufgetaut)
50g Zucker
10g Speisestärke
3 EL Wasser
1 EL Zitronensaft
1/2 TL Vanille Extrakt*
Für die Buttercreme:
4 Eiweiß (M)
200g Zucker
1/4 TL Salz
290g weiche Butter
1 TL Vanille Extrakt*
100g Puderzucker
etwas Lebensmittelfarbe* (pink, rot)
bunte Zuckerperlen* (Sprinkles)
DIRECTIONS / ZUBEREITUNG
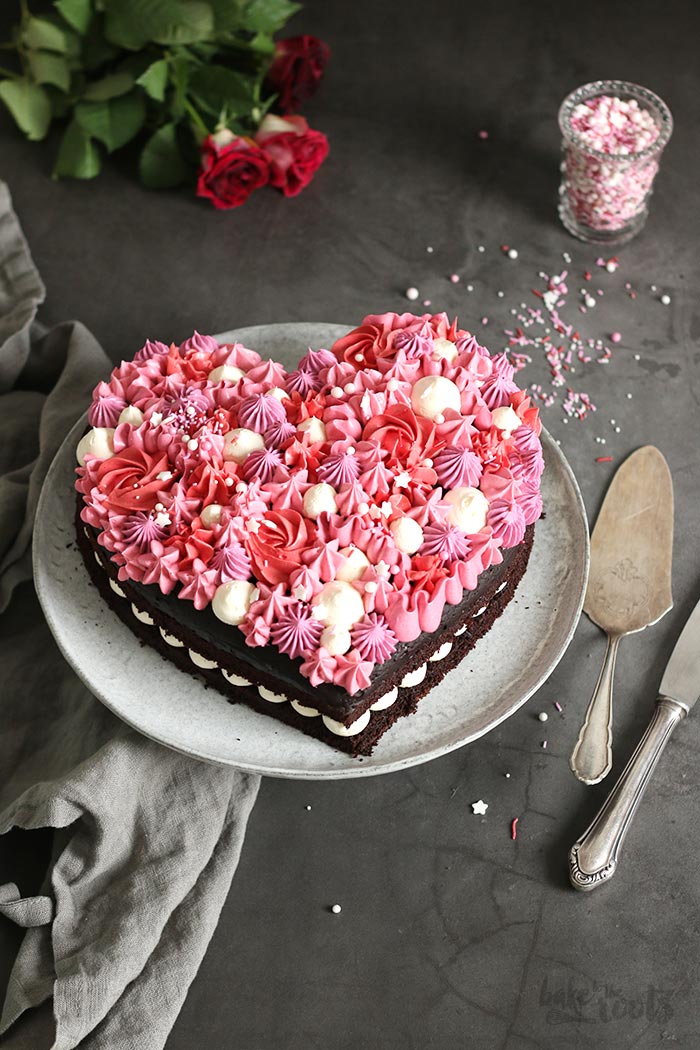
1. Preheat the oven to 180°C (350°F). Grease a heart baking pan* lightly and set aside. You can also use a heart-shaped baking frame* – place that one on a baking sheet lined with baking parchment and set aside.
2. Working with just one large bowl, add the flour, brown sugar, cocoa powder, espresso powder, baking powder, baking soda, and salt to the bowl and mix until well combined. Add the eggs, vanilla extract, oil, and milk and mix until combined. Add the hot water and mix everything until well combined. Pour the batter into the prepared baking tin or baking frame and bake for about 30-35 minutes or until a wooden skewer inserted into the center comes out clean. Take out of the oven and let cool for some time in the baking pan, then remove and let cool down completely on a wire rack.
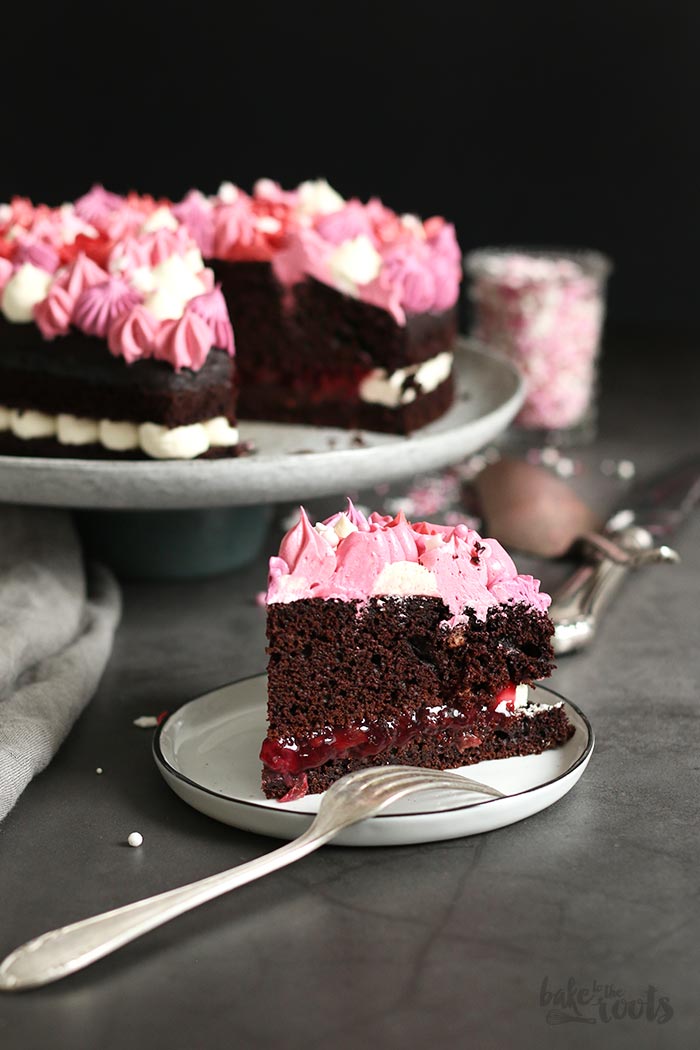
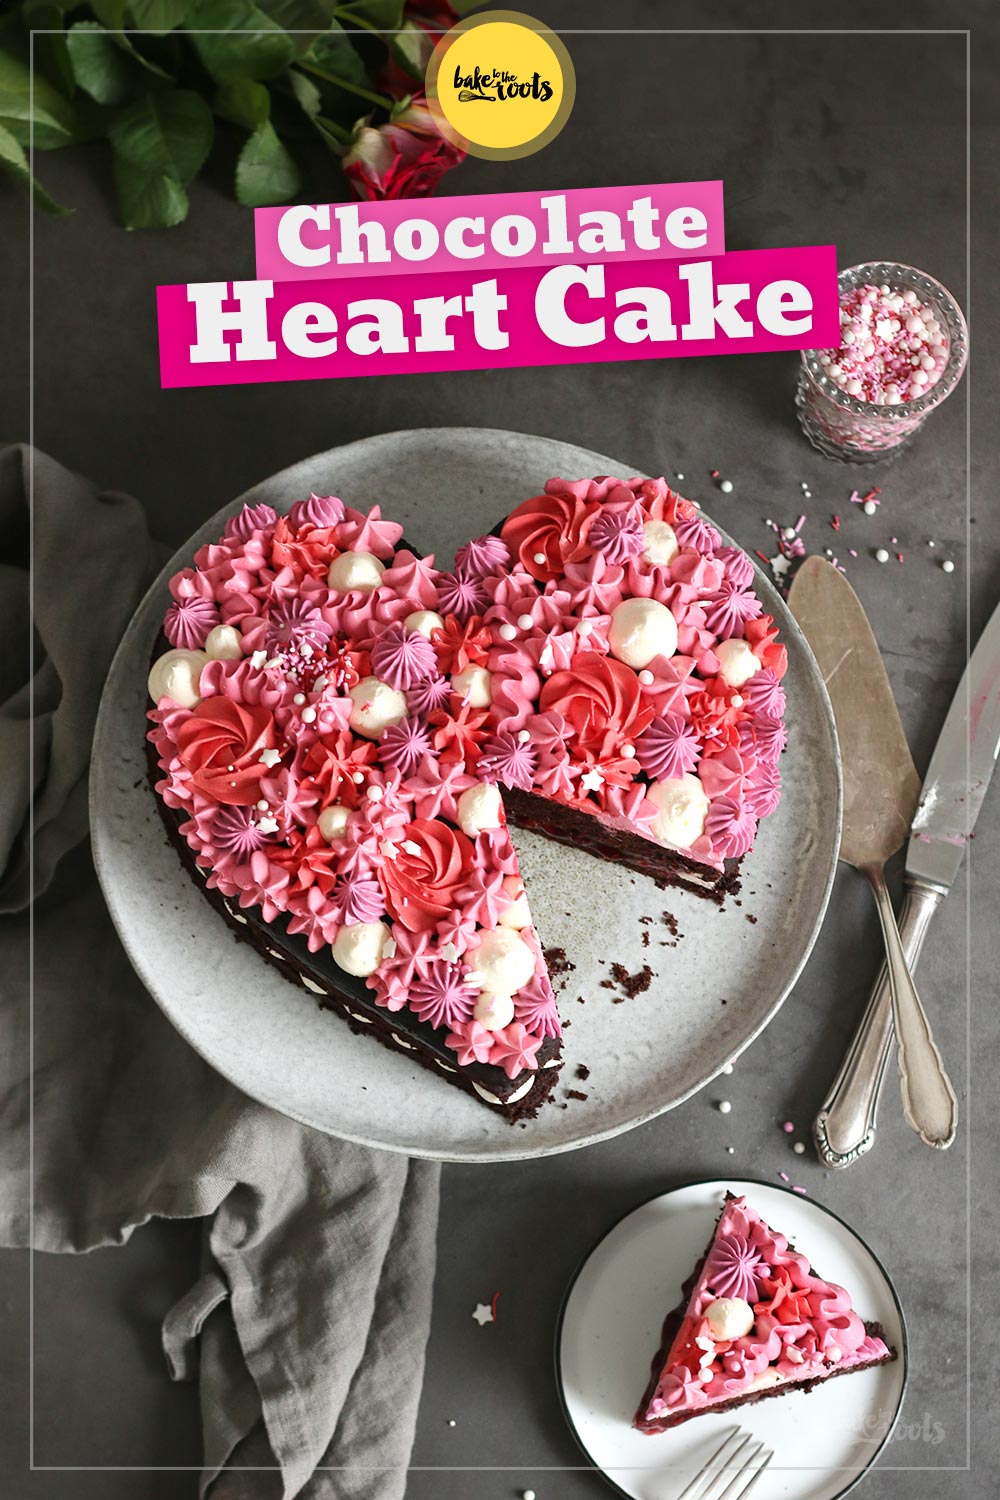
3. For the berry filling wash and dry the berries. If you use frozen ones, let them defrost. Try to save all the juices. Add the sugar and cornstarch to a small bowl and mix. Add water, lemon juice, and vanilla extract to a pot and mix. Next, add the cornstarch-sugar mixture and whisk until there are no more lumps. Bring the mixture to a boil, then add the berries and let simmer them for about 2-4 minutes – the berries should be soft but not mushy and the liquids should have thickened. Take off the heat and let cool down completely.
4. For the buttercream, add the egg whites and sugar to a large, heatproof bowl and place on a pot with simmering water. Mix slowly until the temperature of the mixture reaches 71°C (160°F) and the sugar has dissolved completely. Take off the heat and mix with a kitchen machine or handheld mixer for about 5 minutes on high speed until the egg whites are glossy and stiff peaks form. The bowl should have room temperature. Add the soft butter in small pieces, one after another, and mix well each time. Add the vanilla extract and confectioners‘ sugar and mix first slowly, then on high speed for about 5 minutes until thick and creamy. Divide the buttercream into several portions and mix with the food colors you like. Fill into piping bags with different piping tips – make one piping bag with a large round tip with uncolored buttercream and set aside.
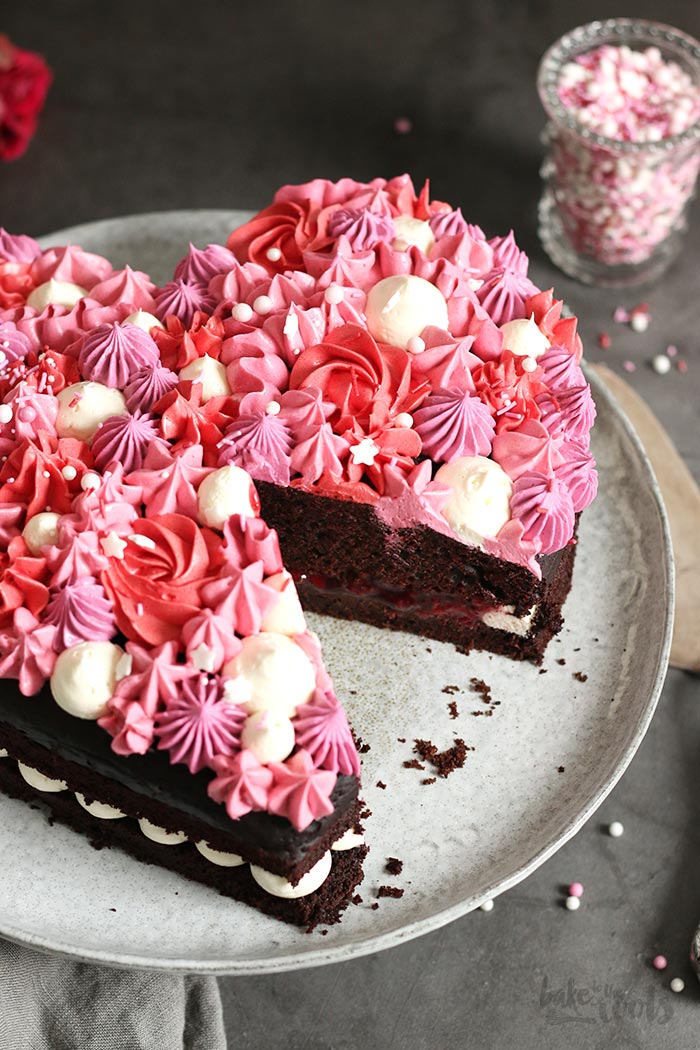
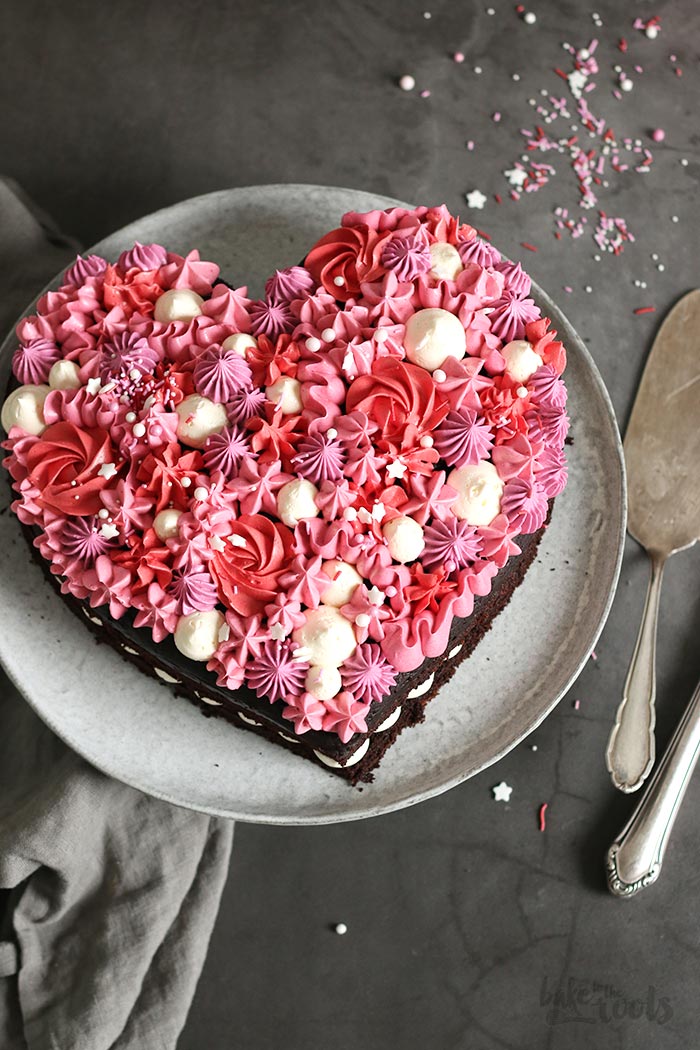
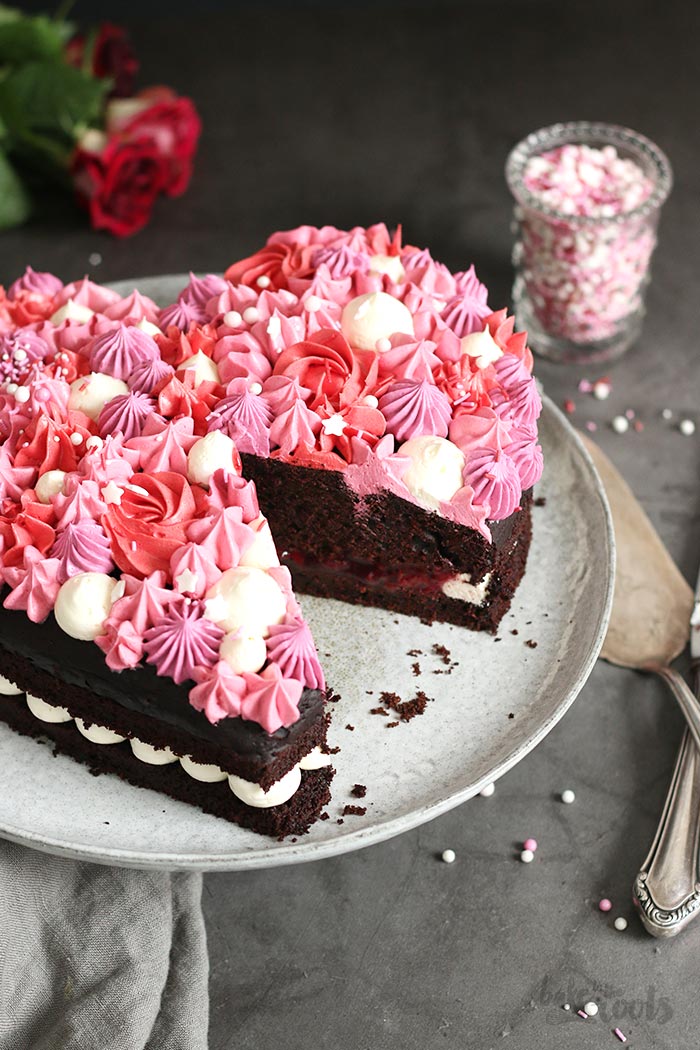
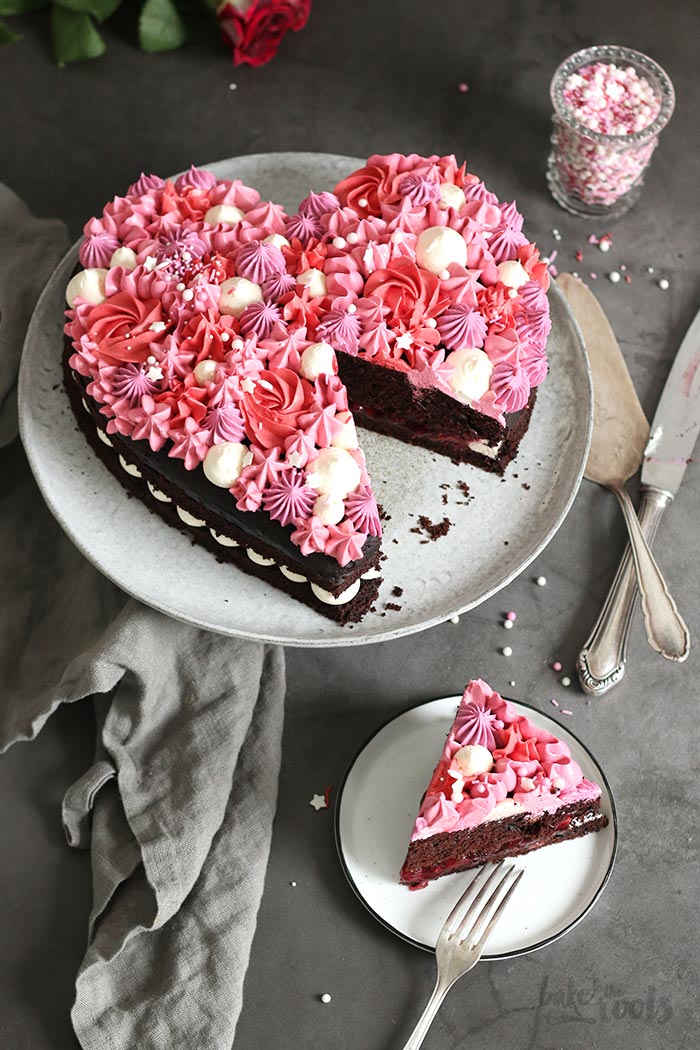
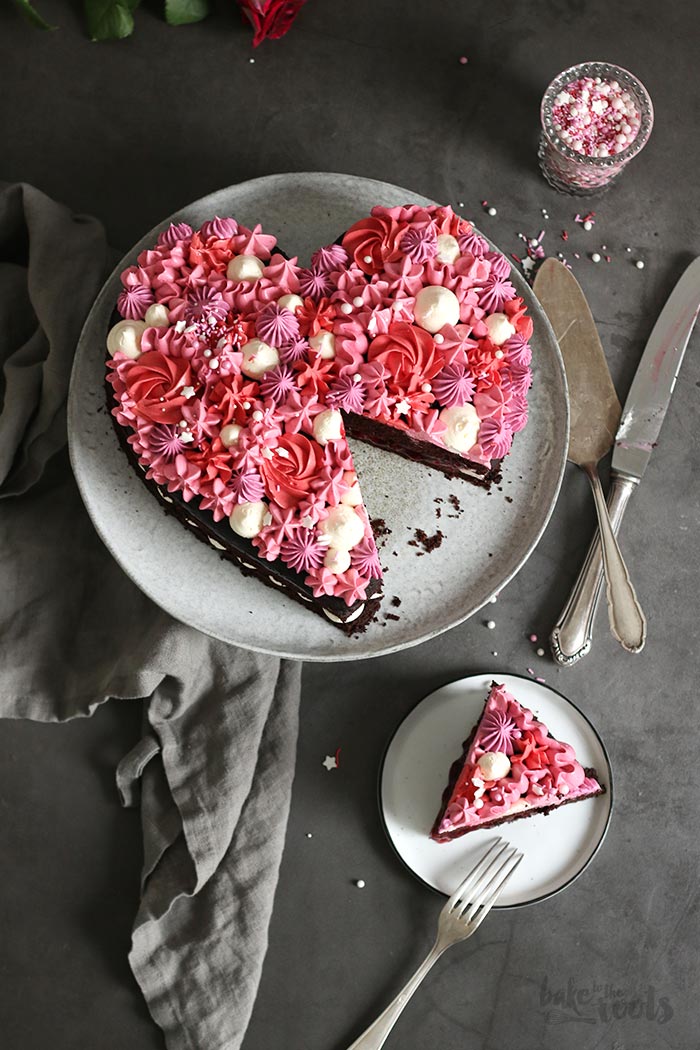
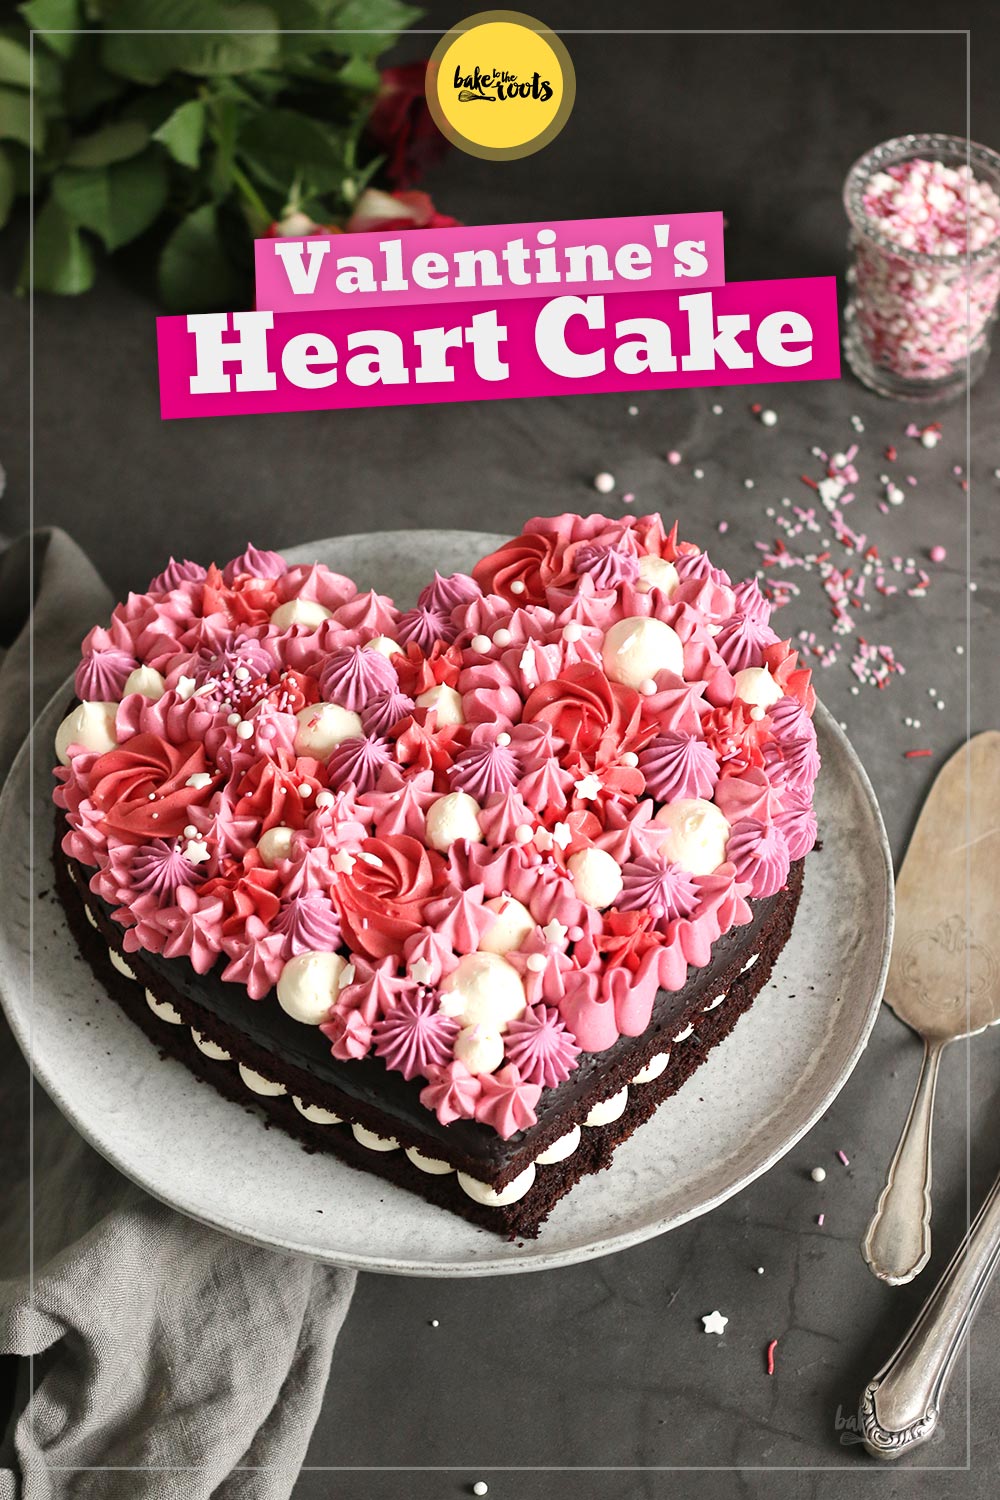
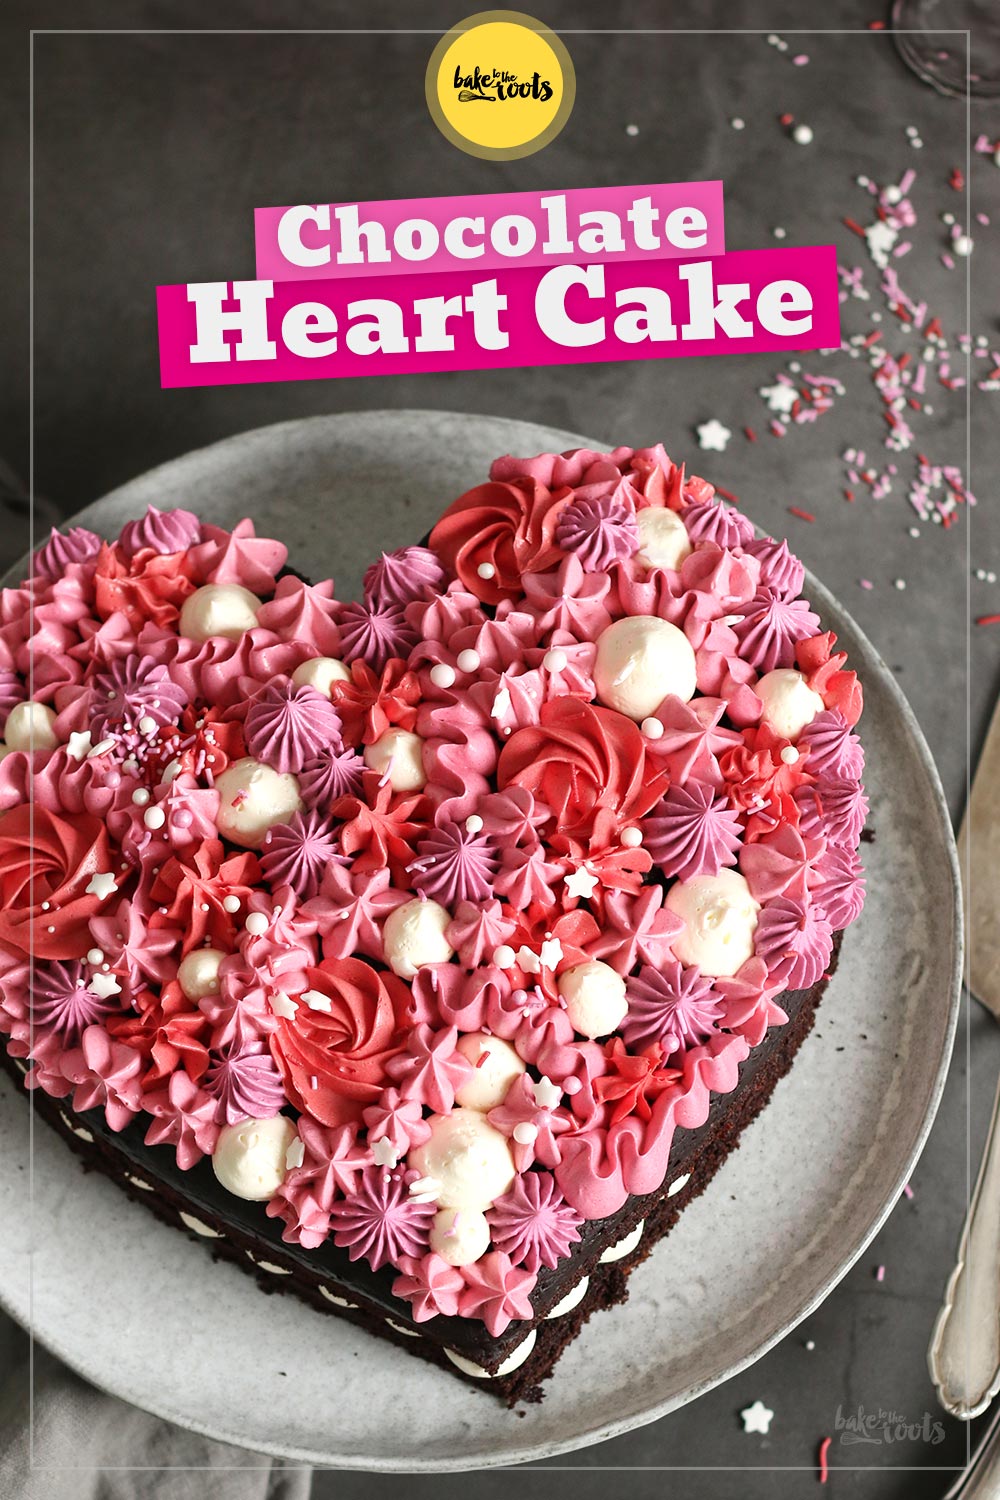
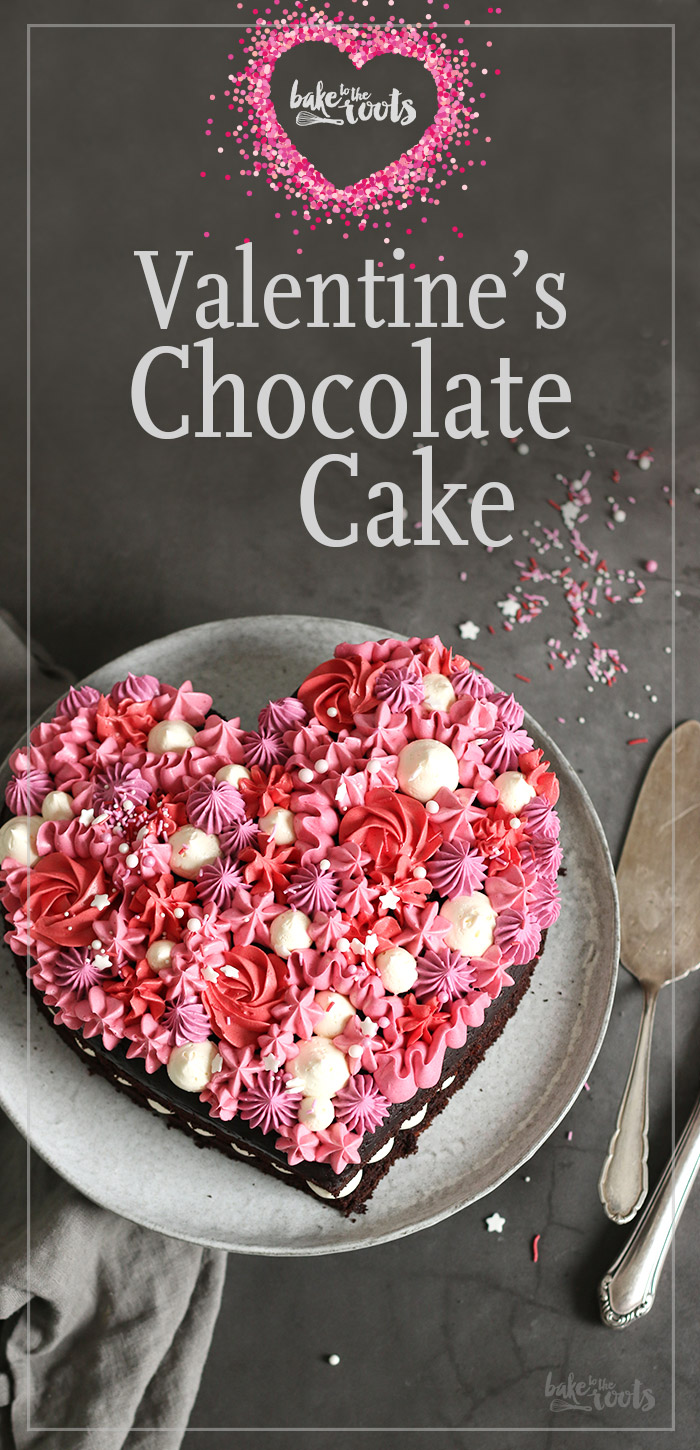
5. To assemble the cake, cut the cake in half and place the bottom part on a serving plate. Use the uncolored buttercream and pipe little dollops/swirls along the edge of the cake layer to create a barrier for the filling – you should have one continuous barrier or else the filling will come through. Add the berry filling on top and distribute it evenly up to the buttercream barrier. Place the second cake layer on top and press down a bit. Place in the fridge for about 10-15 Minutes.
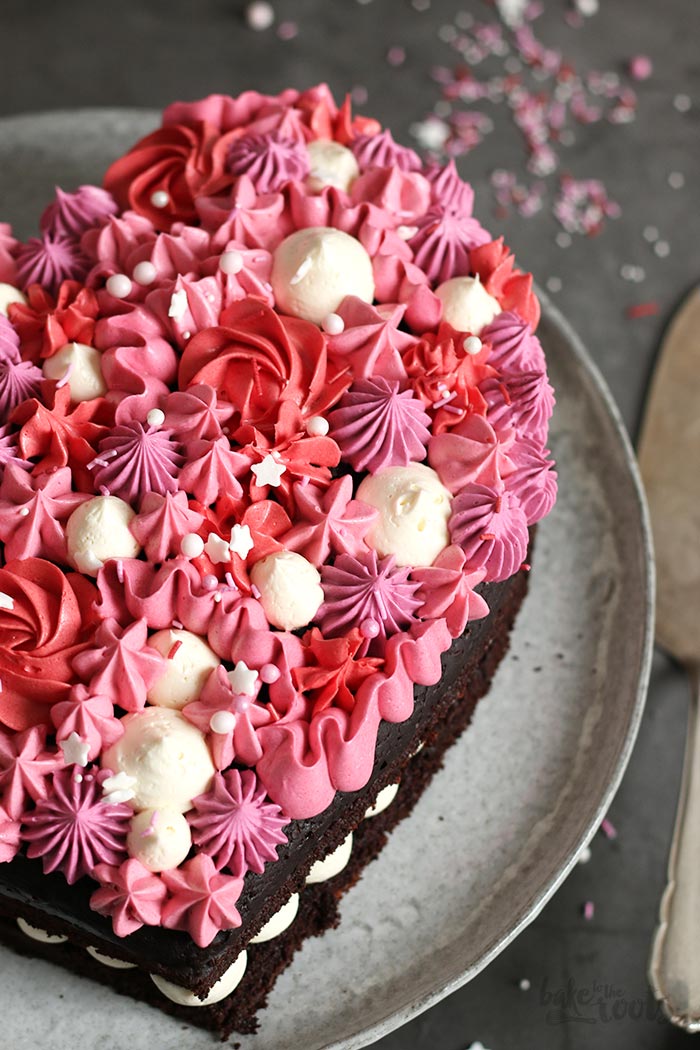
6. Use the colored buttercream to pipe roses, swirls, and dots onto the cake. Sprinkle with some sugar sprinkles. Store in the fridge and let get back to room temperature before serving.
1. Den Ofen auf 180°C (350°F) Ober-/Unterhitze vorheizen und eine Herzbackform* leicht einfetten zur Seite stellen. Wer einen Herz-Backrahmen* verwendet, der sollte den Backrahmen auf ein mit Backpapier ausgelegtes Backblech setzen.
2. Das Mehl zusammen mit dem braunen Zucker, Kakao, Espresso-Pulver, Backpulver, Natron und Salz in eine große Schüssel geben und verrühren. Die Eier, Vanille Extrakt, Öl und Milch dazugeben und verrühren. Das heiße Wasser am Schluss dazugeben und alles gut verrühren. Den (recht flüssigen) Teig in die vorbereitete Form füllen und für etwa 30-35 Minuten backen – mit einem Holzspieß testen, ob noch Teig kleben bleibt, und den Kuchen erst herausholen, wenn der Spieß sauber herauskommt. Aus dem Ofen holen und erst ein wenig in der Form abkühlen lassen, dann auf ein Kuchengitter setzen und komplett auskühlen lassen.
3. Für die Füllung die Beeren waschen und trocknen. Wer TK-Beeren nimmt, sollte sie einfach auftauen lassen. Flüssigkeiten sollte man dabei auffangen. Den Zucker und die Stärke vermischen. Das Wasser mit Zitronensaft und Vanille Extrakt in einen Kochtopf geben und mit der Zucker-Stärkemischung verrühren, bis keine Klümpchen mehr zu sehen sind. Auf den Herd stellen und aufkochen. Sobald die Flüssigkeit kocht und andickt, die Beeren dazugeben und alles unter gelegentlichem Rühren für etwa 2-4 Minuten köcheln lassen. Die Beeren sollten weich, aber nicht matschig werden und die Flüssigkeit im Topf angedickt sein. Vom Herd ziehen und komplett abkühlen lassen.
4. Als Nächstes die Buttercreme vorbereiten und dafür das Eiweiß mit Zucker und Salz in eine große Schüssel geben und über einem Topf mit köchelndem Wasser aufschlagen. Die Masse so lange rühren, bis sie eine Temperatur von 71°C (160°F) erreicht hat. Sobald die Temperatur erreicht wurde, vom Herd nehmen und die Masse mit der Küchenmaschine oder einem Handmixer für ca. 5 Minuten aufschlagen, bis das Eiweiß steif und glänzend ist und in etwa Raumtemperatur erreicht hat. Die Butter in kleinen Stücken einzeln zugeben und jeweils gut unterrühren. Den Vanille Extrakt und Puderzucker zugeben und alles erst langsam und dann auf höchster Stufe für etwa 5 Minuten aufschlagen. Es sollte eine homogene, cremige Masse entstehen. Die Buttercreme in mehrere Portionen aufteilen und dann nach Belieben einfärben und in Spritzbeutel mit unterschiedlichen Spritztüllen einfüllen – ein wenig ungefärbte Buttercreme sollte ebenfalls in einen Spritzbeutel mit runder Tülle abgefüllt werden.
5. Für den Zusammenbau und die Dekoration des Kuchens den Kuchen in der Mitte halbieren. Die untere Hälfte auf eine Servierplatte legen und mit der ungefärbten Buttercreme kleine Tupfen auf den Kuchen entlang des Randes aufspritzen – diese Schicht dient als Barriere für die Füllung, also möglichst ohne Lücken aufspritzen. Die Füllung auf den Kuchen geben und bis zur Buttercreme-Barriere verstreichen. Die zweite Kuchenschicht auflegen und etwas festdrücken. Den Kuchen für etwa 10-15 Minuten in den Kühlschrank stellen.
6. Mit den verschieden eingefärbten Cremes den Kuchen mit Rosen, Tupfen und Wellenlinien verzieren und mit den Zuckerperlen bestreuen. Im Kühlschrank aufbewahren und vor dem Servieren auf Zimmertemperatur kommen lassen.
Craving more? Keep in touch on Facebook, Instagram and Pinterest for new post updates and more. You can also contact me with any questions or inquiries!
Here is a version of the recipe you can print easily.
Print
Valentine’s Day Chocolate Heart Cake
- Prep Time: 01:00
- Cook Time: 00:35
- Total Time: 03:00
- Yield: 1 1x
- Category: Cakes
- Method: -
- Cuisine: United States
- Diet: Vegetarian
Description
If you have a special person (or several persons) in your life – make this cake to surprise them… not only for Valentine’s Day.
Ingredients
For the cake:
2 cups (260g) stronger all-purpose flour*
1 cup (200g) brown sugar
2/3 cup (80g) cocoa powder*
1 tbsp. instant espresso powder*
1 1/2 tsp baking powder
1 tsp. baking soda
1/4 tsp. salt
2 medium eggs
1 tsp. vanilla extract*
1/2 cup (120ml) vegetable oil (e.g. sunflower oil)
1 cup (240ml) milk
1/2 cup (180ml) hot water
For the berry filling:
14 oz. (400g) mixed berries (fresh or frozen and thawed)
1/4 cup. (50g) sugar
0.4 oz. (10g) cornstarch
3 tbsp. water
1 tbsp. lemon juice
1/2 tsp. vanilla extract*
For the buttercream:
4 medium egg whites
1 cup (200g) sugar
1/4 tsp. salt
1 1/4 cups (290g) butter, at room temperature
1 tsp. vanilla extract*
3.5 oz. (100g) confectioners‘ sugar
some food color* (pink, red)
some sprinkles* for decoration
Instructions
1. Preheat the oven to 180°C (350°F). Grease a heart baking pan* lightly and set aside. You can also use a heart-shaped baking frame* – place that one on a baking sheet lined with baking parchment and set aside.
2. Working with just one large bowl, add the flour, brown sugar, cocoa powder, espresso powder, baking powder, baking soda, and salt to the bowl and mix until well combined. Add the eggs, vanilla extract, oil, and milk and mix until combined. Add the hot water and mix everything until well combined. Pour the batter into the prepared baking tin or baking frame and bake for about 30-35 minutes or until a wooden skewer inserted into the center comes out clean. Take out of the oven and let cool for some time in the baking pan, then remove and let cool down completely on a wire rack.
3. For the berry filling wash and dry the berries. If you use frozen ones, let them defrost. Try to save all the juices. Add the sugar and cornstarch to a small bowl and mix. Add water, lemon juice, and vanilla extract to a pot and mix. Next, add the cornstarch-sugar mixture and whisk until there are no more lumps. Bring the mixture to a boil, then add the berries and let simmer them for about 2-4 minutes – the berries should be soft but not mushy and the liquids should have thickened. Take off the heat and let cool down completely.
4. For the buttercream, add the egg whites and sugar to a large, heatproof bowl and place on a pot with simmering water. Mix slowly until the temperature of the mixture reaches 71°C (160°F) and the sugar has dissolved completely. Take off the heat and mix with a kitchen machine or handheld mixer for about 5 minutes on high speed until the egg whites are glossy and stiff peaks form. The bowl should have room temperature. Add the soft butter in small pieces, one after another, and mix well each time. Add the vanilla extract and confectioners‘ sugar and mix first slowly, then on high speed for about 5 minutes until thick and creamy. Divide the buttercream into several portions and mix with the food colors you like. Fill into piping bags with different piping tips – make one piping bag with a large round tip with uncolored buttercream and set aside.
5. To assemble the cake, cut the cake in half and place the bottom part on a serving plate. Use the uncolored buttercream and pipe little dollops/swirls along the edge of the cake layer to create a barrier for the filling – you should have one continuous barrier or else the filling will come through. Add the berry filling on top and distribute it evenly up to the buttercream barrier. Place the second cake layer on top and press down a bit. Place in the fridge for about 10-15 Minutes.
6. Use the colored buttercream to pipe roses, swirls, and dots onto the cake. Sprinkle with some sugar sprinkles. Store in the fridge and let get back to room temperature before serving.
Notes
Enjoy baking and spread the love!
Links marked with an asterisk (*) are affiliate links (advertising/Werbung) to Amazon Germany. If you click on one of those links and buy something via this link, I will get a commission for that sale. The price of whatever you buy is not affected in any way by this.


Hi,is it possible to use two separate baking tins?And if so, how long?
Should work with two pans – I would check after 25 minutes with a cake tester and bake as long as needed.
Cheers
Marc
Made this today, and it turned out perfectly!
Will be sure to tag on Instagram when I post some pictures tomorrow – thank you for the recipe!
I made this cake for Valentines Day for my daughter. I only used half the suggested ingredients as I only had a small tin to hand. I didn’t fill it, but did my best to decorate it as shown. It’s one of the best results I’ve had in a long time. My daughter was extremely happy. The cake was delicious. I’m going to make it again today. This recipe is definitely a keeper!! Thank you so much!!
Hi Lorraine,
I’m happy you liked the cake! I hope you will find many more recipes here to try :)
Cheers
Marc