
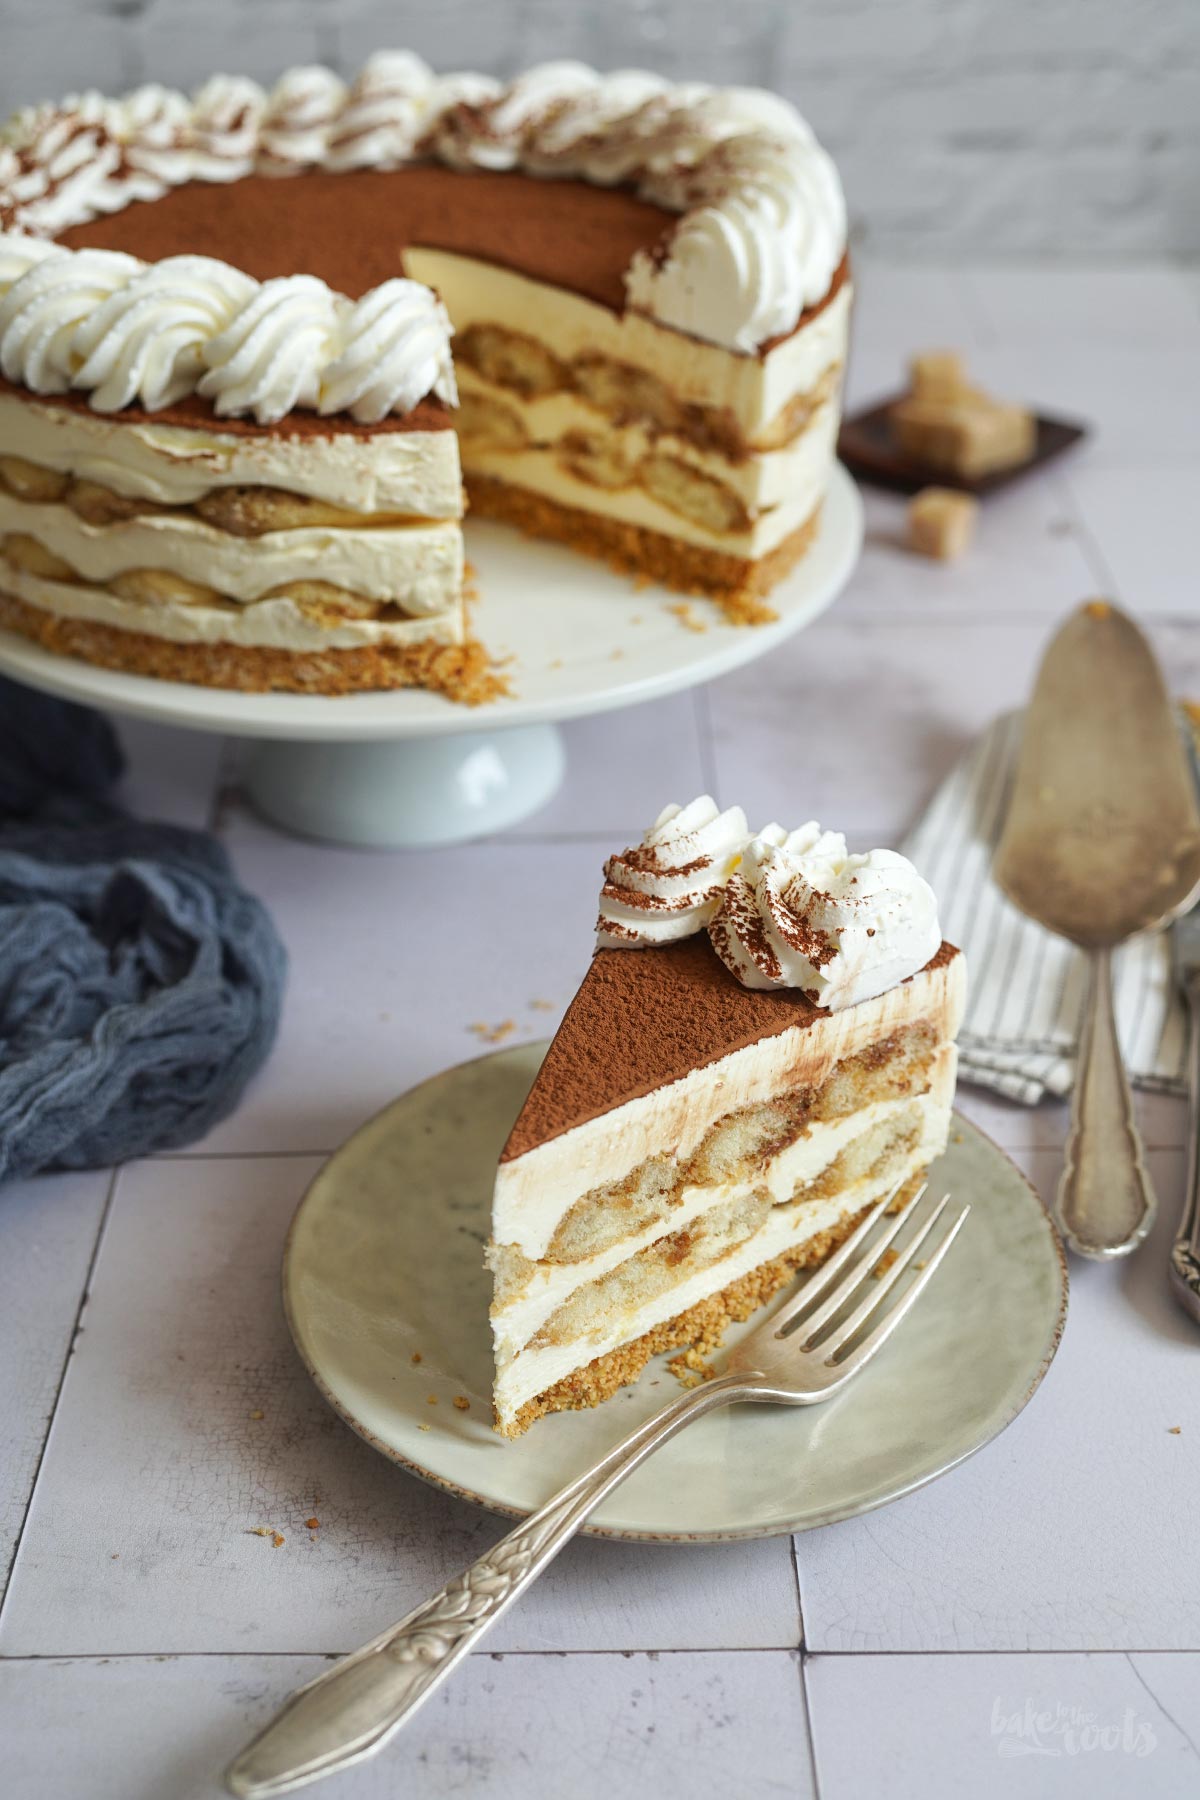
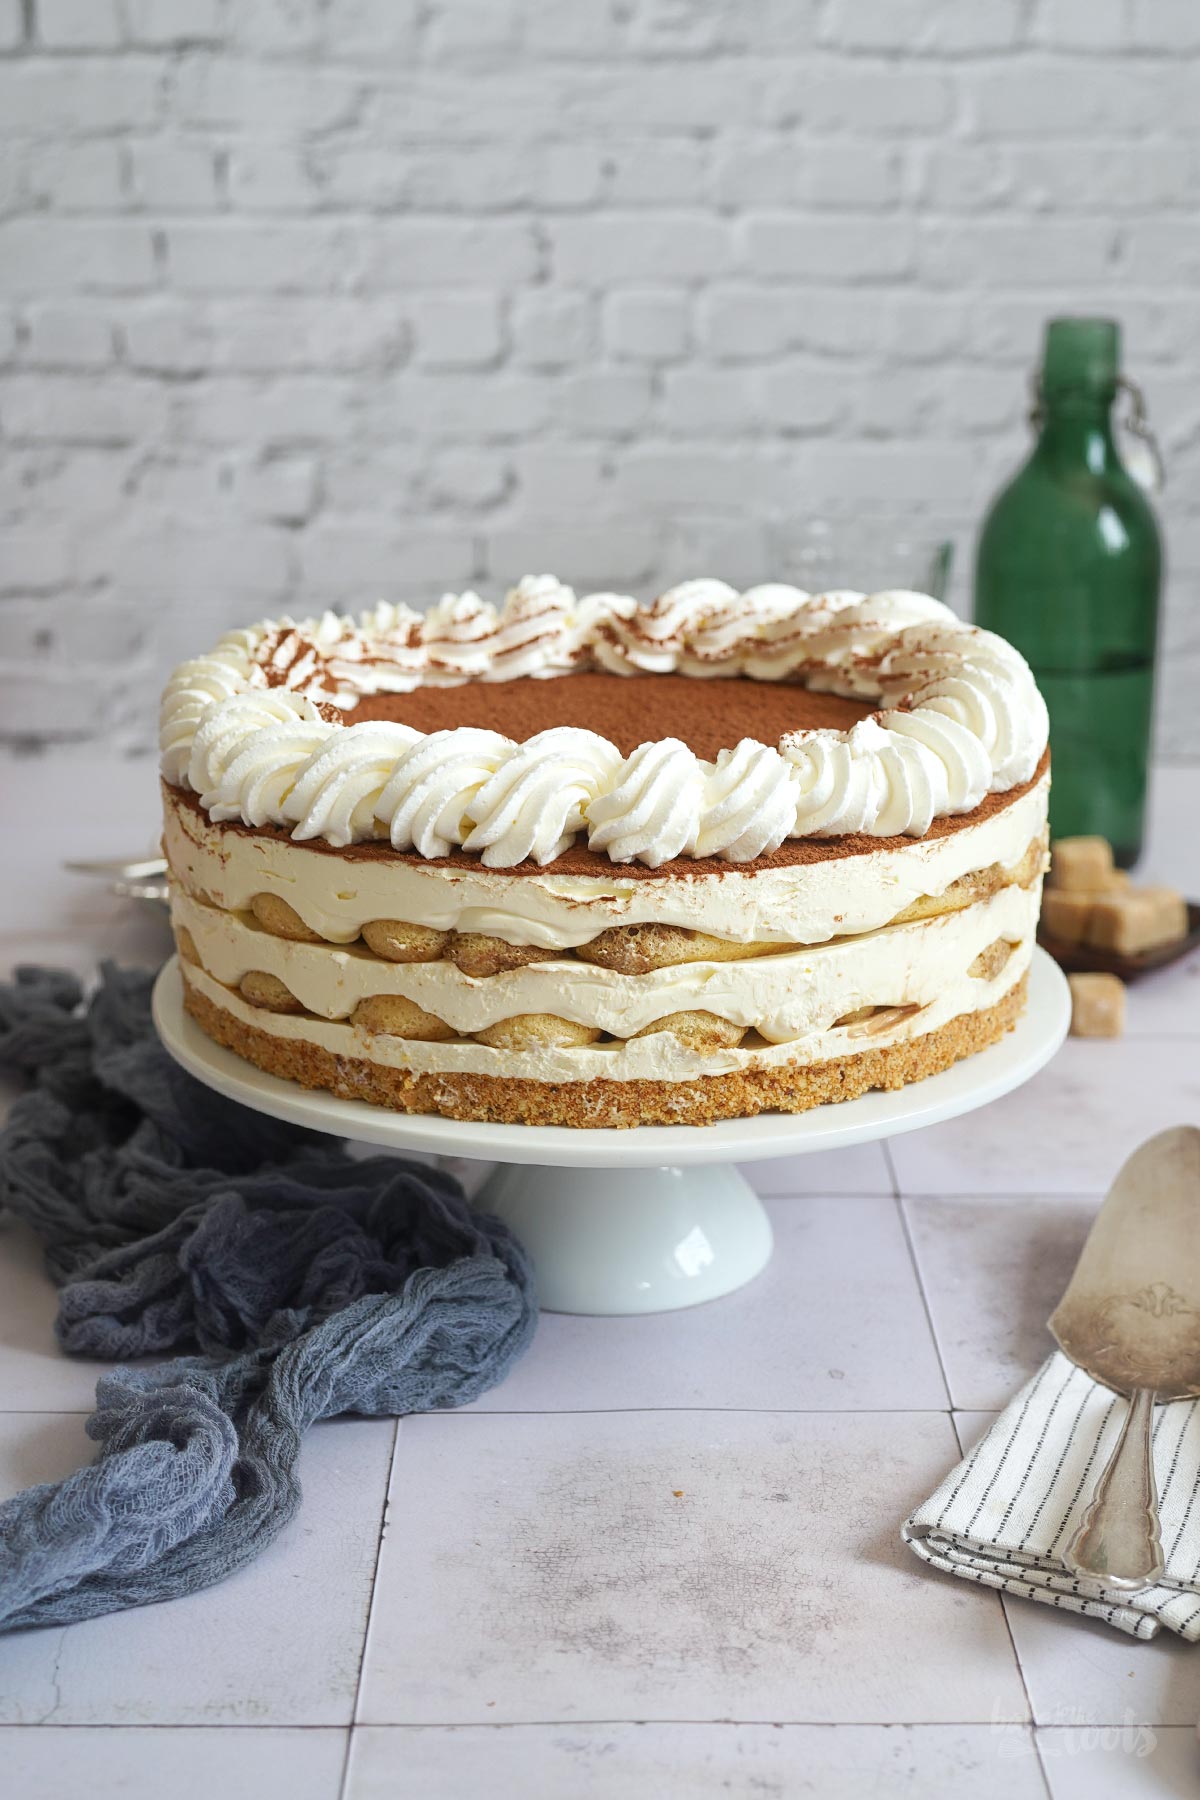
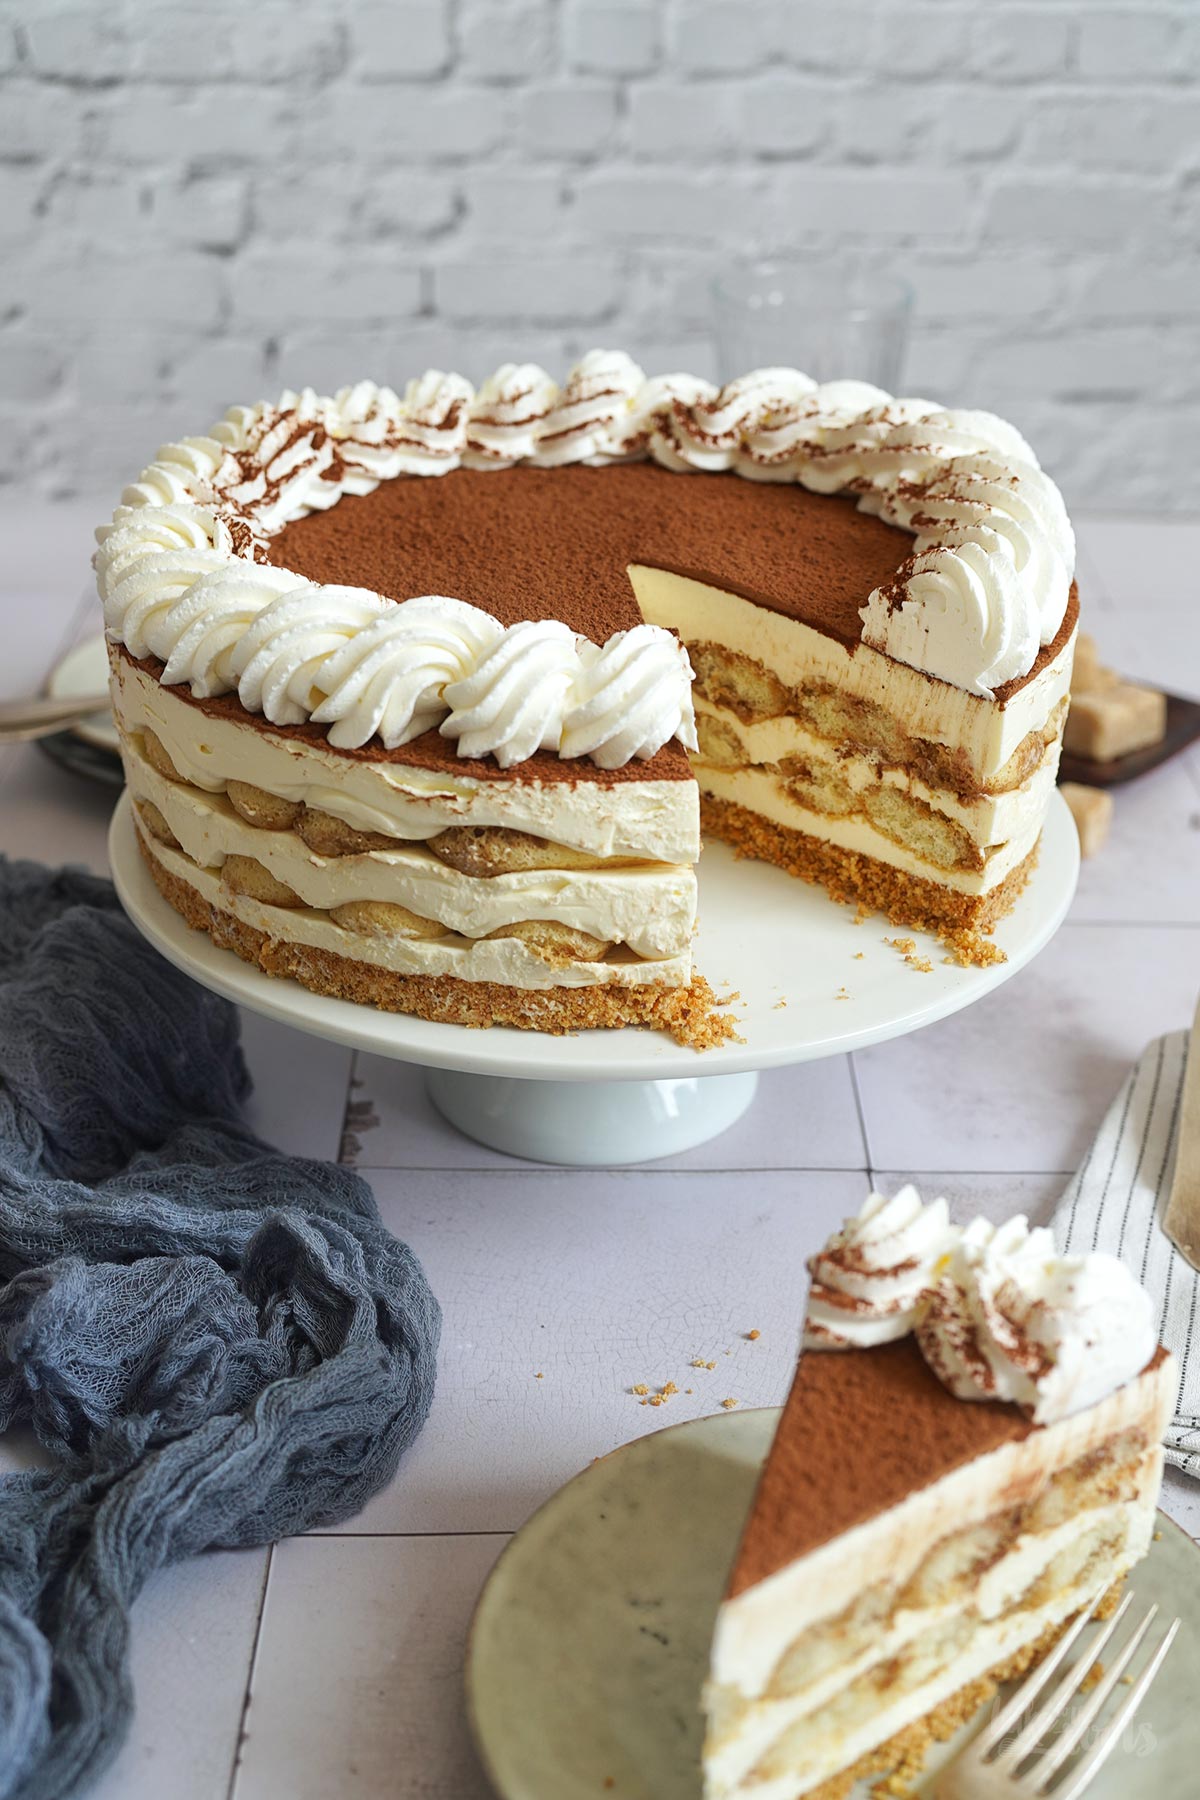
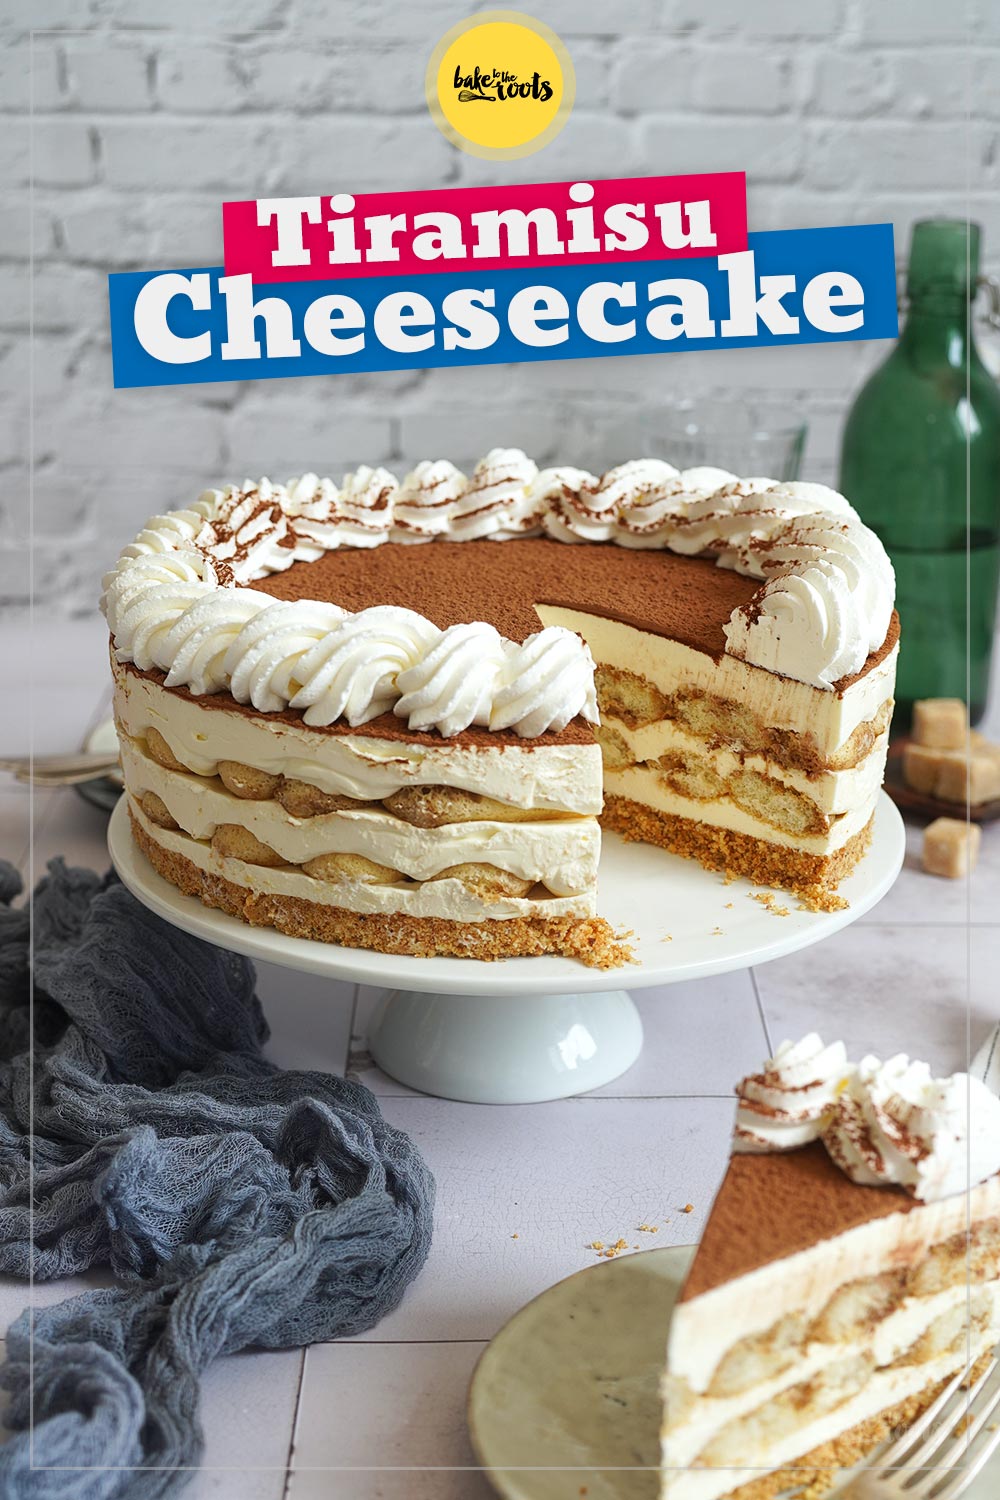
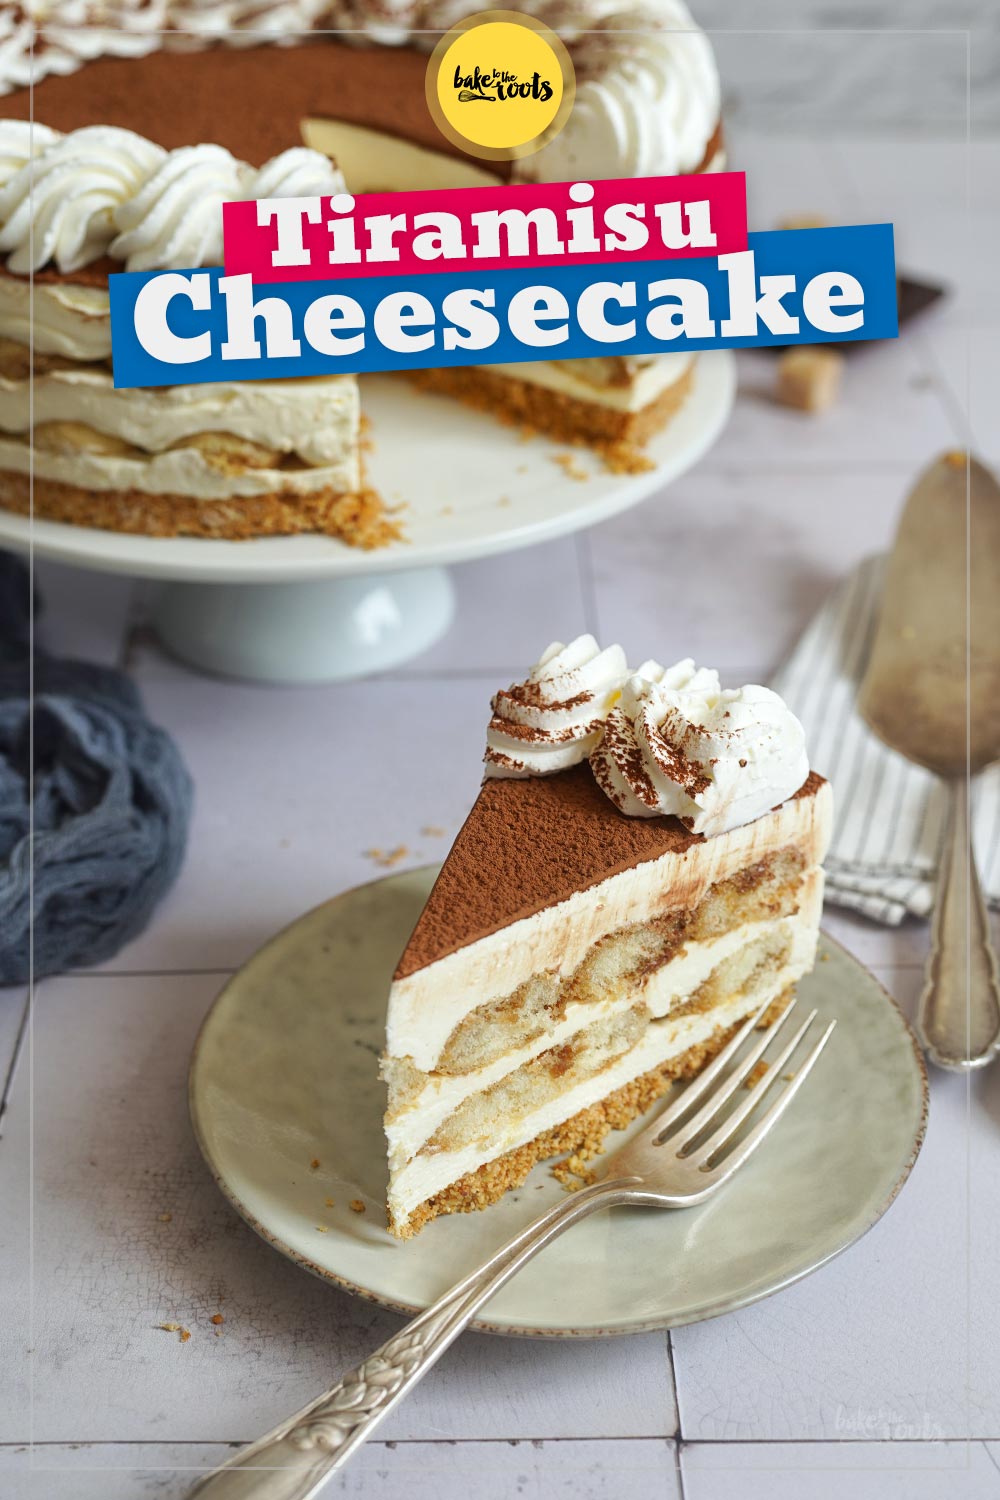
Tiramisu is probably the most famous Italian dessert. Delicious mascarpone cream, ladyfingers, and a mixture of strong coffee or espresso plus something boozy. When it comes to the boozy part opinions are divided – Marsala, Amaretto, or something completely different?! Some people are quite sensitive if their favorite dessert is prepared incorrectly. This No-Bake Tiramisu Cheesecake will probably also cause a lot of controversy in the comments. How can you make a cake like that out of a classic dessert? That’s horrible!
Well… let’s hope everybody stays civilized in the comments. If you get too »experimental« with beloved classics from a country or region you can easily get some nasty comments or messages in your inbox. To be honest – sometimes I can understand when people are annoyed – some cooks/bakers/bloggers are not necessarily very sensitive with recipes other people may hold dear to their hearts. I have to include myself here as well. I’ve published some recipes here and stepped on the toes of religious people with that. Unintentionally, of course. A wrongly spelled name, some unfitting ingredients, etc. – all that can look and feel like an insult in some cultures.
When it comes to judging other recipes I can’t take myself completely out of it either. Just as an example – when Americans call a dense chocolate cake with a few cherries and buttercream a »Black Forest Cake«, I can’t help but roll my eyes about that.
Some Italians (and other die-hard Tiramisu fans) will feel the same way about my Tiramisu Cheesecake here. For many reasons, I suppose… turning it into a cake (WTF?!), the ingredients (such as cream cheese or gelatin), the alcohol I used instead of more common options… I apologize in advance. From the bottom of my heart!
Nonetheless – it’s a really delicious variation of the classic Italian dessert! Not saying there is anything »original« about this sweet treat. Let’s say it’s a cheesecake that is inspired by one of my favorite desserts… and it tastes damn delicious too! I would like to emphasize that explicitly here. I could go on and on and talk about its great flavors, but no. Everyone should just give it a try.
This cheesecake here is quick and easy to prepare. I really love to use Biscotti for the base of no-bake cheesecakes. If you don’t have them at home you can use regular (shortbread) cookies instead. To stiffen the filling I normally use gelatin in a recipe like this – if you prefer something else like agar-agar, go for it! I think regular cream stiffener would work here as well. The cream filling is not super runny anyway…
About the alcohol in this recipe – I used Baileys Tiramisu* here. I had half a bottle at home waiting to be used, and the flavors were a good match. It’s a limited edition and probably not available everywhere. If you can’t get hold of it just use something else like Amaretto or Marsala – whatever you like best. Use what you would normally use for Tiramisu.

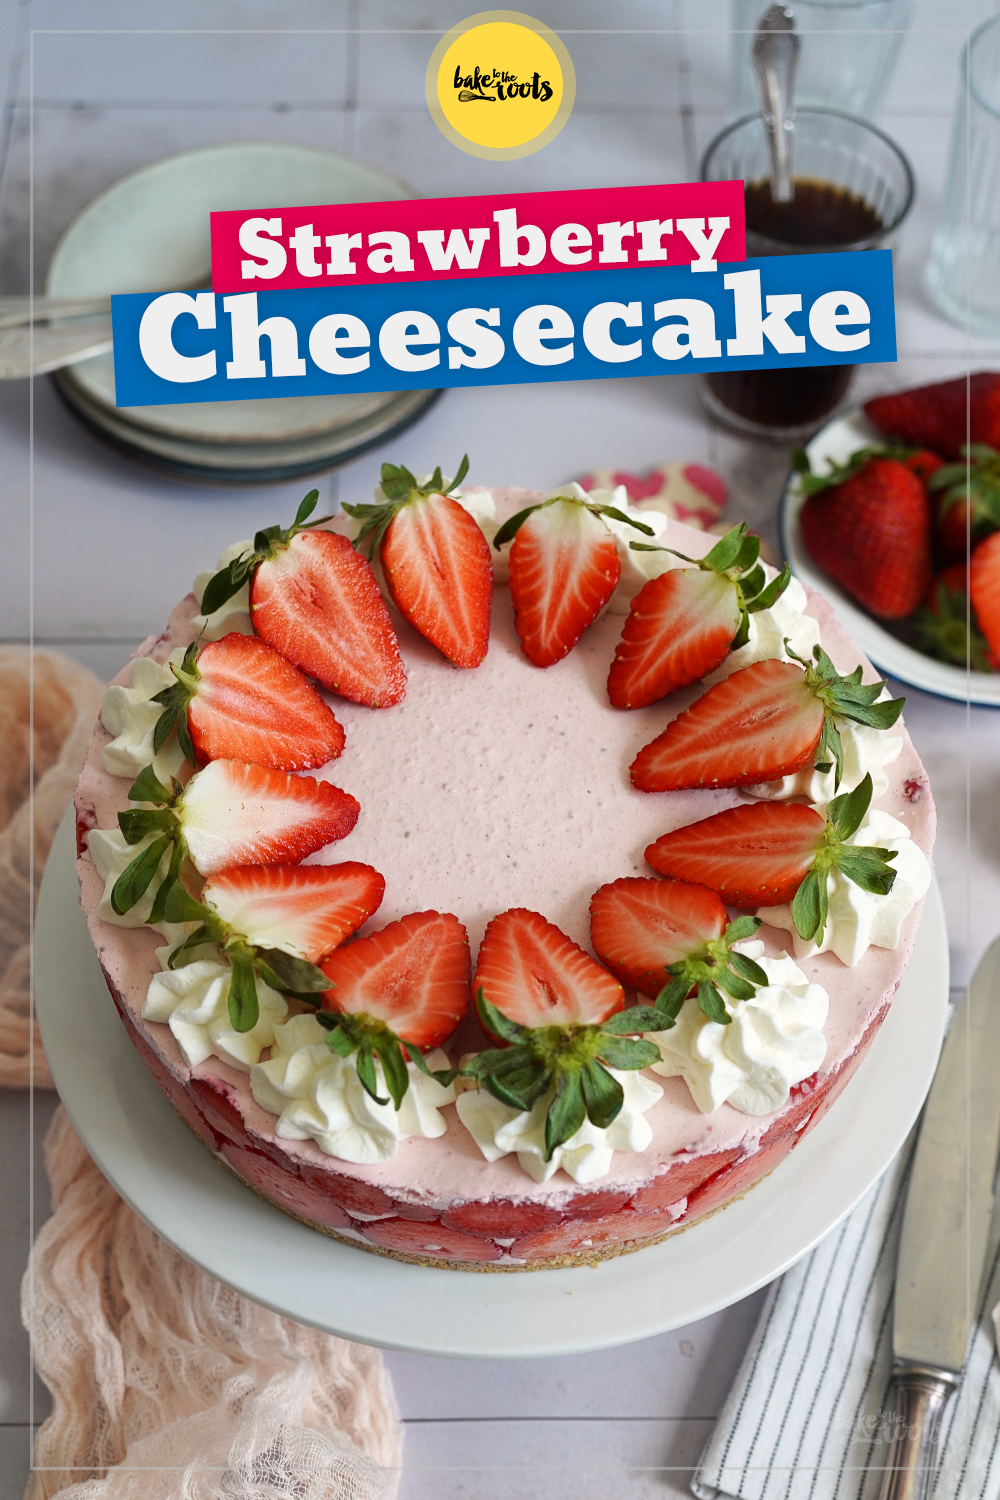
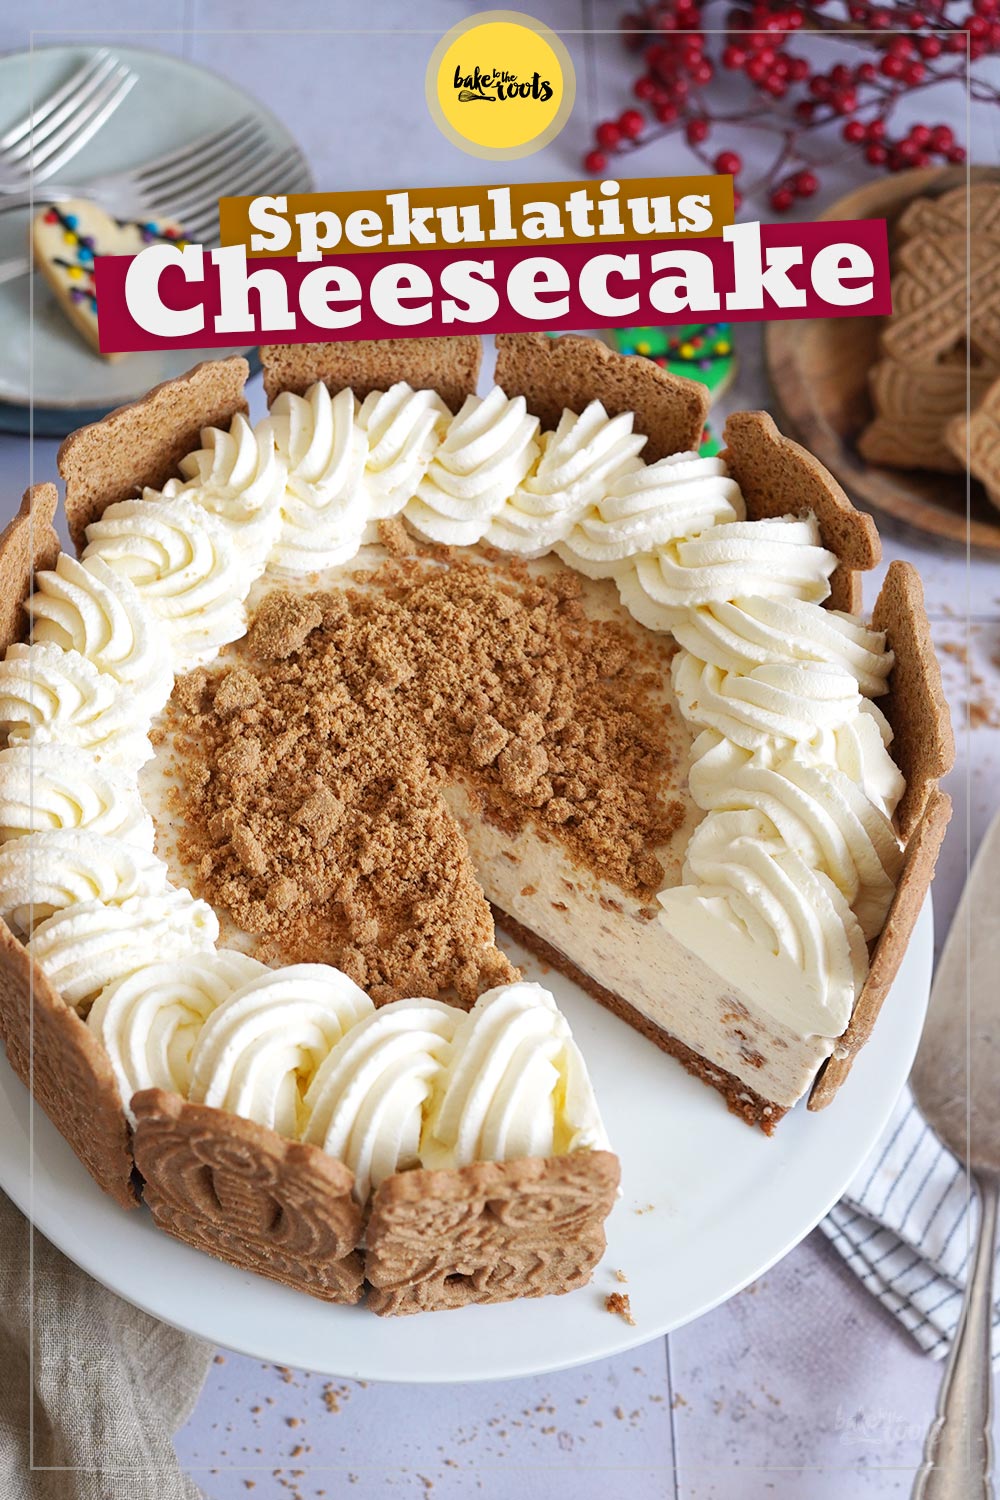
There are already several no-bake recipes similar to this one on the blog. You can see four delicious examples here. Just click on the picture (or tap on it if you are using your mobile) to see the corresponding recipe. You will be redirected automatically. Easy peasy.
INGREDIENTS / ZUTATEN
For the base:
9 oz. (250g) Almond Biscotti*
1.4 oz. (40g) butter, melted
1 pinch of salt
For the filling:
4 gelatin sheets
21 oz. (600g) cream cheese, at room temperature
9 oz. (250g) mascarpone, at room temperature
1 tsp. vanilla extract
1/2 cup (100g) sugar
7 oz. (200g) heavy cream (cold), whipped
3.4 fl. oz. (100ml) freshly brewed espresso
1.7 fl. oz. (50ml) Baileys Tiramisu* or similar
7-9 oz. (200-250g) ladyfingers
For the decoration:
2-3 tsp. cocoa powder for dusting
some whipped heavy cream (optional)
Für den Boden:
250g Mandel Cantuccini*
40g Butter, geschmolzen
1 Prise Salz
Für die Füllung:
4 Blätter Gelatine
600g Frischkäse, Zimmertemperatur
250g Mascarpone, Zimmertemperatur
1 TL Vanille Extrakt
100g Zucker
200g Schlagsahne (kalt), aufgeschlagen
100ml frisch aufgebrühter Espresso
50ml Baileys Tiramisu* o.ä.
200-250g Löffelbiskuit
Für die Dekoration:
2-3 TL Kakao zum Bestäuben
etwas aufgeschlagene Sahne (optional)
DIRECTIONS / ZUBEREITUNG
1. Add the Biscotti for the base to a blender or food processor and mix/pulse until you get fine crumbs. Add the melted butter and salt and mix until well combined. Transfer the moist crumbs to a round baking dish with a loose bottom* (at least 9 inches) and press together to form a smooth layer. Place in the fridge until ready to use.
2. Let the gelatin sheets soak for about 5-7 minutes in a small bowl with cold water. Meanwhile, mix the cream cheese with mascarpone cheese, vanilla extract, and sugar in a large bowl. Squeeze the gelatin sheets to get rid of some of the water, add them to a small pot, and warm them on the stove. Once the gelatin has dissolved, add about 2-3 tbsp. of the cheesecake mixture and stir to combine. Add this mixture to the large bowl with the rest of the cheesecake mixture and stir until well combined. Whisk the heavy cream until stiff peaks form, add it to the bowl in several batches, and gently fold in.
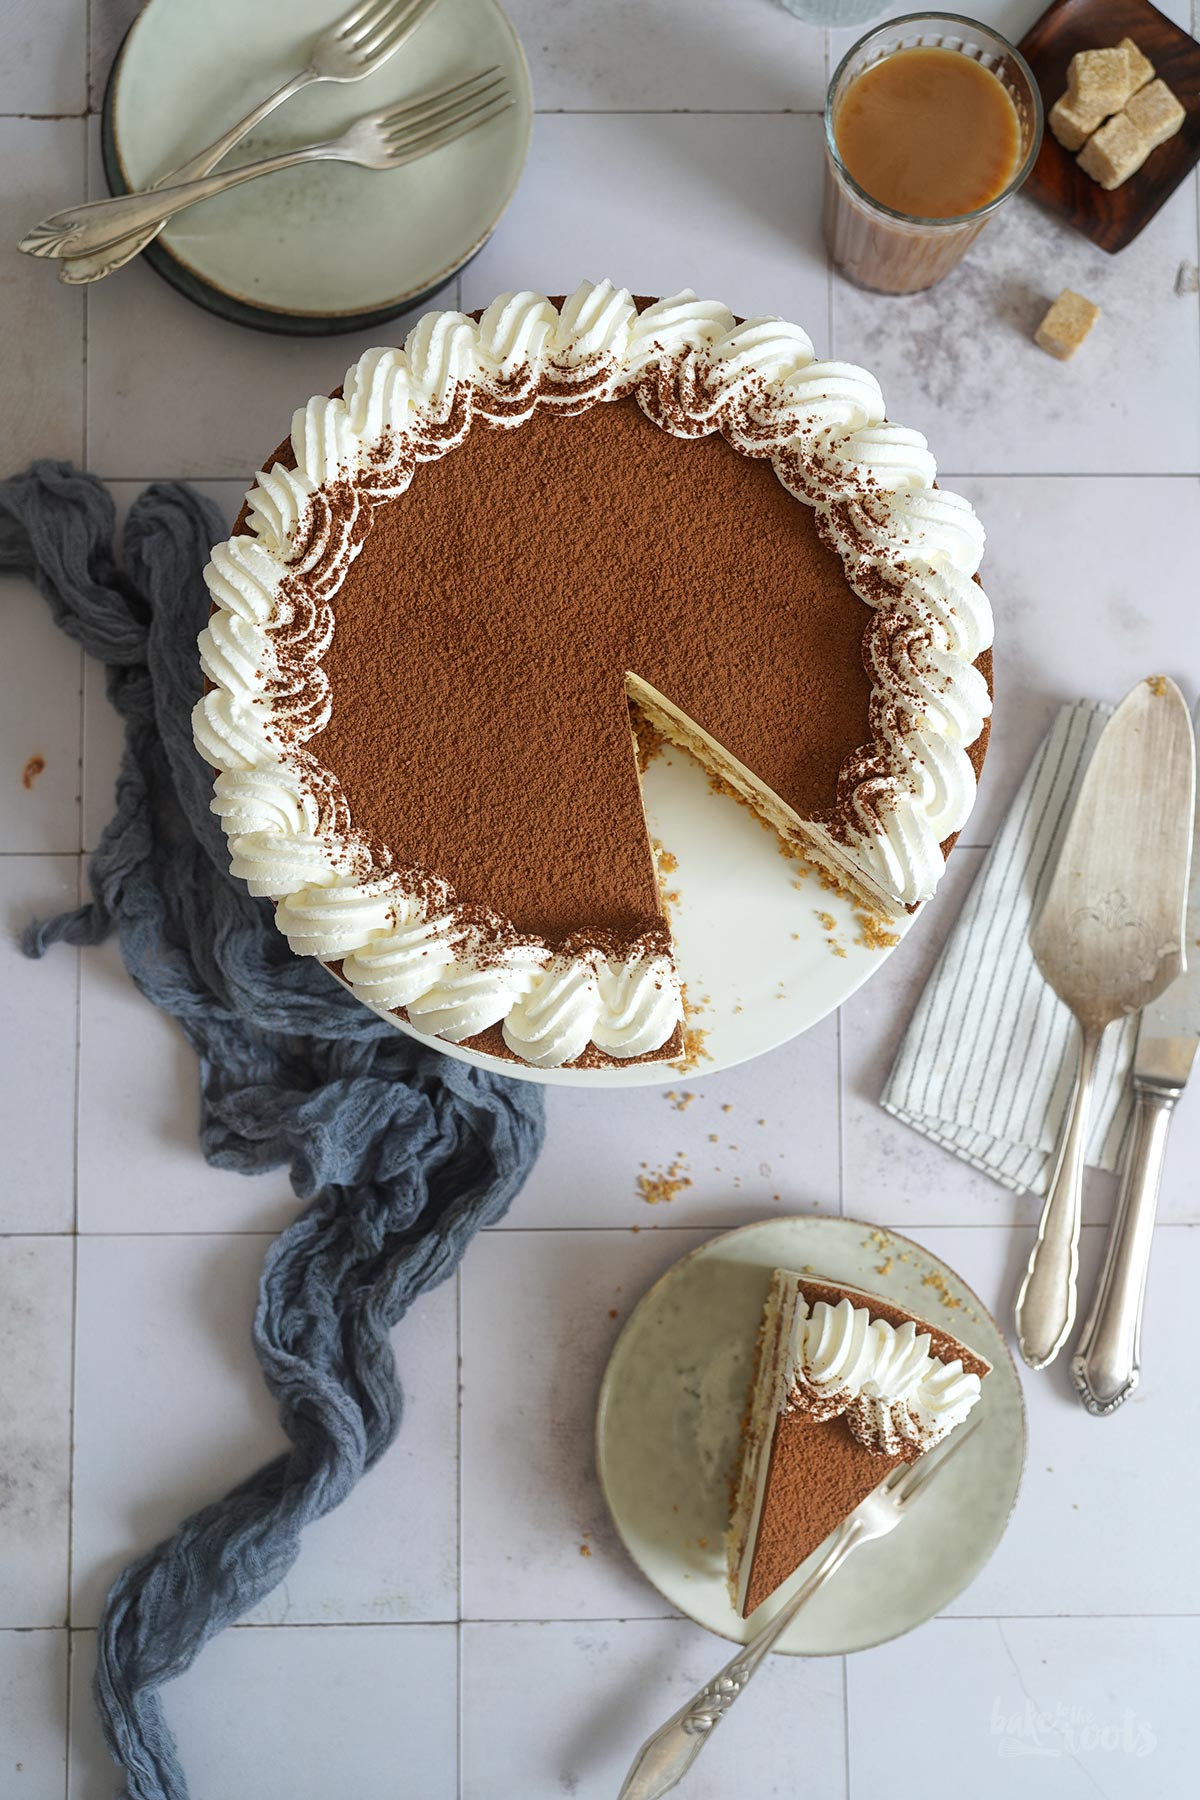
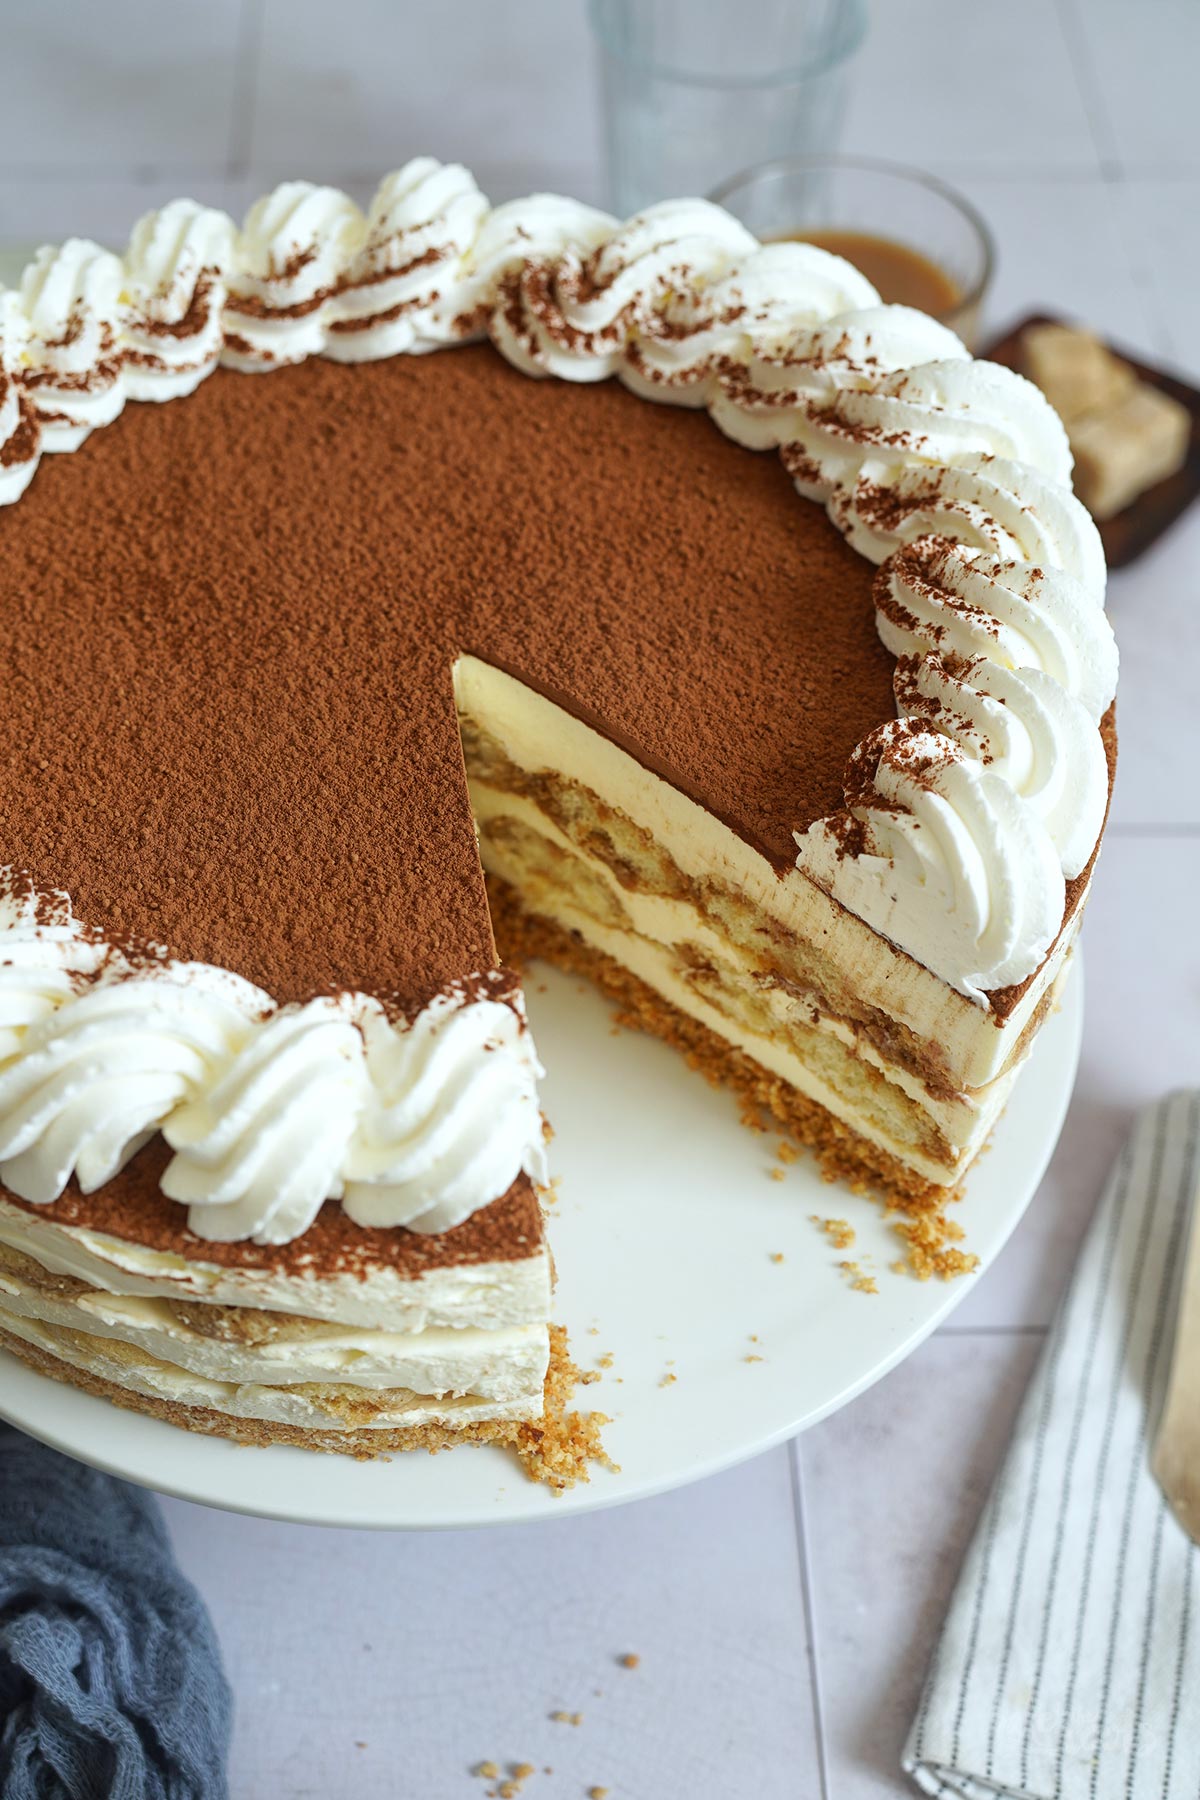
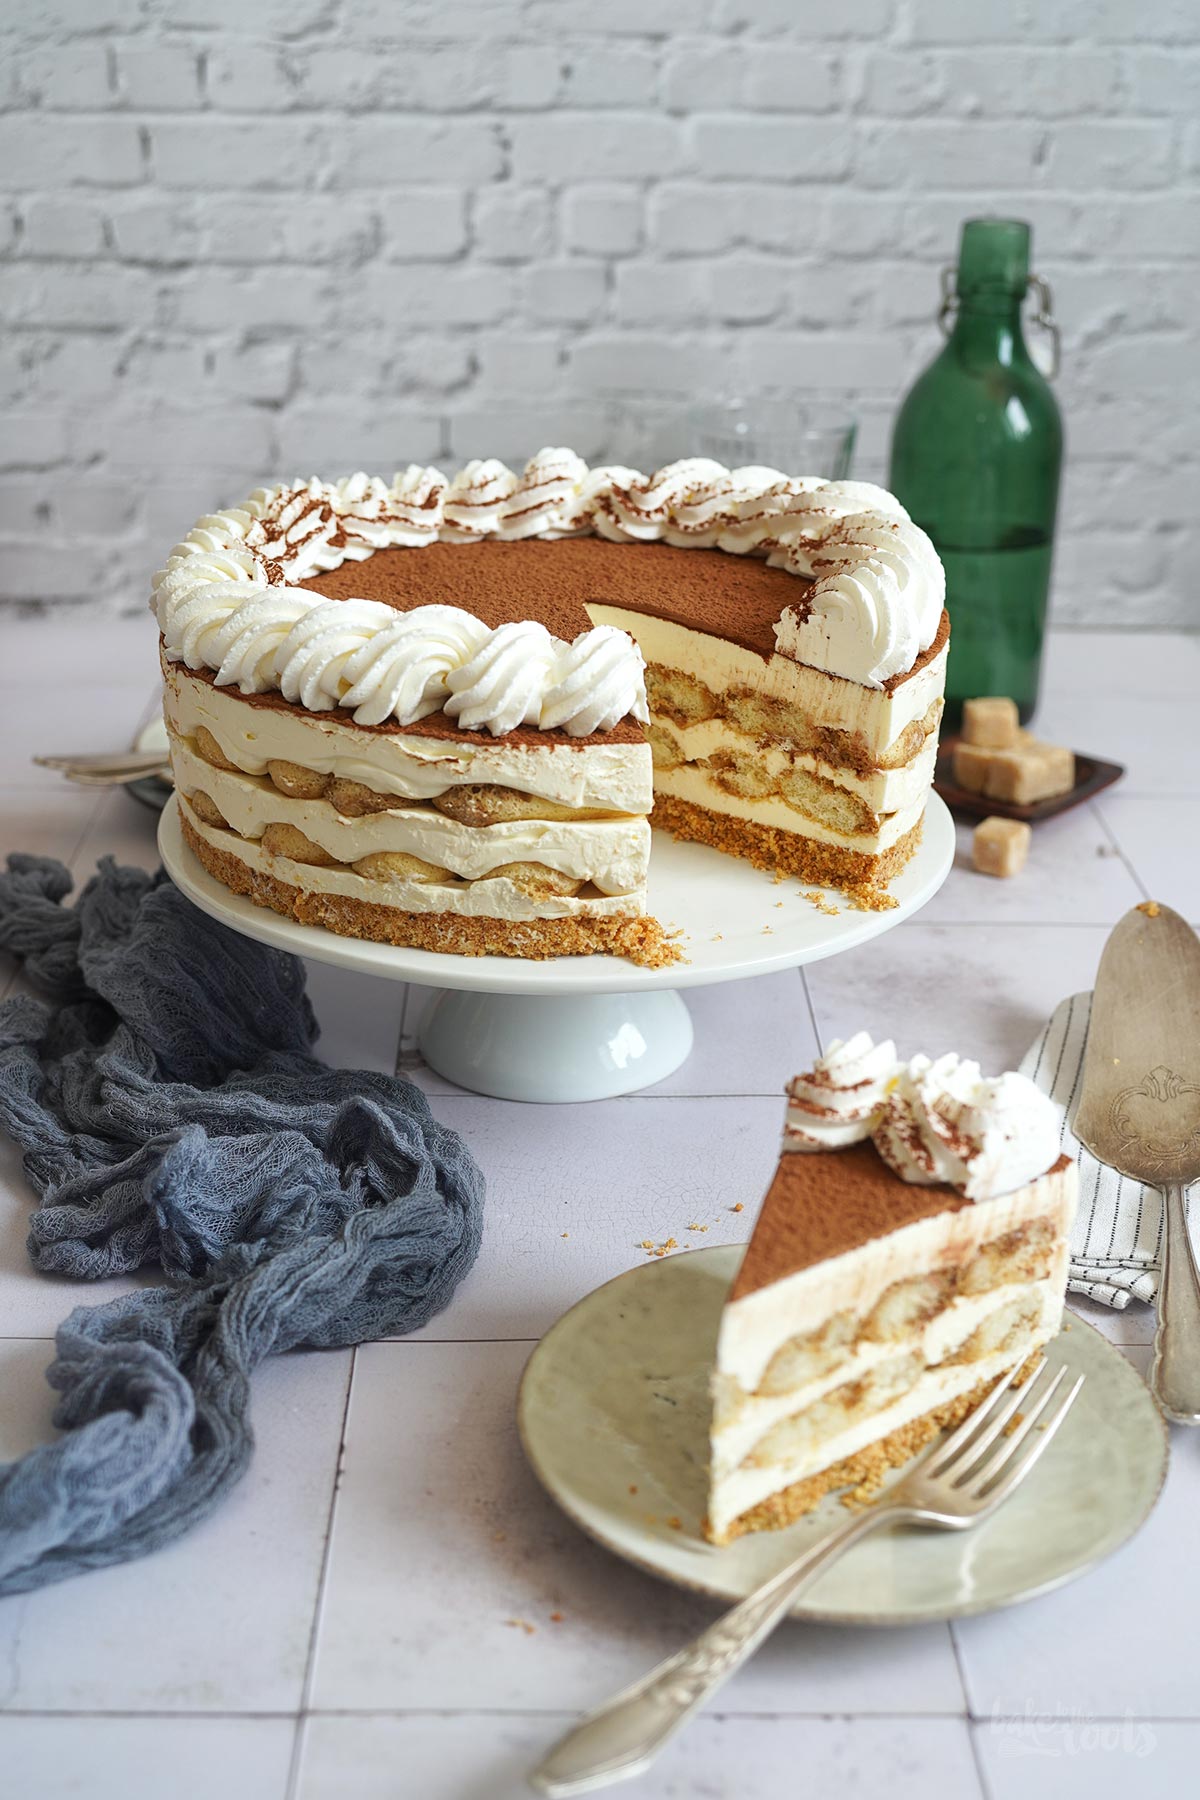
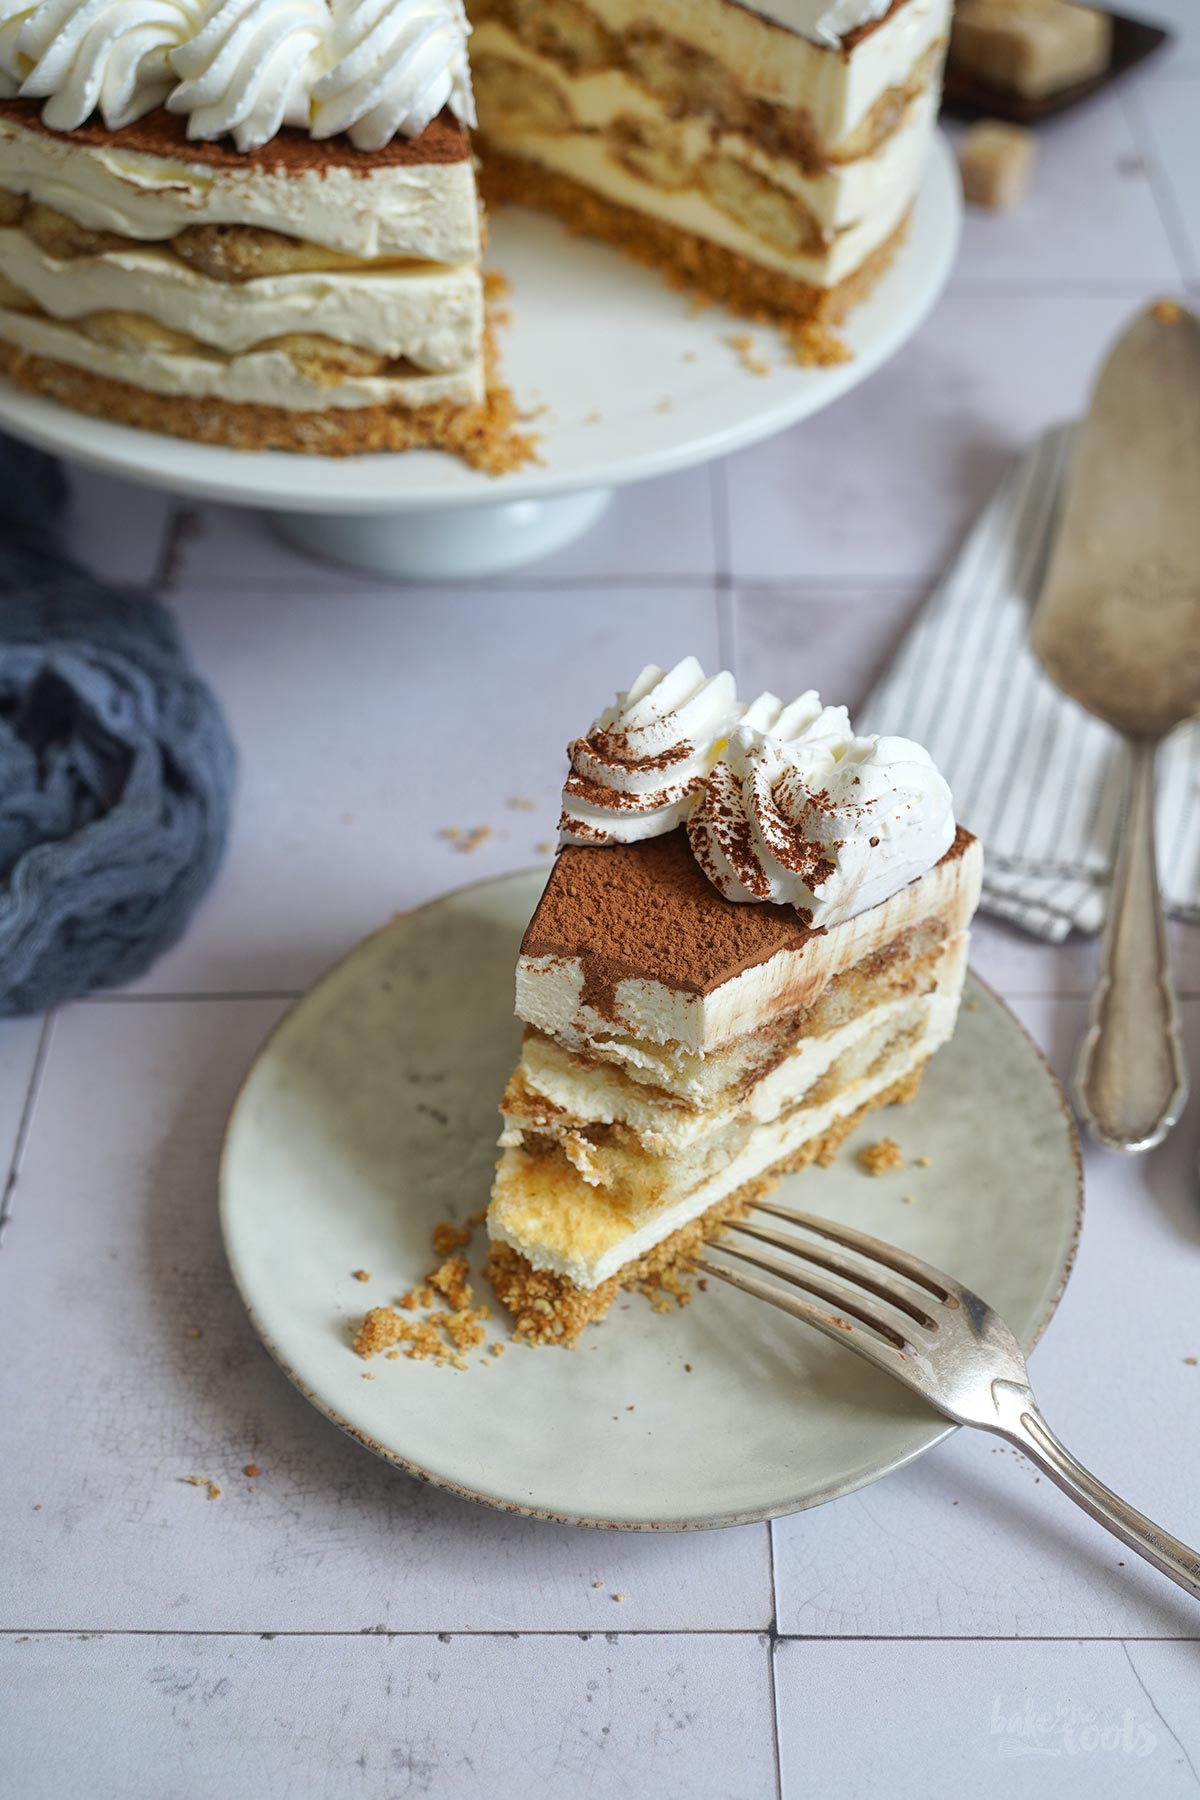
3. Combine the freshly brewed espresso and the liqueur (e.g. Baileys) and let it cool down a bit. Remove the mold with the cookie base from the fridge and spread about 1/3 of the cheesecake mixture evenly on top of the base. Next, place a layer of ladyfingers on the cream. Gaps should be filled with trimmed pieces of ladyfingers. Drizzle about half of the espresso mixture on the ladyfingers, then spread another third of the cheesecake mixture evenly on top. Add a second layer of ladyfingers, drizzle with the remaining espresso mixture, and cover everything with the remaining cream. Place the cheesecake in the fridge for at least 5-6 hours, better overnight.
4. Remove the chilled cheesecake from the fridge, dust it with cocoa, and then remove it from the mold (this will keep the edges clean). Place the cake on a serving plate. Decorate the cheesecake with some whipped cream to your liking (optional). If you do, let the cocoa soak in a bit beforehand so that the whipped cream doesn’t slide around on top ;) If desired, also dust the whipped cream decoration with a bit more cocoa powder and serve. The cheesecake should be good to eat for 2-3 days when chilled properly in the fridge.
Tip: If your mold does not have a very high edge (should be at least 2.7 inches tall) I recommend using (acetate) foil around the edges that extends over the edges of the mold. If you got a cake ring you can use that instead of the mold – those are usually quite tall.
1. Die Cantuccini für den Boden in einem Mixer oder einer Küchenmaschine zu feinen Bröseln verarbeiten. Geschmolzene Butter und Salz dazugeben und alles gut vermengen. Die feuchten Keksbrösel in eine runde Backform mit Hebeboden* (mind. 23cm/9 inches) füllen und zu einer glatten Schicht zusammenpressen. Bis zur weiteren Verwendung in den Kühlschrank stellen.
2. Die Gelatine in einer kleinen Schüssel mit kaltem Wasser für etwa 5-7 Minuten einweichen lassen. In der Zwischenzeit den Frischkäse mit Mascarpone, Vanille Extrakt und Zucker in einer großen Schüssel verrühren. Die gequollenen Gelatineblätter etwas ausdrücken und dann in einem kleinen Topf auf dem Herd erwärmen. Sobald sich die Gelatine aufgelöst hat, etwa 2-3 EL der Käsekuchenmasse in den Topf dazugeben und unterrühren. Diese Mischung in die große Schüssel mit dem Rest der Käsekuchenmasse geben und alles gut verrühren. Die Sahne steif schlagen und dann in mehreren Portionen unter die Masse heben.
3. Den frisch aufgebrühten Espresso mit dem Likör (Baileys) verrühren und ein wenig abkühlen lassen. Die Form mit dem Keksboden aus dem Kühlschrank nehmen und etwa 1/3 der Käsekuchenmasse gleichmäßig auf dem Boden verteilen. Als Nächstes eine Schicht Löffelbiskuit auflegen – nach Möglichkeit sollten die Löffelbiskuit dicht an dicht liegen. Lücken sollte man mit zurechtgeschnittenen Stücken ausfüllen. Etwa die Hälfte der Espresso-Likör-Mischung auf die Löffelbiskuit träufeln und dann noch einmal etwa 1/3 der Käsekuchenmasse darauf verteilen. Eine zweite Schicht Löffelbiskuit auflegen, mit dem Rest der Espresso-Mischung beträufeln und dann mit der verbliebenen Käsekuchenmasse alles abdecken. Den Kuchen für mindestens 5-6 Stunden, besser über Nacht, in den Kühlschrank stellen.
4. Den gut gekühlten Käsekuchen aus dem Kühlschrank nehmen und mit Kakao bestäuben, dann aus der Form lösen (so bleiben die Ränder sauber) und auf eine Servierplatte setzen. Den Käsekuchen nach Belieben mit aufgeschlagener Sahne dekorieren (optional) – wer Sahnetupfen aufspritzen möchte, sollte den Kakao vorab etwas anziehen lassen, damit die Sahne darauf nicht rumrutscht. Wer mag, kann hier auch noch einmal mit etwas Kakao auf der Sahne nachlegen und dann servieren. Der Käsekuchen hält gut gekühlt im Kühlschrank etwa 2-3 Tage durch.
Tipp: Sollte die verwendete Form einen nicht ganz so hohen Rand haben (mind. 7cm hoch), dann empfiehlt sich, die Form vorab mit Acetat-Folie am Rand auszukleiden. Wer einen Kuchenring hat, kann diesen ebenfalls statt der Form verwenden – die sind normalerweise hoch genug.
Craving more? Keep in touch on Facebook, Instagram and Pinterest for new post updates and more. You can also contact me with any questions or inquiries!
Here is a version of the recipe you can print easily.
Print
No-Bake Tiramisu Cheesecake
- Prep Time: 00:30
- Cook Time: 00:00
- Total Time: 07:00
- Yield: 1 1x
- Category: Cheesecakes
- Method: -
- Cuisine: International
- Diet: Vegetarian
Description
One of Italy’s best desserts turned into a cake: a simple and easy-to-prepare prepare No-Bake Tiramisu Cheesecake. So good and refreshing (not only) in summer!
Ingredients
For the base:
9 oz. (250g) Almond Biscotti*
1.4 oz. (40g) butter, melted
1 pinch of salt
For the filling:
4 gelatin sheets
21 oz. (600g) cream cheese, at room temperature
9 oz. (250g) mascarpone, at room temperature
1 tsp. vanilla extract*
1/2 cup (100g) sugar
7 oz. (200g) heavy cream (cold), whipped
3.4 fl. oz. (100ml) freshly brewed espresso
1.7 fl. oz. (50ml) Baileys Tiramisu* or similar
7-9 oz. (200-250g) ladyfingers*
For the decoration:
2-3 tsp. cocoa powder for dusting
some whipped heavy cream (optional)
Instructions
1. Add the Biscotti for the base to a blender or food processor and mix/pulse until you get fine crumbs. Add the melted butter and salt and mix until well combined. Transfer the moist crumbs to a round baking dish with a loose bottom* (at least 9 inches) and press together to form a smooth layer. Place in the fridge until ready to use.
2. Let the gelatin sheets soak for about 5-7 minutes in a small bowl with cold water. Meanwhile, mix the cream cheese with mascarpone cheese, vanilla extract, and sugar in a large bowl. Squeeze the gelatin sheets to get rid of some of the water, add them to a small pot, and warm them on the stove. Once the gelatin has dissolved, add about 2-3 tbsp. of the cheesecake mixture and stir to combine. Add this mixture to the large bowl with the rest of the cheesecake mixture and stir until well combined. Whisk the heavy cream until stiff peaks form, add it to the bowl in several batches, and gently fold in.
3. Combine the freshly brewed espresso and the liqueur (e.g. Baileys) and let it cool down a bit. Remove the mold with the cookie base from the fridge and spread about 1/3 of the cheesecake mixture evenly on top of the base. Next, place a layer of ladyfingers on the cream. Gaps should be filled with trimmed pieces of ladyfingers. Drizzle about half of the espresso mixture on the ladyfingers, then spread another third of the cheesecake mixture evenly on top. Add a second layer of ladyfingers, drizzle with the remaining espresso mixture, and cover everything with the remaining cream. Place the cheesecake in the fridge for at least 5-6 hours, better overnight.
4. Remove the chilled cheesecake from the fridge, dust it with cocoa, and then remove it from the mold (this will keep the edges clean). Place the cake on a serving plate. Decorate the cheesecake with some whipped cream to your liking (optional). If you do, let the cocoa soak in a bit beforehand so that the whipped cream doesn’t slide around on top ;) If desired, also dust the whipped cream decoration with a bit more cocoa powder and serve. The cheesecake should be good to eat for 2-3 days when chilled properly in the fridge.
Notes
If your mold does not have a very high edge (should be at least 2.7 inches tall) I recommend using (acetate) foil around the edges that extends over the edges of the mold. If you got a cake ring you can use that instead of the mold – those are usually quite tall.
Links marked with an asterisk (*) are affiliate links (advertising/Werbung) to Amazon Germany. If you click on one of those links and buy something via this link, I will get a commission for that sale. The price of whatever you buy is not affected in any way by this.


Can I omit the alcohol in this recipe and sub with more espresso? Also, I cannot find gelatin sheet, only gelatin powder. Would I still be able to make this recipe? How would I have to adjust the measurements? Thanks!
Hi.
Leaving out the alcohol is no problem.
About the gelatin sheets – gelatin powder is also fine. Use the amount of powder you would use for 350ml/11.8 fl. oz. of liquid.
I hope that helps.
Cheers
Marc