Description
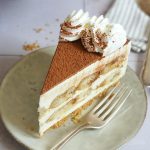
One of Italy’s best desserts turned into a cake: a simple and easy-to-prepare prepare No-Bake Tiramisu Cheesecake. So good and refreshing (not only) in summer!
Ingredients
For the base:
9 oz. (250g) Almond Biscotti*
1.4 oz. (40g) butter, melted
1 pinch of salt
For the filling:
4 gelatin sheets
21 oz. (600g) cream cheese, at room temperature
9 oz. (250g) mascarpone, at room temperature
1 tsp. vanilla extract*
1/2 cup (100g) sugar
7 oz. (200g) heavy cream (cold), whipped
3.4 fl. oz. (100ml) freshly brewed espresso
1.7 fl. oz. (50ml) Baileys Tiramisu* or similar
7-9 oz. (200-250g) ladyfingers*
For the decoration:
2-3 tsp. cocoa powder for dusting
some whipped heavy cream (optional)
Instructions
1. Add the Biscotti for the base to a blender or food processor and mix/pulse until you get fine crumbs. Add the melted butter and salt and mix until well combined. Transfer the moist crumbs to a round baking dish with a loose bottom* (at least 9 inches) and press together to form a smooth layer. Place in the fridge until ready to use.
2. Let the gelatin sheets soak for about 5-7 minutes in a small bowl with cold water. Meanwhile, mix the cream cheese with mascarpone cheese, vanilla extract, and sugar in a large bowl. Squeeze the gelatin sheets to get rid of some of the water, add them to a small pot, and warm them on the stove. Once the gelatin has dissolved, add about 2-3 tbsp. of the cheesecake mixture and stir to combine. Add this mixture to the large bowl with the rest of the cheesecake mixture and stir until well combined. Whisk the heavy cream until stiff peaks form, add it to the bowl in several batches, and gently fold in.
3. Combine the freshly brewed espresso and the liqueur (e.g. Baileys) and let it cool down a bit. Remove the mold with the cookie base from the fridge and spread about 1/3 of the cheesecake mixture evenly on top of the base. Next, place a layer of ladyfingers on the cream. Gaps should be filled with trimmed pieces of ladyfingers. Drizzle about half of the espresso mixture on the ladyfingers, then spread another third of the cheesecake mixture evenly on top. Add a second layer of ladyfingers, drizzle with the remaining espresso mixture, and cover everything with the remaining cream. Place the cheesecake in the fridge for at least 5-6 hours, better overnight.
4. Remove the chilled cheesecake from the fridge, dust it with cocoa, and then remove it from the mold (this will keep the edges clean). Place the cake on a serving plate. Decorate the cheesecake with some whipped cream to your liking (optional). If you do, let the cocoa soak in a bit beforehand so that the whipped cream doesn’t slide around on top ;) If desired, also dust the whipped cream decoration with a bit more cocoa powder and serve. The cheesecake should be good to eat for 2-3 days when chilled properly in the fridge.
Notes
If your mold does not have a very high edge (should be at least 2.7 inches tall) I recommend using (acetate) foil around the edges that extends over the edges of the mold. If you got a cake ring you can use that instead of the mold – those are usually quite tall.