
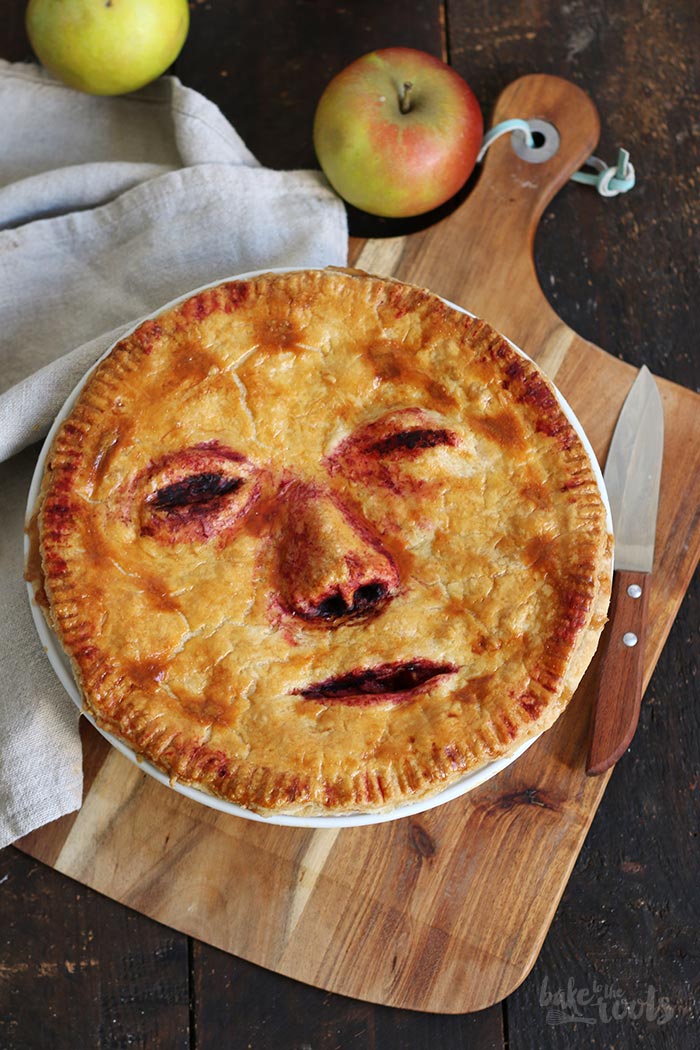
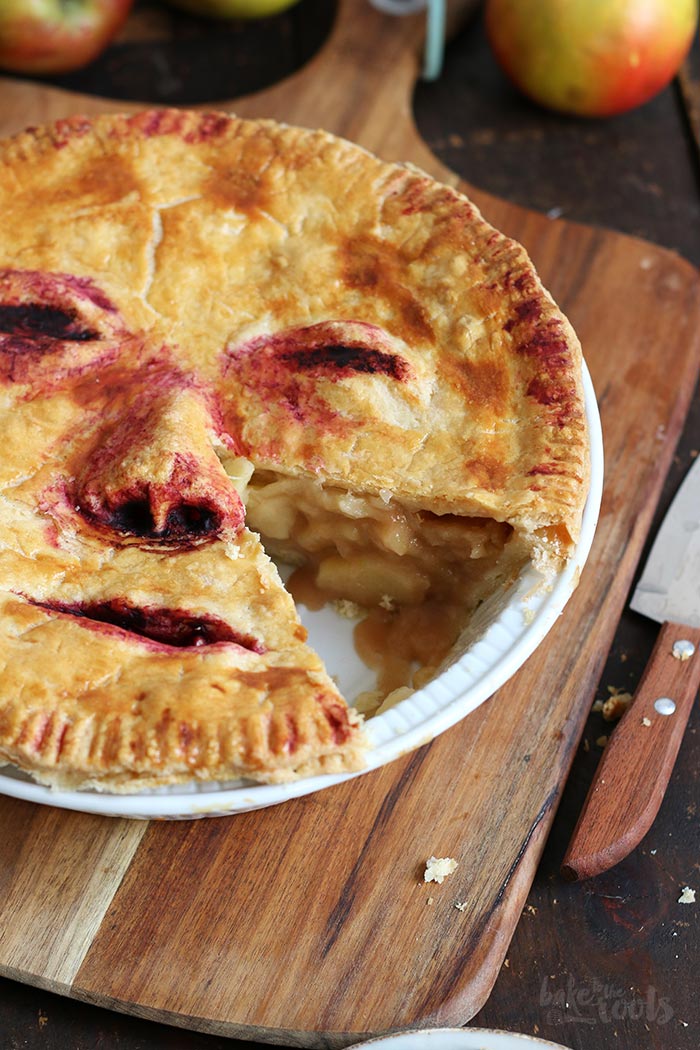
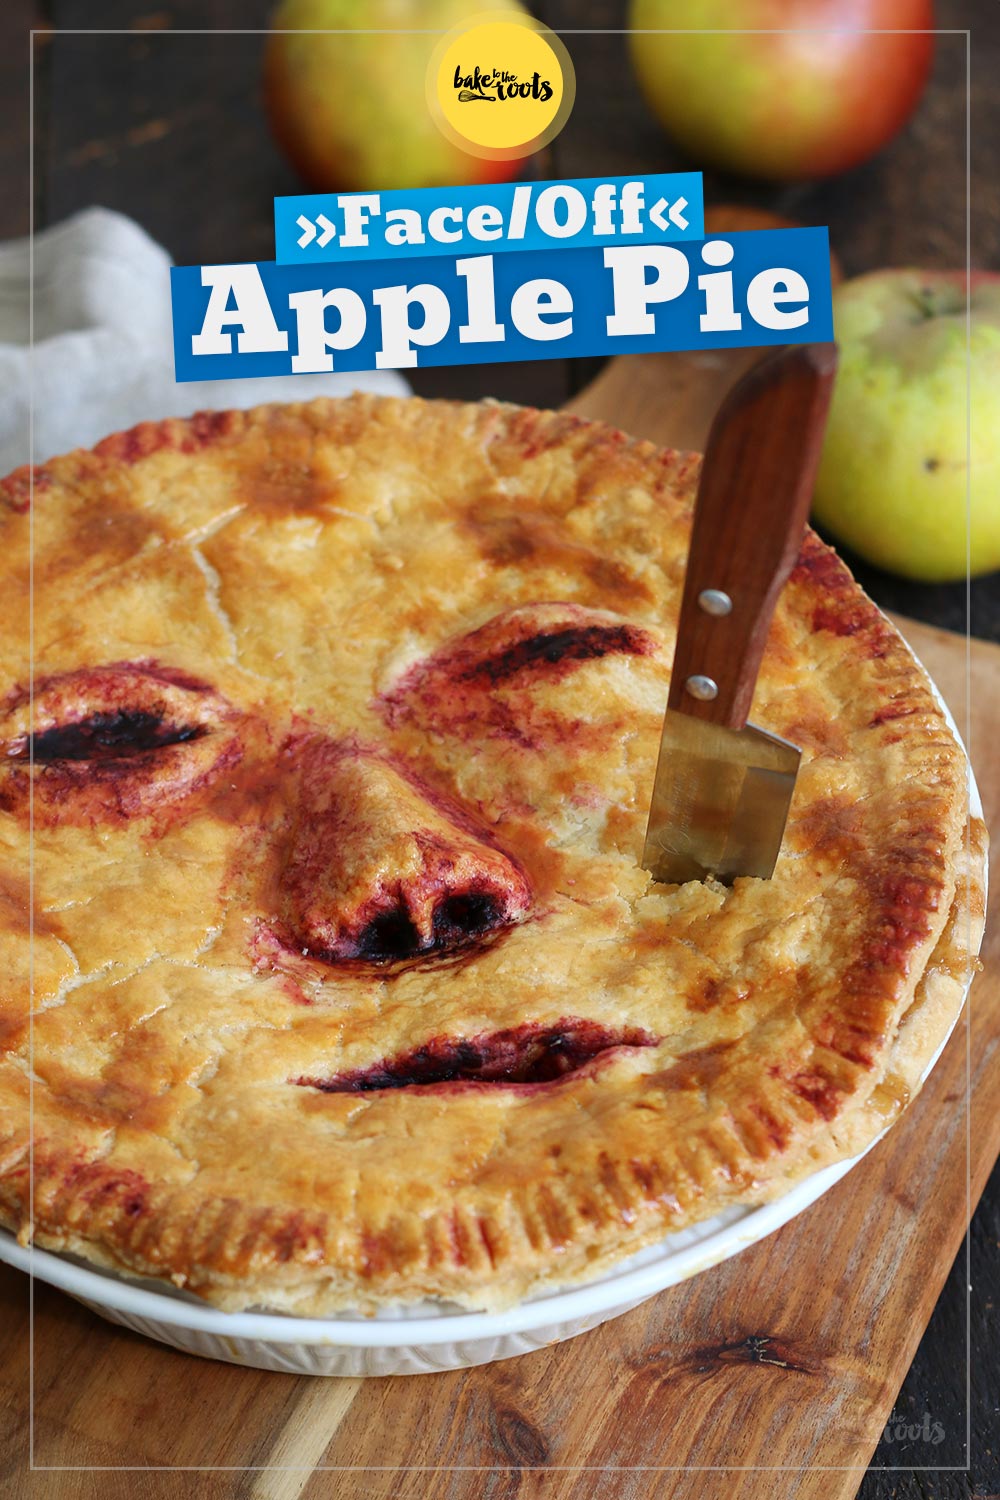
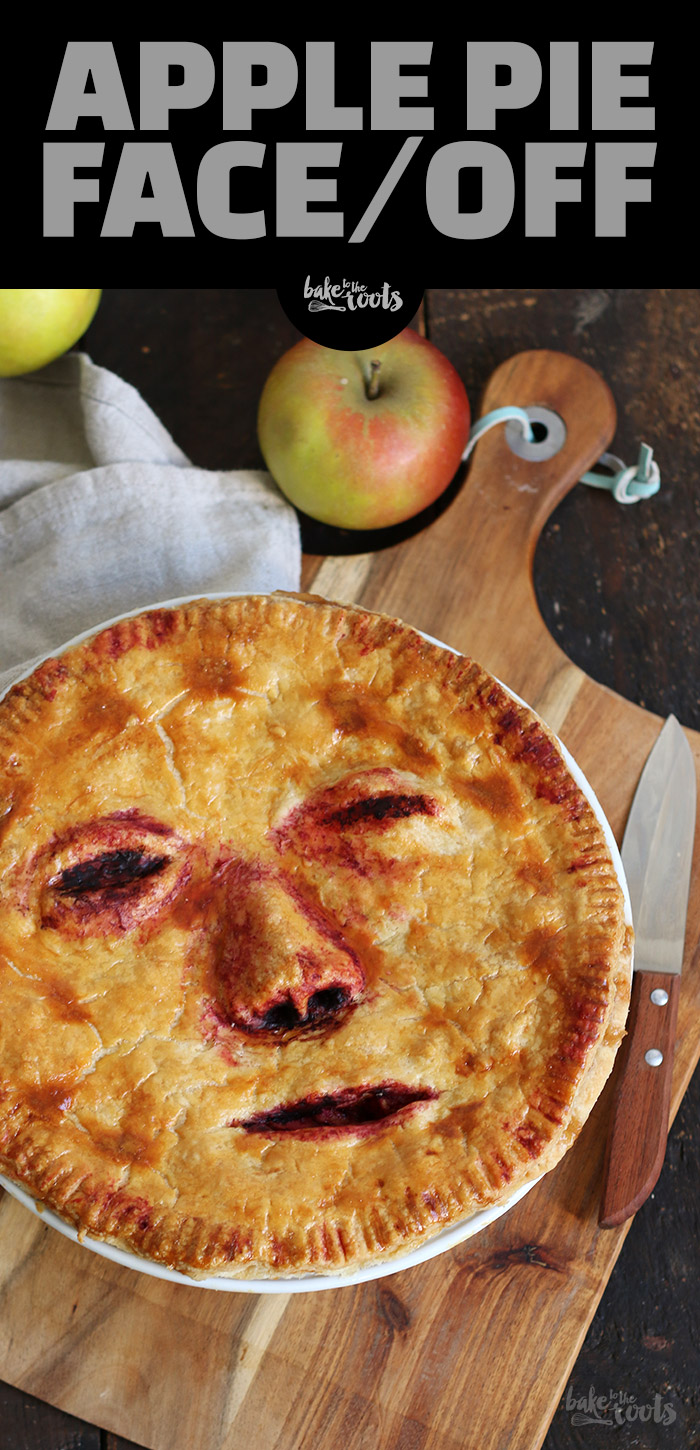
I think there will be quite a few people who are not gonna like this pie. It looks horrible, but the flavors are so good! But hey… it’s a Halloween Apple Pie, so »horrible« is actually good again! Right?! It’s the perfect pie to surprise your guests or scare them away – not only around Halloween. So let’s get some apples chopped, and let’s find a suitable face or something else to cover the filling of the pie.
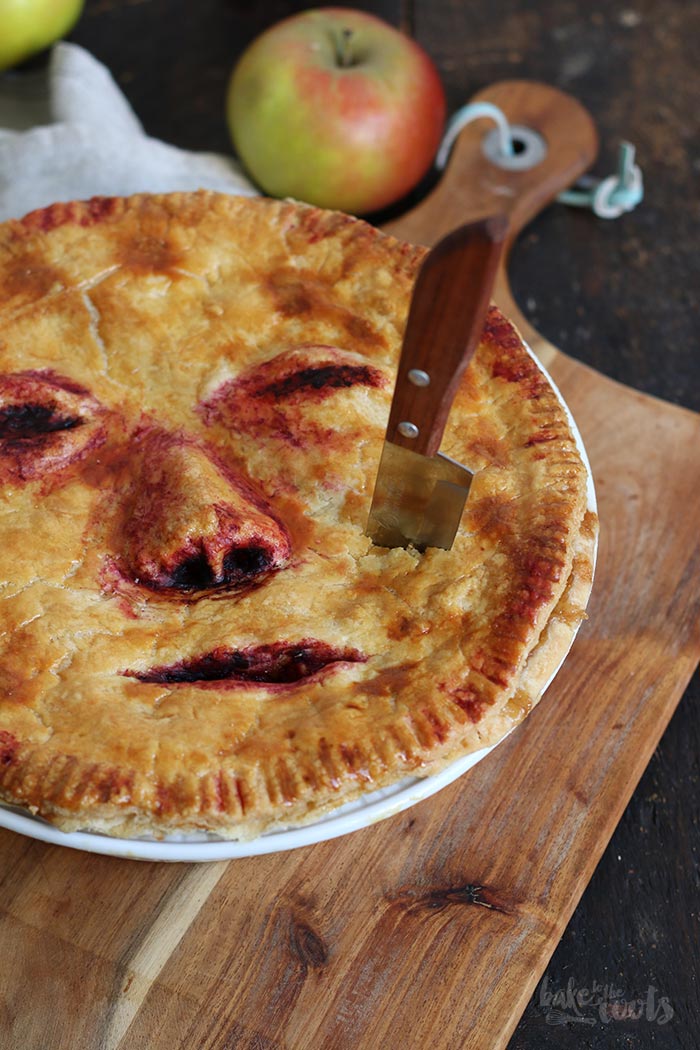
Several months ago I stumbled over a video from Ashley Newman – here is her Instagram account. Be warned, some of the pictures are probably a bit »disturbing« for some people. Anyway, she creates all kinds of stuff for horror movies, makes special effects makeup etc. Among all the things she does, she also makes »people pot pies« as decorations for people with needs for fake pies that look like somebody baked them with human faces. Basically like this pie here – her stuff is not edible though. My pie here is edible and delicious… I did mention that already, right? ;)
Well… Her creations look much better than my pie and much more frightening, but I thought, »Let’s give it a try and see what I can come up with…«. I wished it was more realistic, but working with pie dough is not that easy if you want something to look like human skin. Using rubber or whatever the people pot pies are made of is probably also difficult to work with, though. Well I tried my best and here it is – my first Halloween »Face/Off« Pie.
The base for this pie is my favorite apple pie recipe you can also find in my baking book called »Bake in the USA«*. The recipe is easy to prepare and also makes a really nice classic apple pie… if you decide not to create a ripped-off face on top. Making it look like a face is much more fun, though. Isn’t it?! ;)
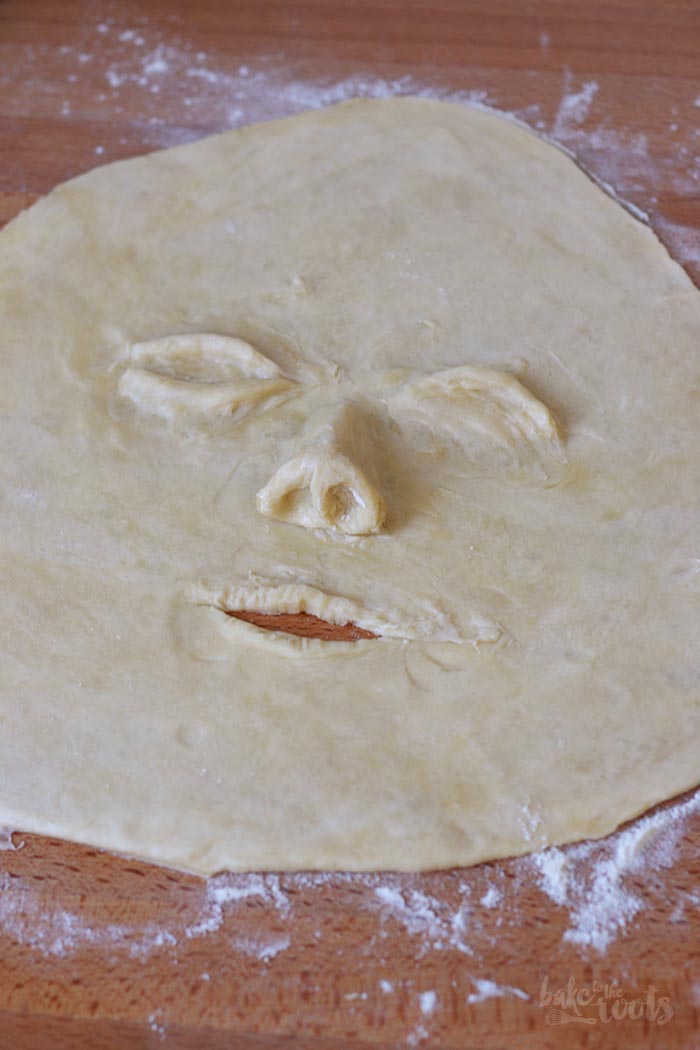
Creating the face as it is on the pie is actually not that much more work compared to a regular apple pie. A small amount of the dough is added and shaped to look like a nose and two strings of dough for each eye. The rest is just a bit of pressing and scratching off dough in the right places. After baking you give the face some more depth with food coloring. That’s it.
If you want it to look more realistic, I guess you can go overboard and work much longer on it, but I needed like 5 minutes or so for this look here. Anyway. I think the pie will turn some heads when served or when used as decorations at a Halloween party. If you look at it from afar for the first time, it looks a bit weird… and that’s what we want. Right?!

INGREDIENTS / ZUTATEN
For the dough:
2 1/2 cups (325g) all-purpose flour*
1/2 tsp. salt
1 cup (230g) cold butter
1/2 cup (120ml) ice water
1 tsp. apple cider vinegar*
For the filling:
5-6 medium apples
3-4 tbsp. lemon juice
2 tbsp. butter
2 tbsp. all-purpose flour*
1/4 cup (60ml) apple juice* (naturally cloudy)
1/2 cup (100g) sugar
1/4 cup (50g) brown sugar
1/4 tsp. salt
1 tsp. ground cinnamon*
2 tbsp. soft wheat semolina*
1 egg for brushing
some red/green food color*
a fine brush
Für den Teig:
325g Mehl (Type 405)*
1/2 TL Salz
230g kalte Butter
120ml Eiswasser
1 TL Apfelessig*
Für die Füllung:
5-6 mittelgroße Äpfel
3-4 EL Zitronensaft
2 EL Butter
2 EL Mehl (Type 405)*
60ml Apfelsaft (naturtrüb)*
100g Zucker
50g brauner Zucker
1 TL Zimt*
1/4 TL Salz
2 EL Weichweizengrieß*
1 Ei zum Bestreichen
etwas rote/grüne Lebensmittelfarbe*
ein feiner Pinsel
DIRECTIONS / ZUBEREITUNG
1. Mix the flour with the salt in a large bowl. Add the cold butter in small pieces and mix. Cut the butter with a pastry blender into pea-sized pieces. Mix the ice water with vinegar and add gradually to the bowl, mix until the dough starts coming together. Do not knead much, the dough should not be too wet or sticky – it should just hold together. Wrap in plastic wrap and place in the fridge for at least 1 hour.
2. Roll out half of the dough on a floured surface to a round circle that is slightly larger than a pie dish (23cm)* – keeps the rest of the dough in the fridge. Transfer the dough to the pie dish and press it to the bottom and sides – the dough should overlap slightly. Prick with a fork several times and place in the fridge for about 30 minutes.
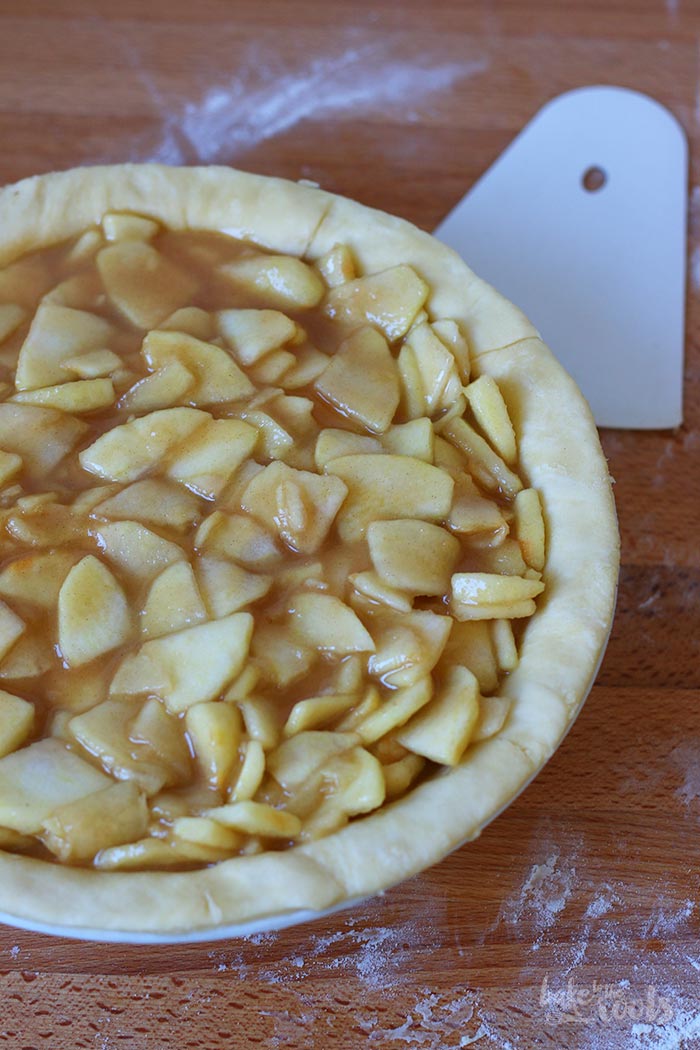
3. Peel and core the apples. Cut into thin slices, add to a bowl and mix with the lemon juice so the apples won’t brown. Set aside. Add the butter to a large pot and bring to a boil. Add the flour and mix until you get a thick paste. Next, add the apple juice and mix it in. Add both sugars, cinnamon, and salt and mix until well combined. Add the apples and mix. Reduce the heat and let simmer for 2-3 minutes. Take off the heat and let it cool down a bit.
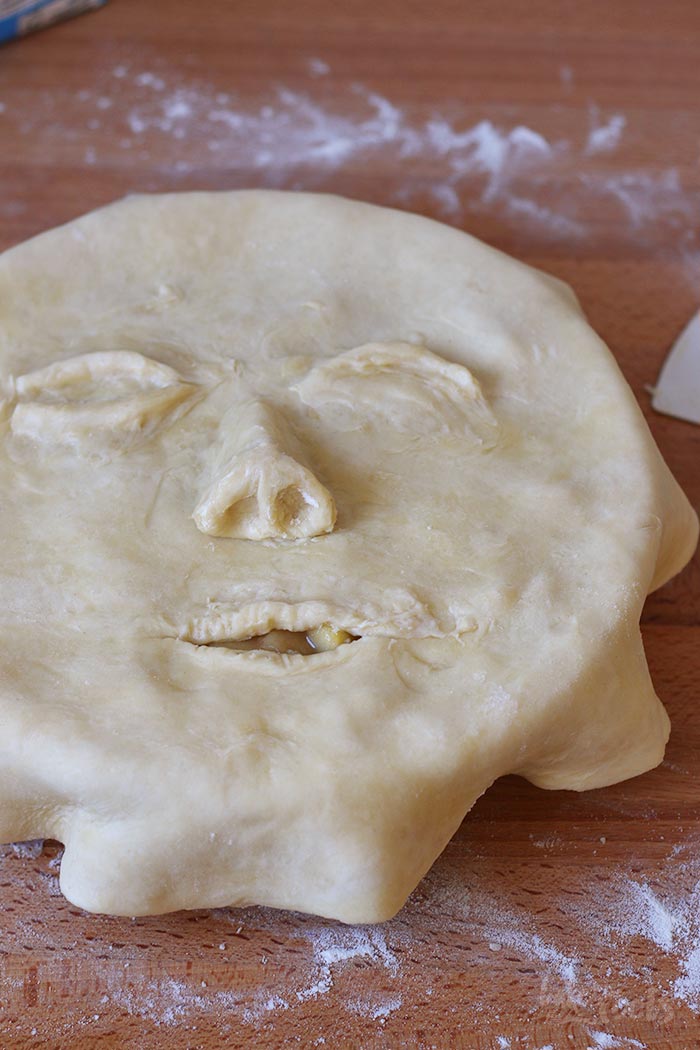
4. Preheat the oven to 200°C (400°F). Take the remaining dough out of the fridge and keep a bit for the eyes and nose and roll out the rest on a floured surface to a circle with the size of the pie dish. Form the nose and place in the middle. Make rolls out of dough for the eyes and place them on the face. Forming and making the parts stick to the dough circle works best with a small spatula and a wooden skewer to get everything in shape. Cut a hole where the mouth should be and form lips. Sprinkle the semolina on top of the dough in the pie dish and fill in the cooled apple filling, smooth out the top. Whisk the egg and brush the sides of the dough in the pie dish. Carefully place the face on top of the apples and press down on the sides. Cut off excess dough and use a fork to press the edges together and to get a nice pattern around the pie.
5. Brush the top (the face) with the egg wash and bake the pie for about 15 minutes. Then reduce the heat to 180°C (350°F) and bake the pie another 35-40 minutes until the pie got a nice golden color. If it gets too dark, cover it with some aluminum foil. Take out the pie and let it cool down completely.
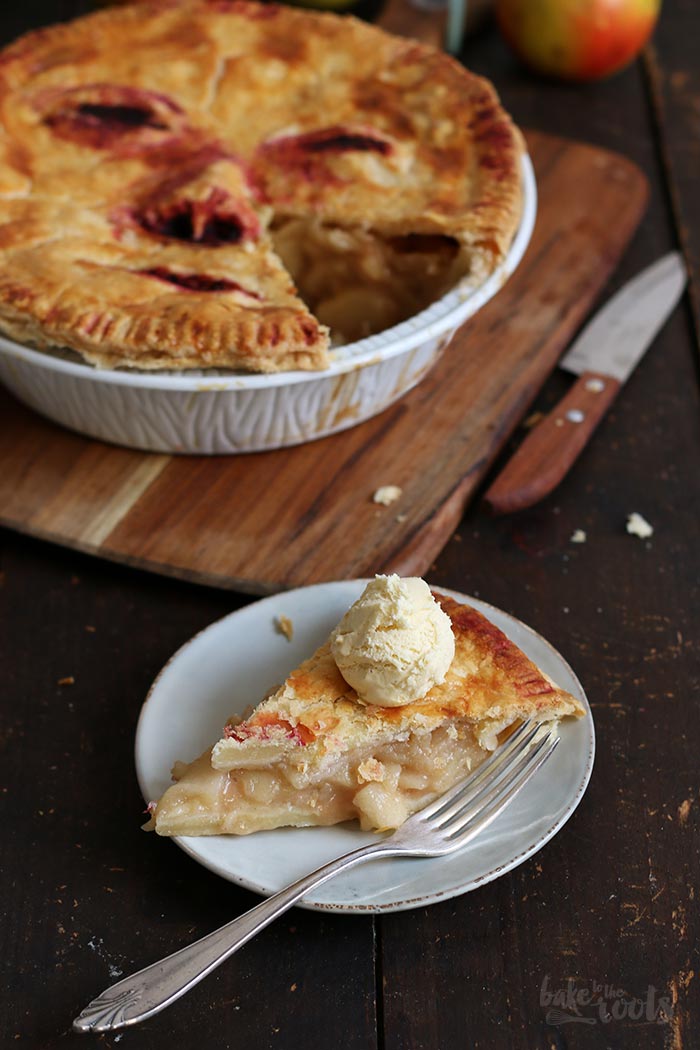
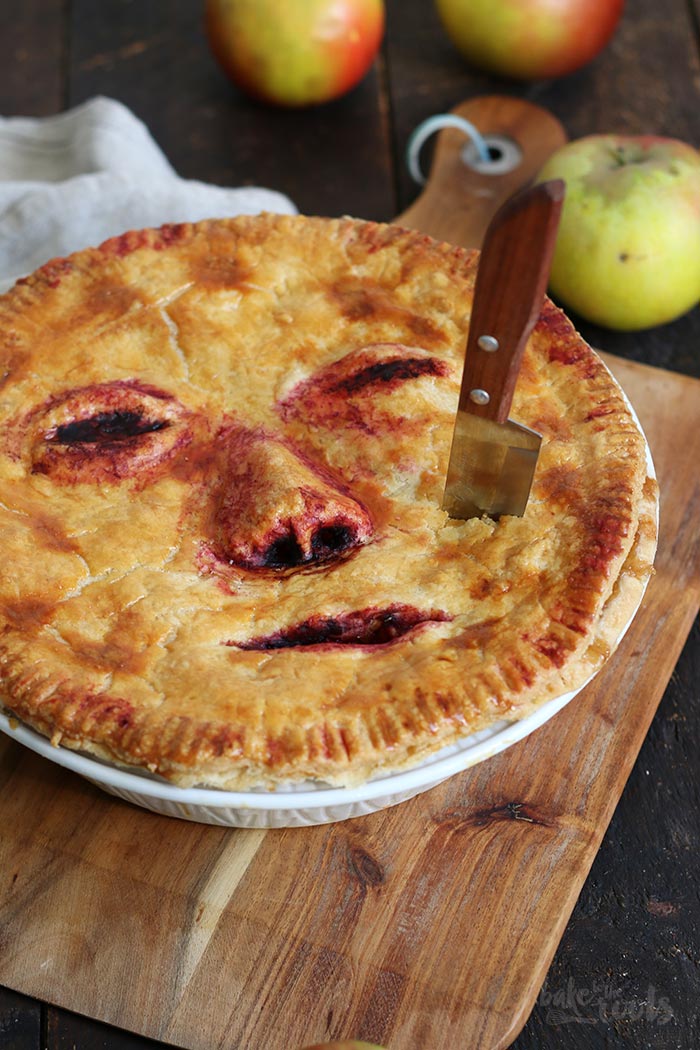
6. To finish the pie, mix the food color with some water and give the face a nice »makeup« by making the nostrils darker, the mouth, eyes, etc. so it looks even scarier. Serve with your favorite ice cream or some bloody sauce (raspberry sauce of course)!
1. Das Mehl mit dem Salz in einer großen Schüssel vermischen. Die Butter in kleinen Stücken zugeben und kurz im Mehl schwenken. Die Butter mit einem Teigmischer oder einem Messer in erbsengroße Stücke zerteilen. Das Wasser mit dem Essig vermischen und nach und nach zugeben und alles mit den Fingern verarbeiten, bis der Teig anfängt zusammenzuhalten. Der Teig sollte weder feucht noch klebrig sein. In Klarsichtfolie wickeln und für mindestens 1 Stunde in den Kühlschrank legen.
2. Die Hälfte des Teiges auf einer bemehlten Fläche etwas größer als eine 23cm Pieform* ausrollen (den Rest des Teiges im Kühlschrank lassen). Den Teig in die Form legen und festdrücken. Den Rand auf etwa 1cm Überhang zurechtschneiden und dann mit einer Gabel mehrmals einstechen. Für weitere 30 Minuten in den Kühlschrank stellen.
3. Die Äpfel schälen, entkernen und in dünne Scheiben schneiden. In eine Schüssel geben und mit dem Zitronensaft vermischen, damit die Äpfel nicht braun werden. Zur Seite stellen. Die Butter in einen großen Topf geben und schmelzen. Das Mehl einrühren, bis eine dicke Paste entsteht. Den Apfelsaft zugeben und rühren, bis alles andickt. Die beiden Zuckersorten, Zimt und Salz zugeben und alles verrühren. Die Apfelspalten zugeben und vermischen. Die Hitzezufuhr reduzieren und für 2-3 Minuten leicht köcheln lassen. Vom Herd nehmen und etwas abkühlen lassen.
4. Den Ofen auf 200°C (400°F) Ober-/Unterhitze vorheizen. Vom restlichen Teig etwas für die Nase und die Augen zur Seite legen und den Rest dann auf die Größe der Form rund ausrollen (Arbeitsfläche gut mit Mehl bestäuben). In der Mitte den Teig für die Nase in Form bringen, für die Augen je zwei Teigröllchen auflegen und ebenfalls in Form bringen – funktioniert am besten mit einem kleinen Teigspatel und einem Holzspieß. Für den Mund einen Schlitz in den Teig schneiden. Den Grieß in der Form auf dem Boden verteilen und die Äpfel einfüllen und glatt streichen. Das Ei verquirlen und damit den Teigrand bestreichen. Das Teiggesicht vorsichtig auflegen und am Rand abschneiden. Mit einer Gabel Kerben in den Rand drücken und die beiden Teigschichten damit verbinden.
5. Das Gesicht mit dem verquirlten Ei bestreichen und den Pie für etwa 15 Minuten backen, dann die Temperatur des Ofens auf 180°C (350°F) reduzieren und für weitere 35-40 Minuten backen. Sollte der Pie zu dunkel werden, mit etwas Alufolie abdecken. Den fertigen Pie aus dem Ofen nehmen und abkühlen lassen.
6. Die Lebensmittelfarbe mit etwas Wasser vermischen und das Gesicht kolorieren, damit es noch etwas gruseliger aussieht. Mit Eis oder Blutsoße (aus Himbeeren) servieren.
Craving more? Keep in touch on Facebook, Instagram and Pinterest for new post updates and more. You can also contact me with any questions or inquiries!
Here is a version of the recipe you can print easily.
Print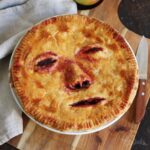
Halloween Apple Pie »Face/Off«
- Prep Time: 00:35
- Cook Time: 00:55
- Total Time: 02:30
- Yield: 1 1x
- Category: Pie
- Method: -
- Cuisine: United States
- Diet: Vegetarian
Description
A super delicious apple pie that might not look quite like what you’re used to… It’s sure to give you a few heart-stopping moments at Halloween!
Ingredients
For the dough:
2 1/2 cups (325g) all-purpose flour*
1/2 tsp. salt
1 cup (230g) cold butter
1/2 cup (120ml) ice water
1 tsp. apple cider vinegar*
For the filling:
5-6 medium apples
3-4 tbsp. lemon juice
2 tbsp. butter
2 tbsp. all-purpose flour*
1/4 cup (60ml) apple juice* (naturally cloudy)
1/2 cup (100g) sugar
1/4 cup (50g) brown sugar
1/4 tsp. salt
1 tsp. ground cinnamon*
2 tbsp. soft wheat semolina*
1 egg for brushing
some red/green food color*
a fine brush
Instructions
1. Mix the flour with the salt in a large bowl. Add the cold butter in small pieces and mix. Cut the butter with a pastry blender into pea-sized pieces. Mix the ice water with vinegar and add gradually to the bowl, mix until the dough starts coming together. Do not knead much, the dough should not be too wet or sticky – it should just hold together. Wrap in plastic wrap and place in the fridge for at least 1 hour.
2. Roll out half of the dough on a floured surface to a round circle that is slightly larger than a pie dish (23cm)* – keeps the rest of the dough in the fridge. Transfer the dough to the pie dish and press it to the bottom and sides – the dough should overlap slightly. Prick with a fork several times and place in the fridge for about 30 minutes.
3. Peel and core the apples. Cut into thin slices, add to a bowl and mix with the lemon juice so the apples won’t brown. Set aside. Add the butter to a large pot and bring to a boil. Add the flour and mix until you get a thick paste. Next, add the apple juice and mix it in. Add both sugars, cinnamon, and salt and mix until well combined. Add the apples and mix. Reduce the heat and let simmer for 2-3 minutes. Take off the heat and let it cool down a bit.
4. Preheat the oven to 200°C (400°F). Take the remaining dough out of the fridge and keep a bit for the eyes and nose and roll out the rest on a floured surface to a circle with the size of the pie dish. Form the nose and place in the middle. Make rolls out of dough for the eyes and place them on the face. Forming and making the parts stick to the dough circle works best with a small spatula and a wooden skewer to get everything in shape. Cut a hole where the mouth should be and form lips. Sprinkle the semolina on top of the dough in the pie dish and fill in the cooled apple filling, smooth out the top. Whisk the egg and brush the sides of the dough in the pie dish. Carefully place the face on top of the apples and press down on the sides. Cut off excess dough and use a fork to press the edges together and to get a nice pattern around the pie.
5. Brush the top (the face) with the egg wash and bake the pie for about 15 minutes. Then reduce the heat to 180°C (350°F) and bake the pie another 35-40 minutes until the pie got a nice golden color. If it gets too dark, cover it with some aluminum foil. Take out the pie and let it cool down completely.
6. To finish the pie, mix the food color with some water and give the face a nice »makeup« by making the nostrils darker, the mouth, eyes, etc. so it looks even scarier. Serve with your favorite ice cream or some bloody sauce (raspberry sauce of course)!
Notes
Enjoy baking and decorating the pie!
Links marked with an asterisk (*) are affiliate links (advertising/Werbung) to Amazon Germany. If you click on one of those links and buy something via this link, I will get a commission for that sale. The price of whatever you buy is not affected in any way by this.


This is fantastic!! Perfectly creepy Halloween dessert ;)
I love this soooo much!! I’m making this for Halloween! so clever