
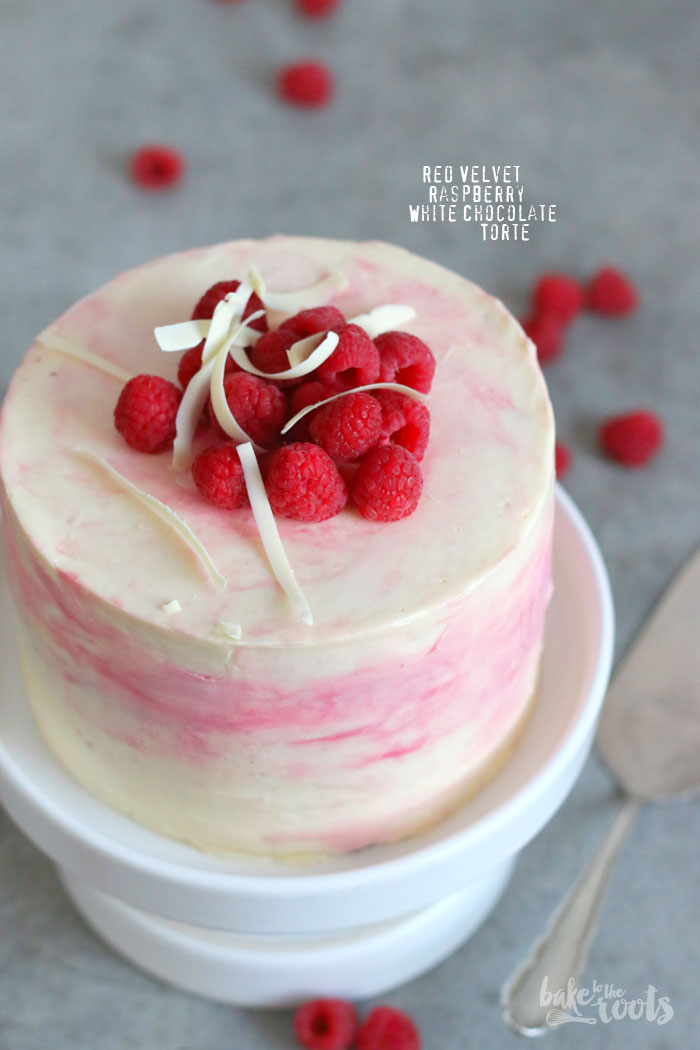
Raspberries are in season when it’s the hottest in summer. Firing up the oven to bake a Red Velvet Raspberry White Chocolate Cake may not be everyone’s cup of tea, but if you want something delicious, you just have to do it. You can’t live on no-bake cakes alone in summer. ;P
This little delight was baked at a time when our kitchen under the roof was extremely warm. Pretty much like a Finnish sauna. Unfortunately, twenty years ago, when they converted the attic into an apartment, they forgot to install some air conditioning. Big mistake. Huge! Since Berlin is getting warmer and warmer, this is getting somewhat problematic now…
Well, we either get used to it and suffer in silence, or get a mobile air condition you can move from room to room. Thanks a lot, climate change! ;P
To be honest, the buttercream on top of the cake was quite happy about the temperatures, it seems – it nestled around the cake layers better than ever. However, I have to mention it could have been problematic if there was no fridge to cool down the cake in between steps.
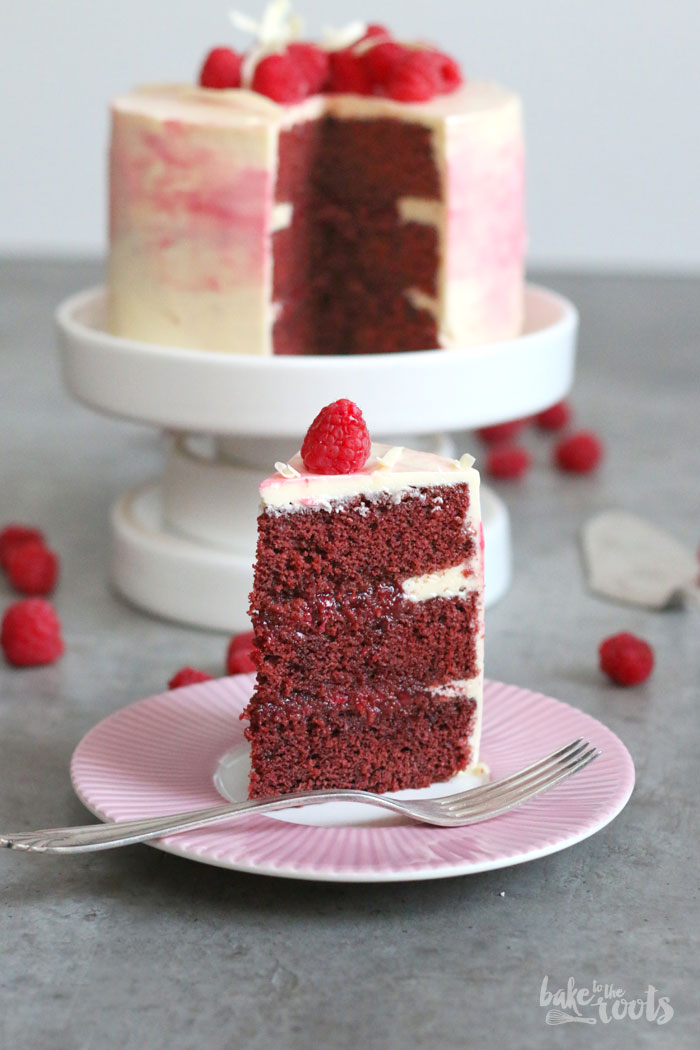
As you can see in the photos of the slice, the buttercream between the cake layers is quite thin. There is more raspberry filling than buttercream. Some like it, some don’t. If you want a thicker buttercream layer, simply prepare more buttercream. The amount in the recipe is just enough to do the cake as it is. ;) We don’t like leftovers, so we hardly make more than needed. Adapting the amount of buttercream is easy, though. Just multiply the weights/amounts of the ingredients with 1.5, for example, and you have enough to get thicker layers…
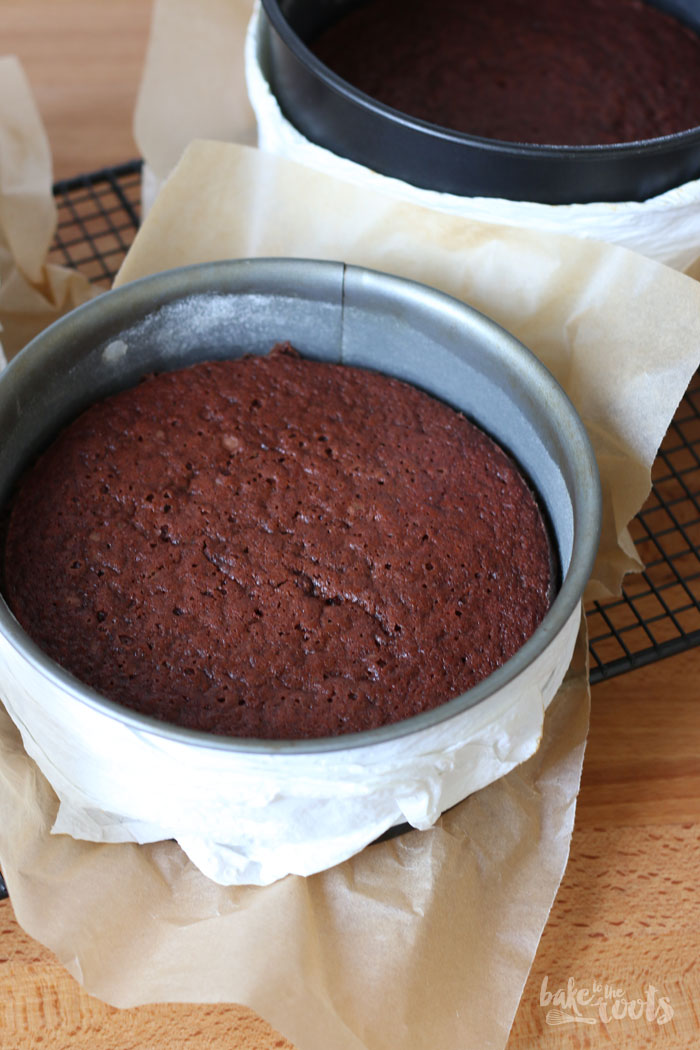
Talking about leftovers and maybe avoiding them… If you bake more often, you probably know the problem of doming cakes. Something you actually want to avoid when baking cakes. It just does not look nice when cutting into a cake, and then you see uneven cake layers. That’s why many bakers cut off those domes. There is a simple trick to avoid cakes developing a domed top while baking: simply place damp baking strips* or damp kitchen paper around the tin and then bake your cakes as usual. The baking strips or kitchen paper keep the heat away from the cake batter. This means that the cake does not get baked immediately around the edges and has more time to rise – which in turn leads to flatter cakes. Don’t worry when using those strips or plain kitchen paper – both will dry out during baking, but none of them will bust into flames. All safe here. ;P
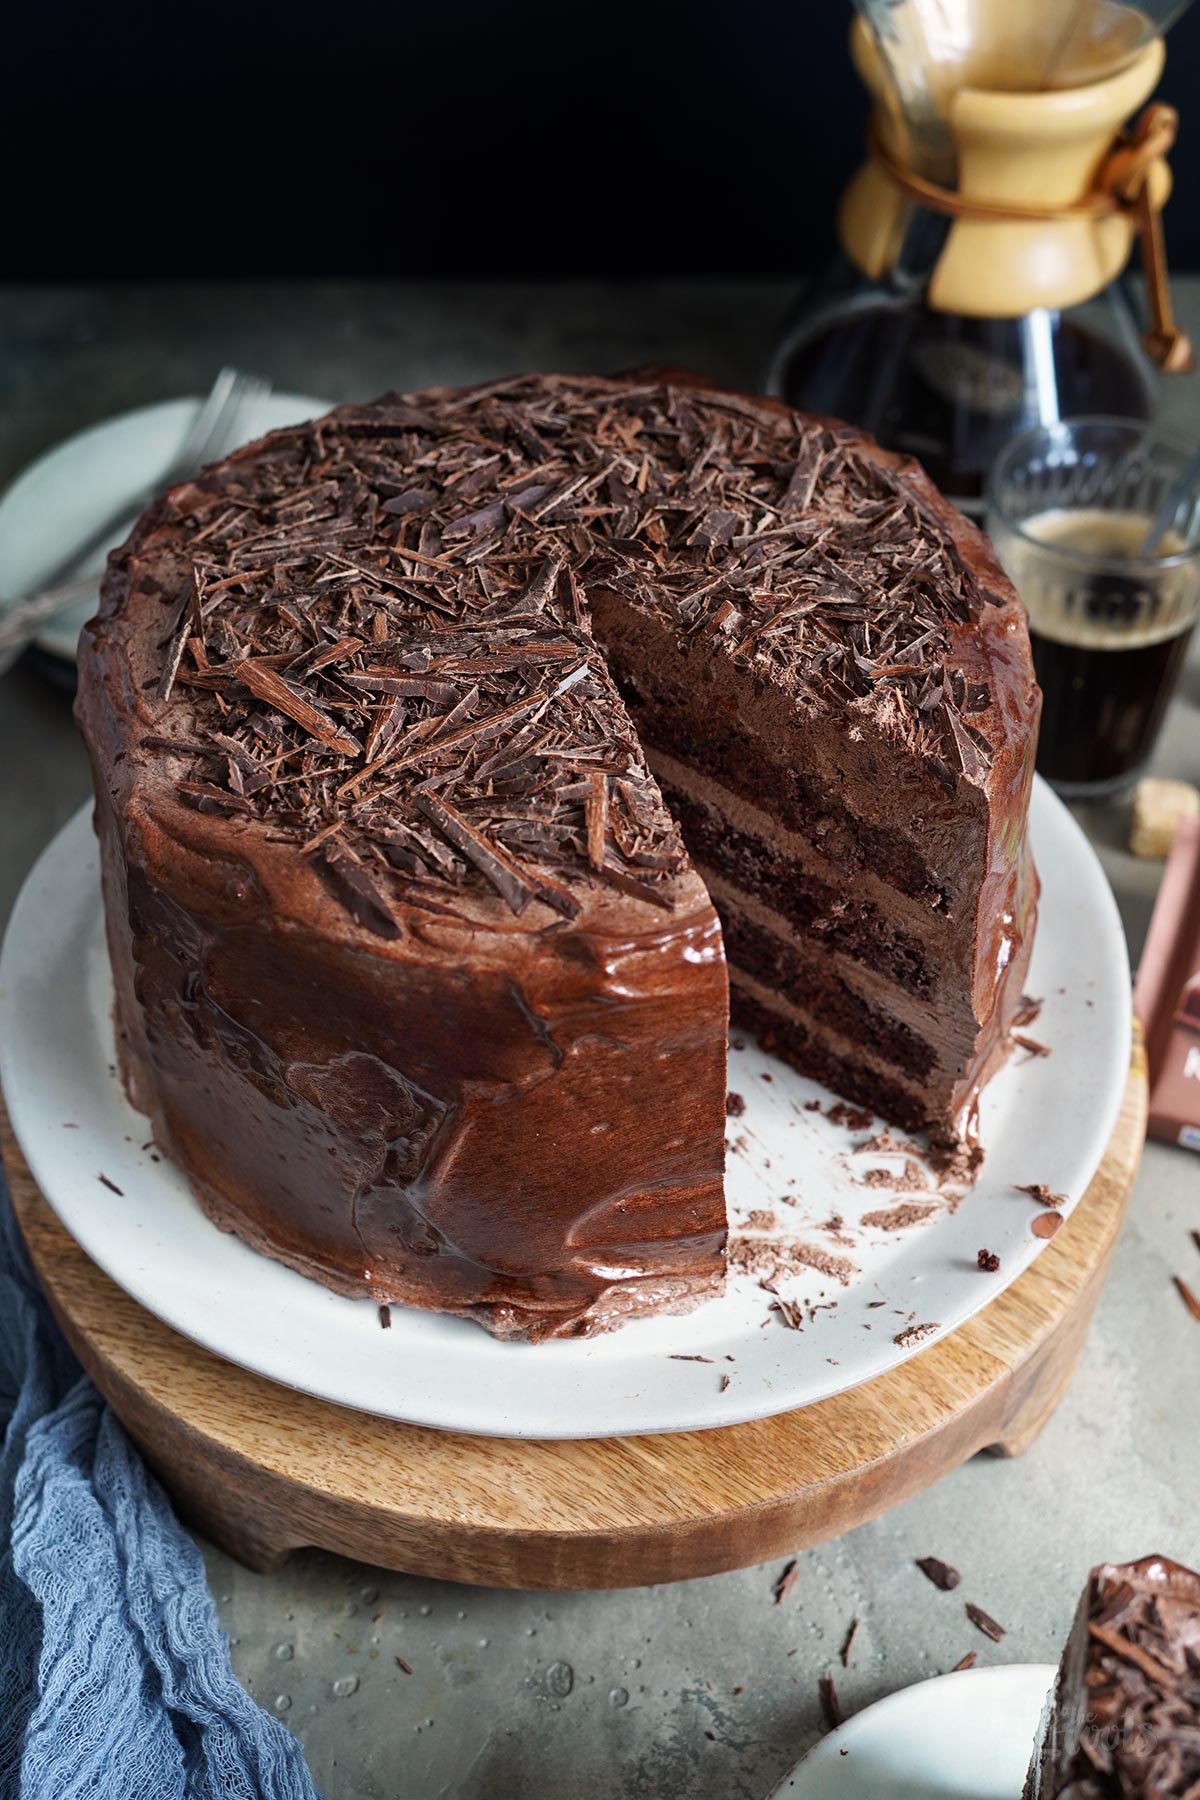
Well, we really like smaller cakes like this one here. We rarely need large cakes for a bunch of people, because we prefer to get together in smaller groups at home. ;P If you prefer smaller cakes as well, you should take a look at these two cakes here as well. Our Coffee Cocoa Mousse Chocolate Cake is a small(er) cake and the absolute highlight for all chocoholics!
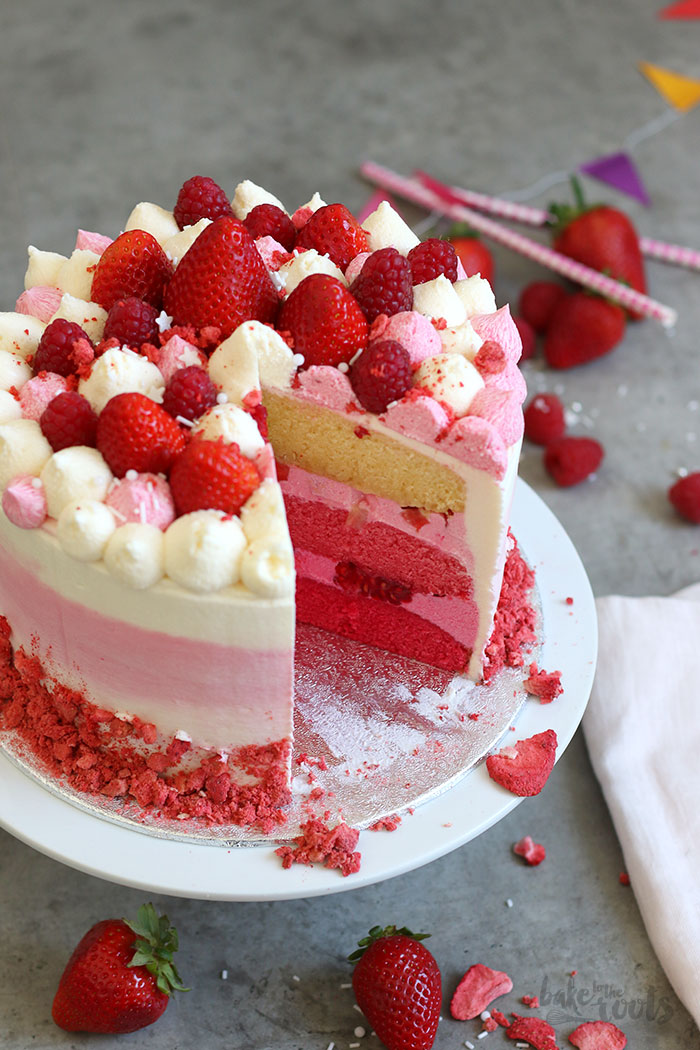
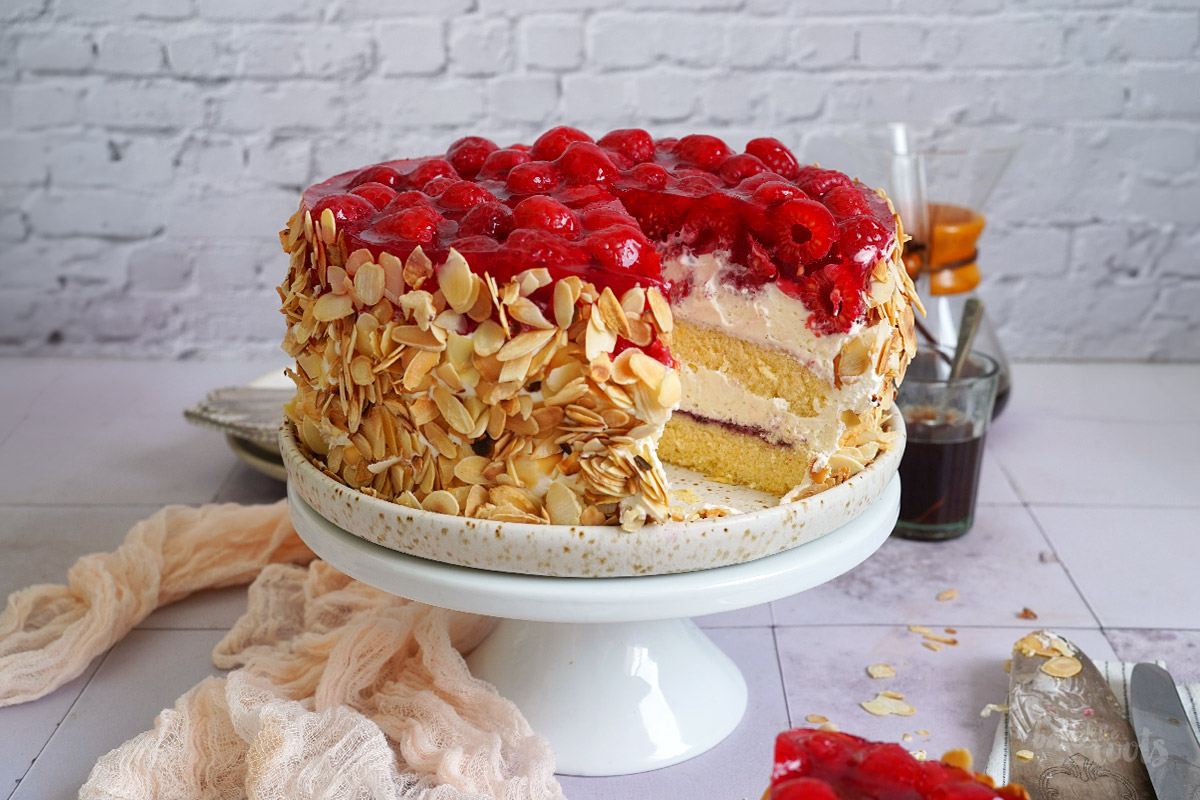
If you prefer some fresh berries, take a look at our Strawberry Raspberry Ombre Cake. So cute and so delicious! As you can see on the pictures with the cake slice, we did not know about that baking strip trick back then, and we did not care enough about symmetry or stuff like that to cut the cake layers evenly. ;P
INGREDIENTS / ZUTATEN
For the cake:
1 cup (240ml) milk
1 tbsp. white wine vinegar
red food coloring*
1/2 cup (120g) butter, at room temperature
1 1/4 cups (250g) sugar
2 large eggs
1 tsp. vanilla extract
1 1/2 cups (200g) all-purpose flour
1/3 cup (45g) cornstarch
2 tbsp. cocoa powder
1 tsp. baking soda
1/2 tsp. salt
For the buttercream:
3.5 oz. (100g) egg whites (about 3 eggs)
1 1/2 cups (150g) sugar
6.7 oz. (190g) butter, at room temperature
1 pinch of salt
1/2 tsp. vanilla extract
3.5 oz. (100g) white chocolate, melted and cooled
some drops pink food coloring* (optional)
For the filling:
3,5 oz. (100g) fresh raspberries
3,5 oz. (100g) raspberry marmalade
For the decoration:
some fresh raspberries
some white chocolate, grated
Für den Kuchen:
240ml Milch
1 EL Weißweinessig
rote Lebensmittelfarbe*
120g weiche Butter
250g Zucker
2 Eier (L)
1 TL Vanille Extrakt
200g Mehl
45g Speisestärke
2 EL Kakaopulver
1 TL Natron
1/2 TL Salz
Für die Buttercreme:
100g Eiweiß (etwa 3 Eier)
150g Zucker
190g weiche Butter
1 Prise Salz
1/2 TL Vanille Extrakt
100g Weiße Schokolade, geschmolzen und abgekühlt
ein paar Tropfen rosa Lebensmittelfarbe* (optional)
Für die Füllung:
100g frische Himbeeren
100g Himbeermarmelade
Für die Dekoration:
einige frische Himbeeren
etwas weiße Schokolade, Abrieb
DIRECTIONS / ZUBEREITUNG
1. Preheat the oven to 180°C (350°F). Line three 18cm springform tins* with baking parchment, grease them lightly and dust with some flour. Set aside.
2. Combine milk, vinegar, and some red food coloring and let the mixture thicken for about 5-8 minutes. You decide how red you want the cake, but for a strong color, you need quite a lot of food coloring.
3. Add the butter and sugar to a large bowl and mix until very light and fluffy. Add the eggs one at a time and mix well after each addition. Next, add the vanilla extract and stir in. Combine flour, cornstarch, cocoa powder, baking soda, and salt. Add these dry ingredients in several batches to the bowl, alternating with the (red) milk mixture – stir until just combined and do not overmix. Divide the batter evenly among the springform tins and bake the cakes for about 25-30 minutes – or until a toothpick inserted into the center of the cakes comes out clean. Take the cakes out of the oven and let them cool down for a moment inside the tins, then remove and let cool down completely on a wire rack.
4. For the buttercream, melt the white chocolate and let it cool down again. Add the egg whites and sugar to a heatproof bowl and place that on top of a saucepan with simmering water – the water should not touch the bowl though. Stir and heat the egg white mixture until it reaches a temperature of 71°C (160°F) and the sugar has dissolved completely.
5. Pour the mixture into the bowl of a food processor and mix on high for about 8-10 minutes until a thick, shiny meringue mixture has formed. It should only be lukewarm at best. If you don’t have a food processor, you can use a hand mixer as well, of course.
6. Gradually add the butter in small pieces to the bowl, adding more only when the butter previously added has been completely incorporated. Once all the butter has been used, add the salt and vanilla extract and continue mixing for about 2 minutes. Next, add the melted chocolate and mix for about 4-5 minutes longer.
7. Mix the raspberries for the filling with the raspberry jam, crushing the raspberries while mixing. You want a thick raspberry mixture.
8. Once the cake layers have cooled, the buttercream is ready, and the filling is prepared, you can start assembling the cake. Place the first cake layer on a serving plate and spread a thin layer of buttercream on top. Add some buttercream to a piping bag with a large round nozzle and pipe a ring/boarder of buttercream around the edge of the cake layer. Spread half of the raspberry filling evenly inside this ring/boarder, then place the second cake layer on top and press it down lightly. Repeat the process and spread a little buttercream on top of the second cake layer, pipe a ring and spread the remaining raspberry filling inside that ring. Place the last cake layer on top, press it down, and then coat the whole cake with a thin layer of buttercream. Place the cake in the fridge for about 30 minutes.
9. Coat the chilled cake with the remaining buttercream. If you want a light pink marble effect, as shown in the pictures, simply color a teaspoon of the buttercream with a little food coloring, spread it all over the cake, and then simply smooth it out. Decorate the finished cake with fresh raspberries and white chocolate to your liking.
Note:
The cake layers can be baked a day in advance. Simply wrap them loosely in plastic until needed to prevent them from drying out.
1. Den Ofen auf 180°C (350°F) Ober-/Unterhitze vorheizen. Drei 18cm Springformen* mit Backpapier auslegen, leicht einfetten und mit Mehl ausstauben.
2. Die Milch mit Essig und etwas roter Lebensmittelfarbe vermischen und für etwa 5-8 Minuten andicken lassen. Je nachdem wie rot ihr den Kuchen haben wollt, desto mehr Farbe muss rein. Für ein kräftiges Rot muss einiges rein!
3. Die Butter mit dem Zucker in einer großen Schüssel hell und luftig aufschlagen. Die Eier einzeln dazugeben und jeweils gut unterrühren. Den Vanille Extrakt dazugeben und unterrühren. Mehl mit Stärke, Kakao, Natron und Salz vermischen. Die Mehlmischung in mehreren Portionen, abwechselnd mit der roten Milchmischung zur Schüssel dazugeben und nur jeweils nur kurz unterrühren. Den Teig gleichmäßig auf die Backformen verteilen und dann für etwa 25-30 Minuten backen. Mit einem Zahnstocher testen, ob noch Teig kleben bleibt und die Kuchen erst herausholen, wenn dieser sauber herauskommt. Die Kuchen aus dem Ofen nehmen, in den Formen ein wenig abkühlen lassen, dann herauslösen und auf einem Kuchengitter komplett auskühlen lassen.
4. Für die Buttercreme die weiße Schokolade schmelzen und wieder abkühlen lassen. Das Eiweiß und den Zucker in die hitzebeständige Schüssel geben und auf einen Topf mit köchelndem Wasser stellen – das Wasser sollte die Schüssel nicht berühren. Die Eiweißmischung so lange rühren und erwärmen, bis eine Temperatur von 71°C (160°F) erreicht ist und sich der Zucker komplett aufgelöst hat.
5. Die Mischung in die Schüssel einer Küchenmaschine schütten und für etwa 8-10 Minuten auf höchster Stufe aufschlagen, bis eine dicke, glänzende Baisermasse entstanden ist, die nur noch maximal handwarm ist. Wer keine Küchenmaschine hat, kann hier natürlich auch mit einem Handrührgerät arbeiten.
6. Die Butter in kleinen Stücken nach und nach zur Schüssel dazugeben und immer erst nachlegen, wenn die Butter komplett eingearbeitet wurde. Wenn die Butter komplett verarbeitet wurde, das Salz und den Vanille Extrakt dazugeben und alles für etwa 2 Minuten weiter aufschlagen. Als Nächstes die geschmolzene Schokolade dazugeben und alles noch einmal etwa 4-5 Minuten aufschlagen.
7. Die Himbeeren für die Füllung mit der Himbeermarmelade vermengen und die Himbeeren dabei zerdrücken – es sollte eine dickflüssige Himbeermasse entstehen.
8. Wenn die Kuchenschichten abgekühlt sind, die Buttercreme fertig aufgeschlagen ist und die Füllung bereitsteht, kann es mit dem Zusammenbau der Torte losgehen. Dazu eine erste Kuchenschicht auf eine Servierplatte setzen und eine dünne Schicht Buttercreme darauf verstreichen. Etwas Buttercreme in einen Spritzbeutel mit großer runder Tülle einfüllen und dann am Rand der Kuchenschicht einen Ring Creme aufspritzen. Innerhalb dieses Rings die Hälfte der Himbeermasse gleichmäßig verteilen und dann eine zweite Kuchenschicht auflegen und leicht festdrücken. Auch hier wieder alles mit ein wenig Buttercreme bestreichen, einen Ring aufspritzen und die verbliebene Himbeerfüllung im Ring verteilen. Die letzte Kuchenschicht auflegen, leicht festdrücken und dann die Torte mit einer dünnen Schicht Buttercreme einstreichen. Die Torte für etwa 30 Minuten in den Kühlschrank stellen.
9. Die gekühlte Torte mit der verbliebenen Buttercreme einstreichen. Wer eine leicht pinke Marmorierung, wie auf den Fotos möchte, kann einfach einen Teelöffel der Creme mit etwas Lebensmittelfarbe einfärben, rundum verteilt auf die Torte auftragen und dann einfach verstreichen. Die fertige Torte nach Belieben mit frischen Himbeeren und weißer Schokolade dekorieren.
Tipp:
Die Kuchenschichten können einen Tag im Voraus gebacken werden. Bis zur Verwendung einfach locker in Klarsichtfolie einschlagen, damit sie nicht austrocknen.

Craving more? Keep in touch on Facebook, Instagram and Pinterest for new post updates and more. You can also contact me with any questions or inquiries!
Here is a version of the recipe you can print easily.
Print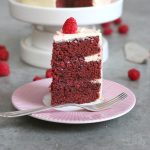
Red Velvet Raspberry White Chocolate Torte
- Prep Time: 01:00
- Cook Time: 00:30
- Total Time: 03:00
- Yield: 1 1x
- Category: Cake
- Cuisine: American
- Diet: Vegetarian
Description
Raspberries and white chocolate are a winning combination – especially in this little cake. It’s the perfect cake to celebrate something special! :)
Ingredients
For the cake:
1 cup (240ml) milk
1 tbsp. white wine vinegar
red food coloring*
1/2 cup (120g) butter, at room temperature
1 1/4 cups (250g) sugar
2 large eggs
1 tsp. vanilla extract
1 1/2 cups (200g) all-purpose flour
1/3 cup (45g) cornstarch
2 tbsp. cocoa powder
1 tsp. baking soda
1/2 tsp. salt
For the buttercream:
3.5 oz. (100g) egg whites (about 3 eggs)
1 1/2 cups (150g) sugar
6.7 oz. (190g) butter, at room temperature
1 pinch of salt
1/2 tsp. vanilla extract
3.5 oz. (100g) white chocolate, melted and cooled
some drops pink food coloring* (optional)
For the filling:
3,5 oz. (100g) fresh raspberries
3,5 oz. (100g) raspberry marmalade
For the decoration:
some fresh raspberries
some white chocolate, grated
Instructions
1. Preheat the oven to 180°C (350°F). Line three 18cm springform tins* with baking parchment, grease them lightly and dust with some flour. Set aside.
2. Combine milk, vinegar, and some red food coloring and let the mixture thicken for about 5-8 minutes. You decide how red you want the cake, but for a strong color, you need quite a lot of food coloring.
3. Add the butter and sugar to a large bowl and mix until very light and fluffy. Add the eggs one at a time and mix well after each addition. Next, add the vanilla extract and stir in. Combine flour, cornstarch, cocoa powder, baking soda, and salt. Add these dry ingredients in several batches to the bowl, alternating with the (red) milk mixture – stir until just combined and do not overmix. Divide the batter evenly among the springform tins and bake the cakes for about 25-30 minutes – or until a toothpick inserted into the center of the cakes comes out clean. Take the cakes out of the oven and let them cool down for a moment inside the tins, then remove and let cool down completely on a wire rack.
4. For the buttercream, melt the white chocolate and let it cool down again. Add the egg whites and sugar to a heatproof bowl and place that on top of a saucepan with simmering water – the water should not touch the bowl though. Stir and heat the egg white mixture until it reaches a temperature of 71°C (160°F) and the sugar has dissolved completely.
5. Pour the mixture into the bowl of a food processor and mix on high for about 8-10 minutes until a thick, shiny meringue mixture has formed. It should only be lukewarm at best. If you don’t have a food processor, you can use a hand mixer as well, of course.
6. Gradually add the butter in small pieces to the bowl, adding more only when the butter previously added has been completely incorporated. Once all the butter has been used, add the salt and vanilla extract and continue mixing for about 2 minutes. Next, add the melted chocolate and mix for about 4-5 minutes longer.
7. Mix the raspberries for the filling with the raspberry jam, crushing the raspberries while mixing. You want a thick raspberry mixture.
8. Once the cake layers have cooled, the buttercream is ready, and the filling is prepared, you can start assembling the cake. Place the first cake layer on a serving plate and spread a thin layer of buttercream on top. Add some buttercream to a piping bag with a large round nozzle and pipe a ring/boarder of buttercream around the edge of the cake layer. Spread half of the raspberry filling evenly inside this ring/boarder, then place the second cake layer on top and press it down lightly. Repeat the process and spread a little buttercream on top of the second cake layer, pipe a ring and spread the remaining raspberry filling inside that ring. Place the last cake layer on top, press it down, and then coat the whole cake with a thin layer of buttercream. Place the cake in the fridge for about 30 minutes.
9. Coat the chilled cake with the remaining buttercream. If you want a light pink marble effect, as shown in the pictures, simply color a teaspoon of the buttercream with a little food coloring, spread it all over the cake, and then simply smooth it out. Decorate the finished cake with fresh raspberries and white chocolate to your liking.
Notes
The cake layers can be baked a day in advance. Simply wrap them loosely in plastic until needed to prevent them from drying out.
Links marked with an asterisk (*) are affiliate links (advertising/Werbung) to Amazon Germany. If you click on one of those links and buy something via this link, I will get a commission for that sale. The price of whatever you buy is not affected in any way by this.


Hi Marc,
thinking of baking this beautiful cake for Christmas. We are 6 adults and 4 kids. Should you double the ingredients? Need your advise … Best, Elina
Hi. The cake as it is is quite small. I would double with that many people.
Cheers Marc