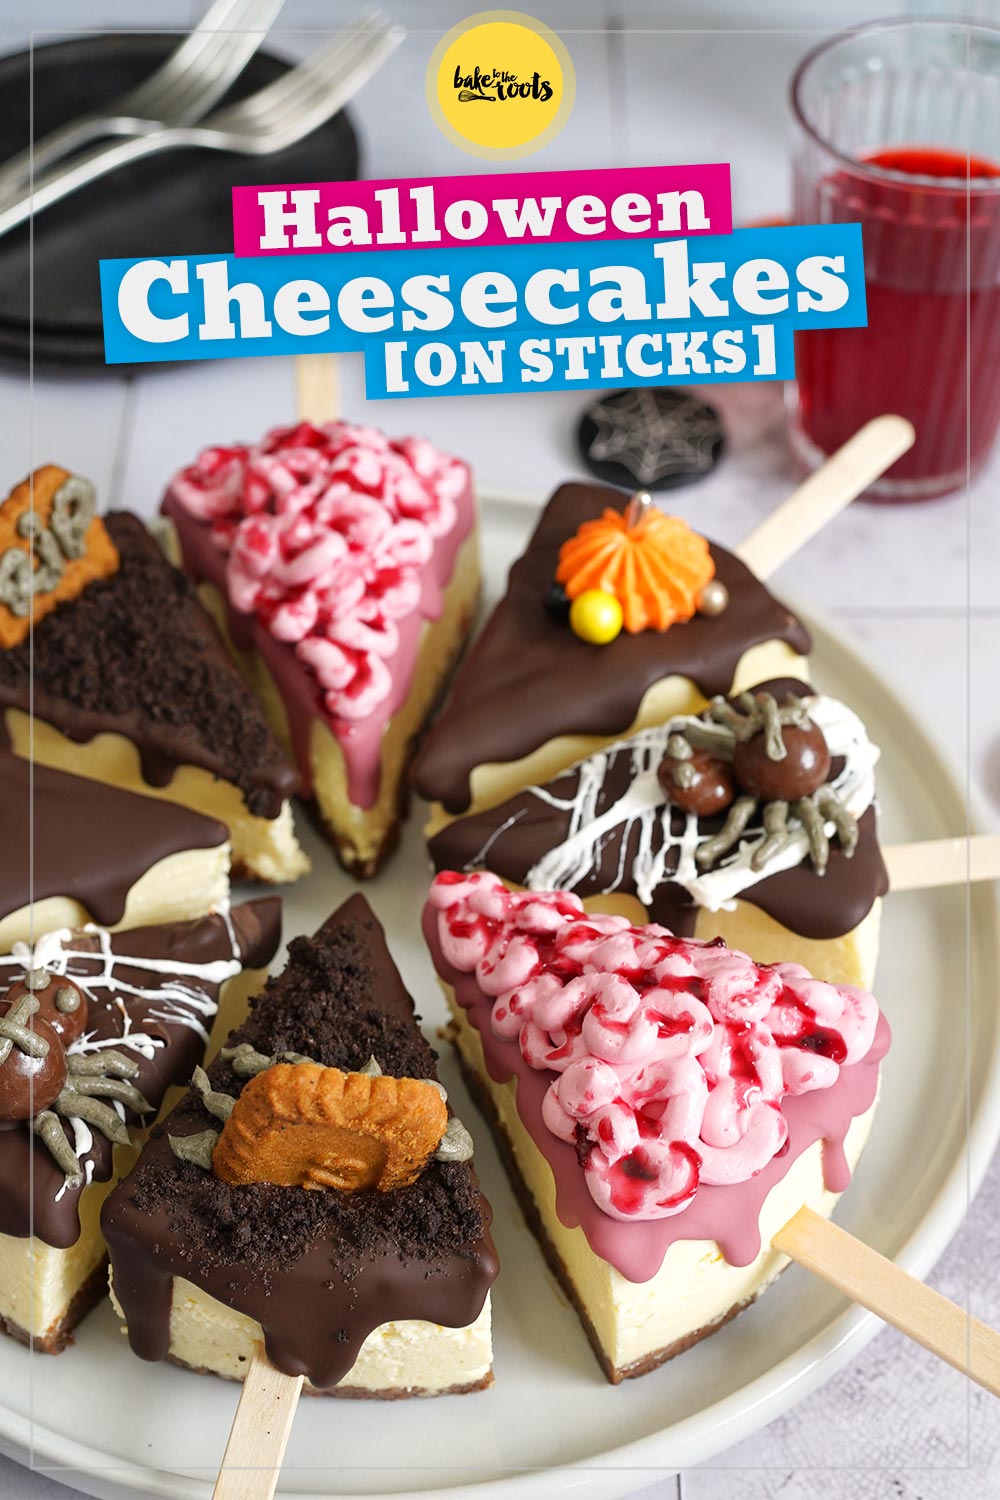
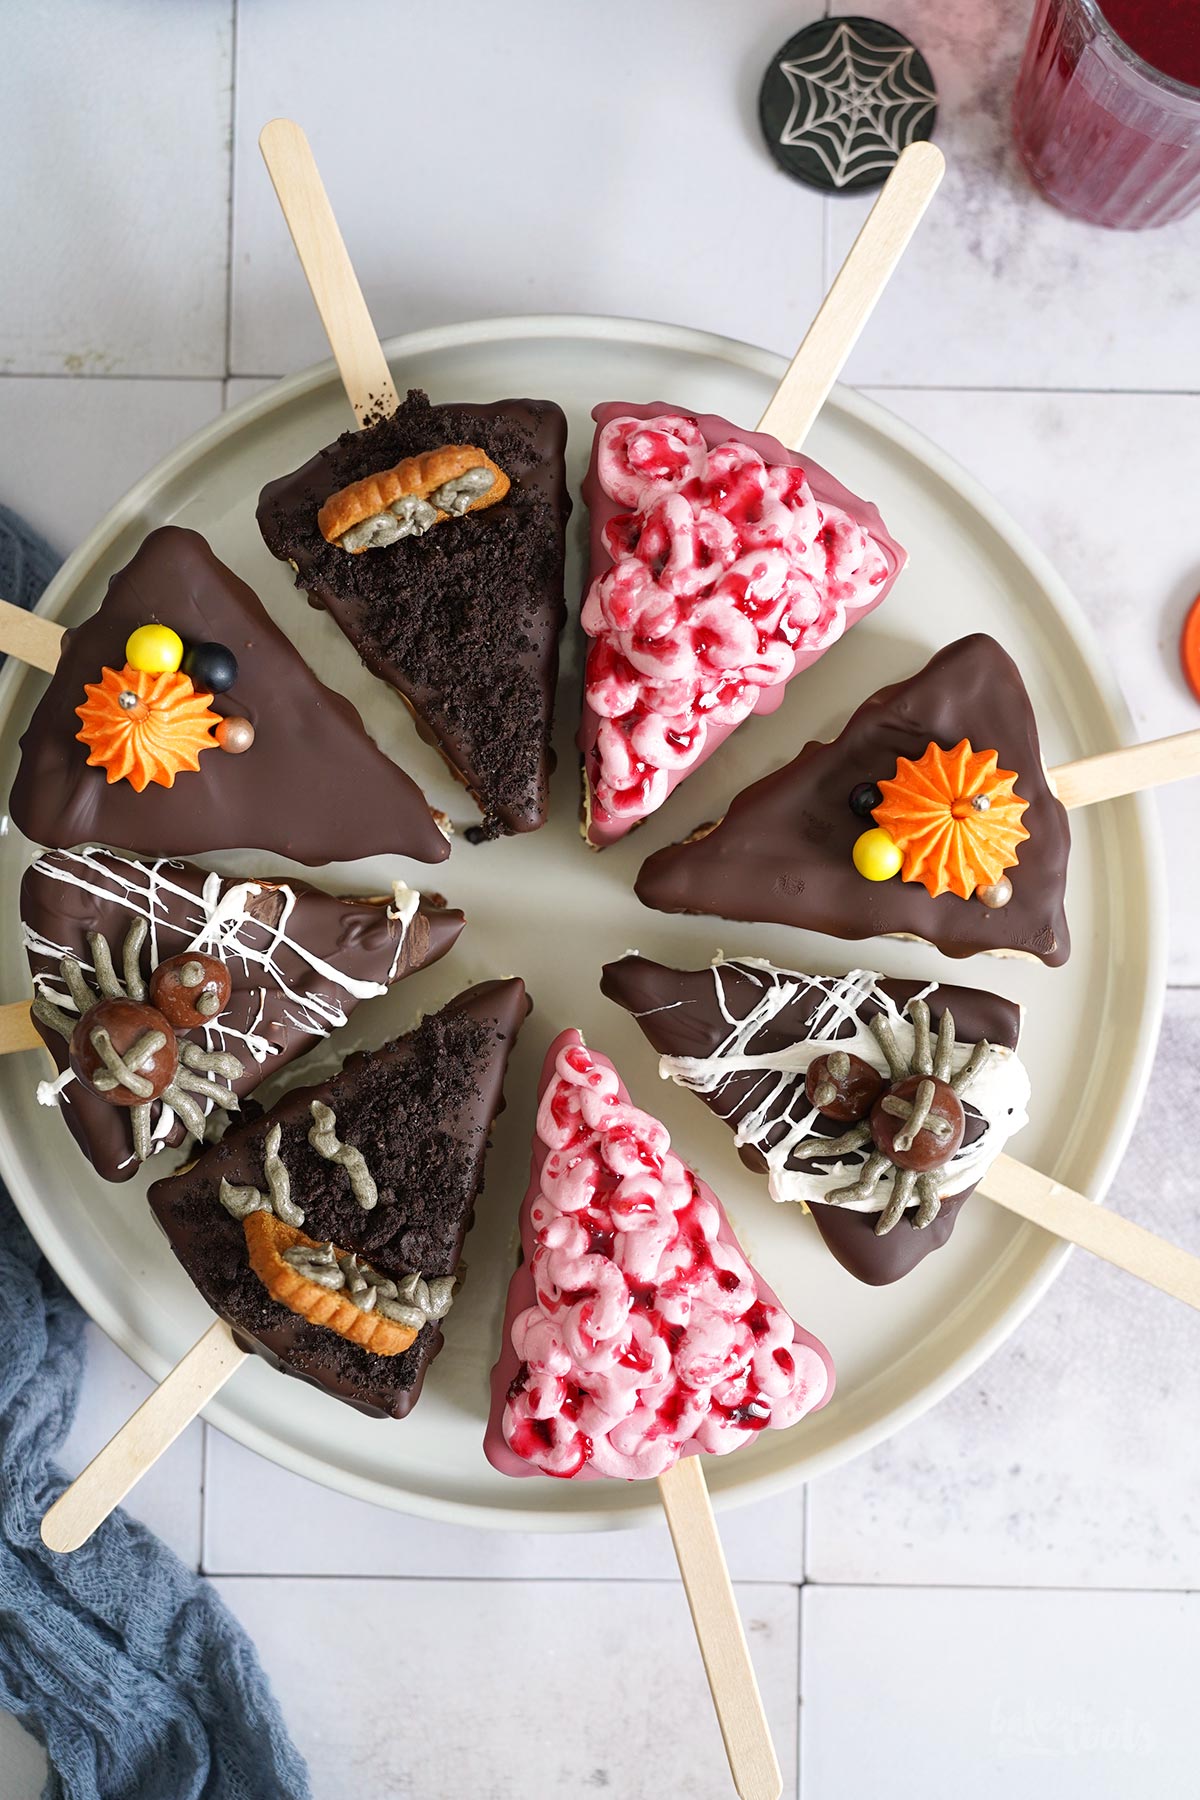
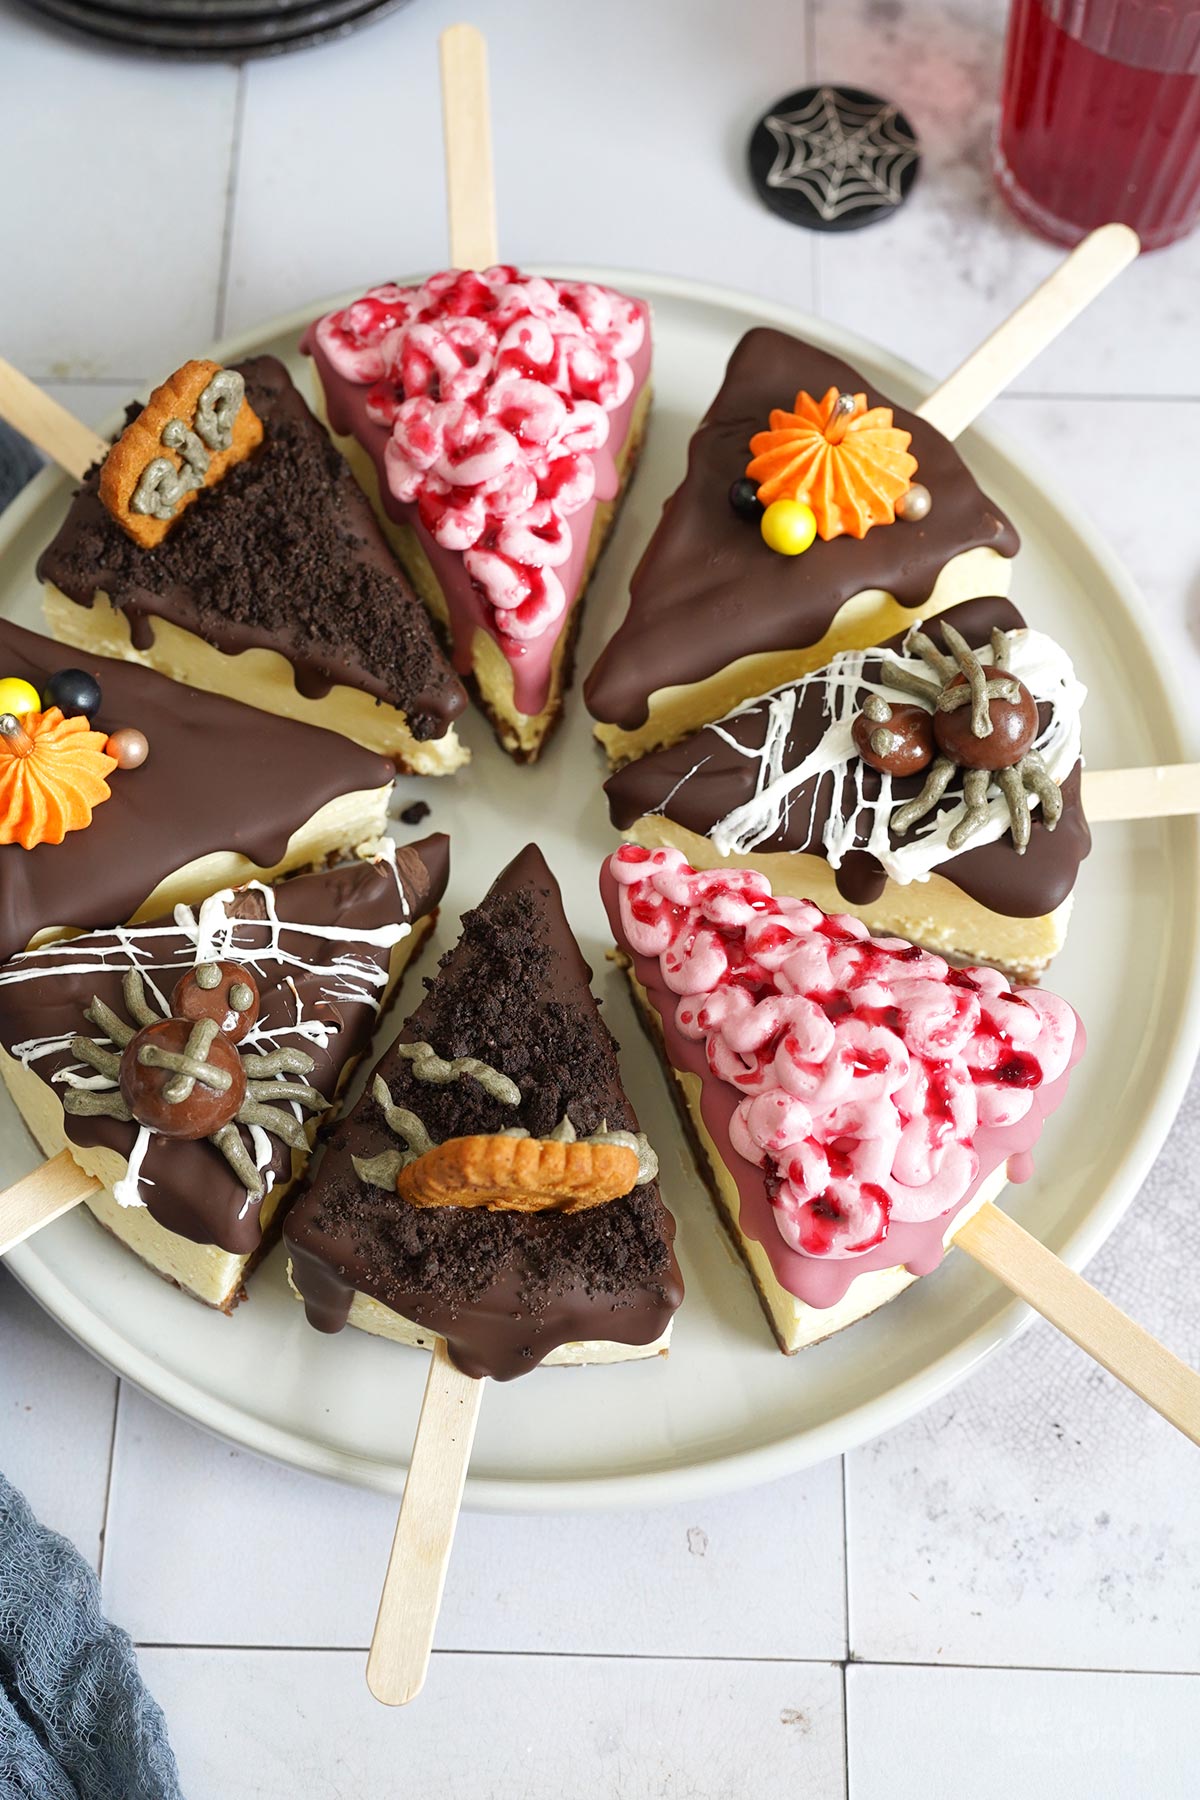
Halloween is coming up soon. We are not decorating anything and we are also not throwing a party… but we like to bake spooky stuff. Simply because it’s fun! Today I’ve given delicious Cheesecake on Sticks a little makeover. Anyone can decorate them beautifully with colorful sprinkles, berries, and fruits. I used gravestones, caught some spiders, and cut open some brains for my decorations. Muharrharr… ;P
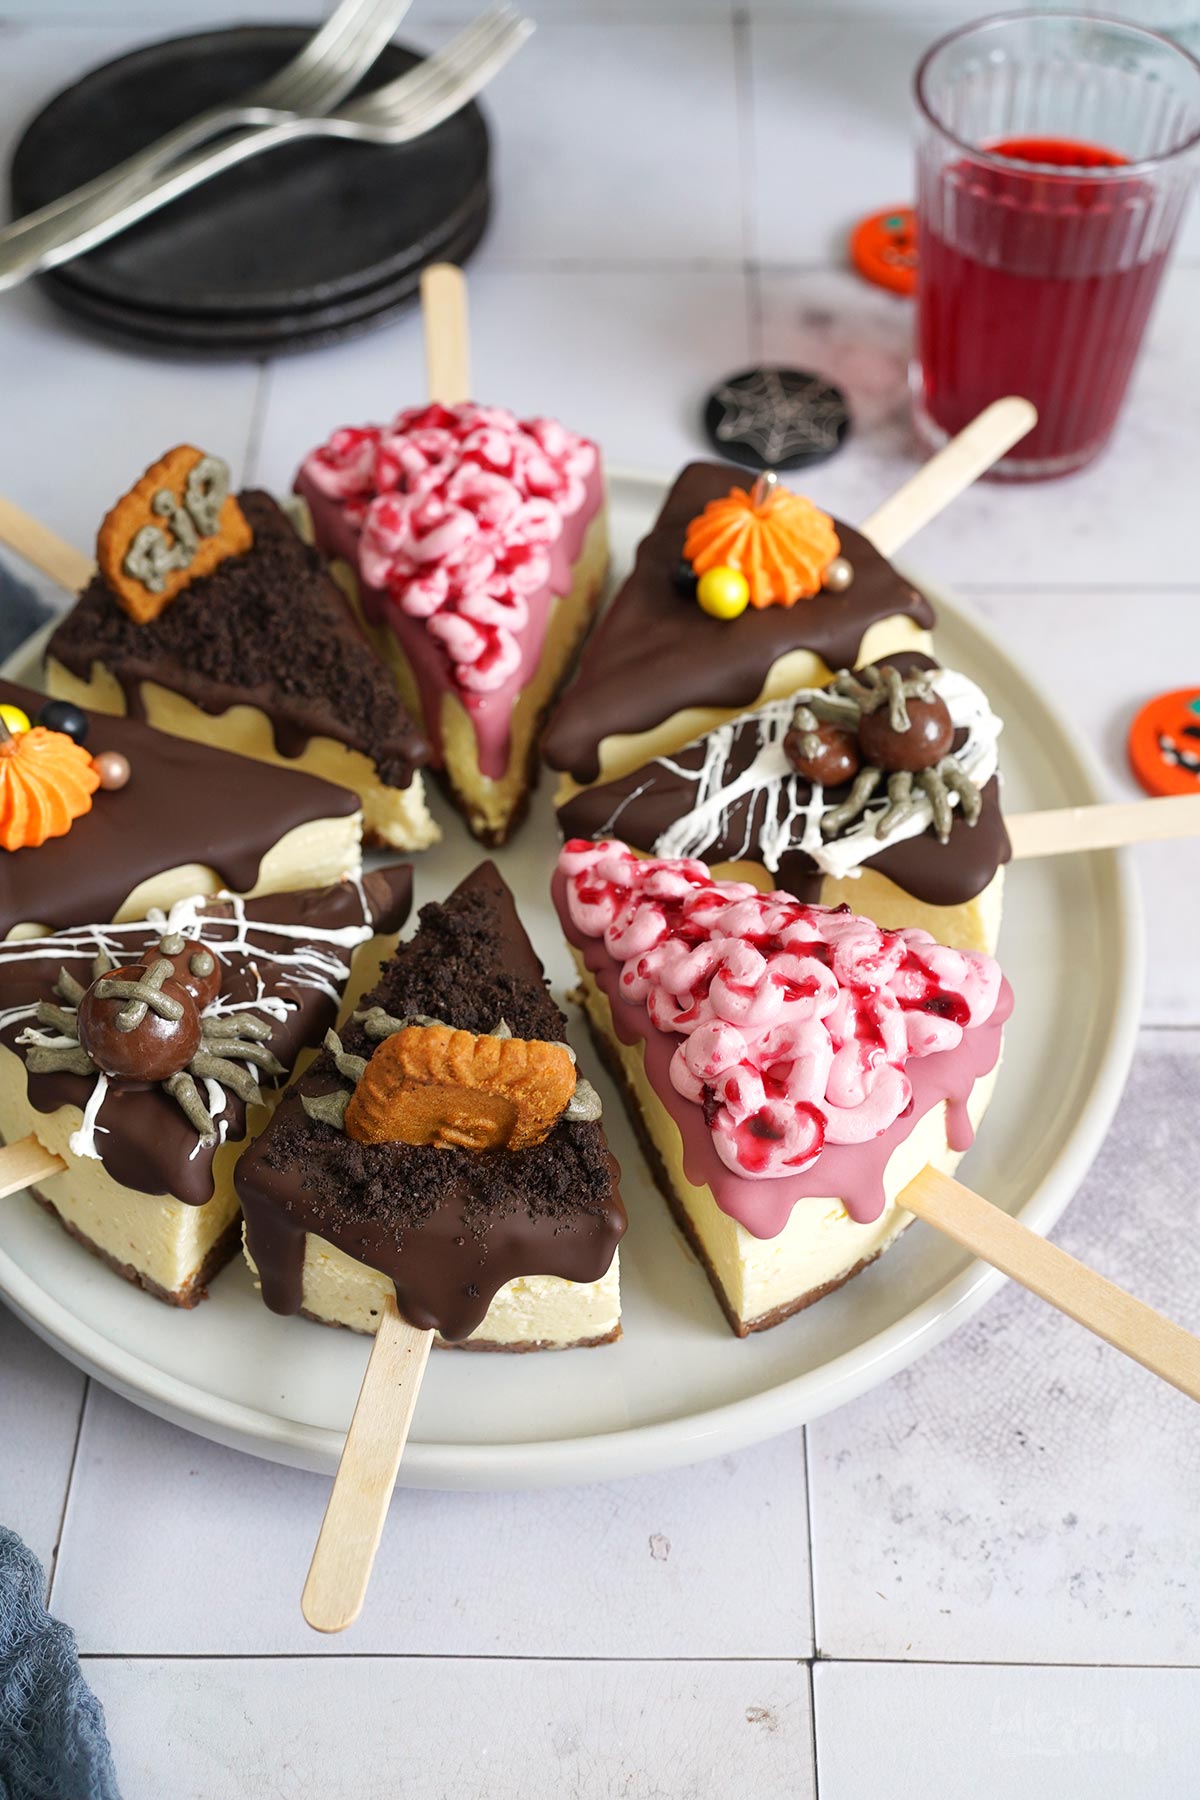
No seriously. I’m really not a big Halloween fan. I am also not super into horror movies tbh. The last time I went to a Halloween party – no clue. Many moons ago. Dressing up for Halloween… probably even longer ago ;P But that doesn’t mean I don’t take this “holiday” as an opportunity to use some (berry) blood every now and then and turn the kitchen into a slaughterhouse. I love decorating cakes and stuff like that. If you end up with something unusual where people say “WTF!”… great! ;P
Instead of decorating my “Cheesecakes on Sticks” today with cute stuff and in bright colors, I used chocolate spiders, cookie tombstones, and buttercream brains. All edible and delicious, of course! ;)
The decorations you can see here are (as always) only a few of many possibilities. Let your imagination run wild here. There is so much you can do… little funny or creepy ghosts made with buttercream, you can “mummify” the cheesecakes with strings of buttercream or do something with bats, for example. I am pretty sure you can come up with something cool too!
Give it a try. Funny or creepy – it will taste good no matter what because the cheesecakes are damn delicious anyway. Unless… you use something like dill pickles or other savory stuff to decorate. Though it could be funny to surprise your guests with weird flavor combinations as well ;P
INGREDIENTS / ZUTATEN
3.5 oz. (100g) chocolate butter cookies (or caramel cookies)
1 oz. (30g) butter, melted
For the filling:
21 oz. (600g) cream cheese, at room temperature
3.5 oz. (100g) mascarpone, room temperature
1/2 cup (100g) sugar (or xylitol)
2 medium eggs, at room temperature
2 tbsp. heavy cream
1 tsp. vanilla extract
For the decoration:
8 popsicle sticks
some buttercream (pink, orange, brown, or black)
3.5 oz. (100g) dark chocolate coating
1.8 oz. (50g) candy melts (pink) or ruby chocolate
some coconut oil
some cherry sauce
some marshmallows
some cookies (e.g. Oreos and Biscoff cookies)
some chocolate-covered nuts & rains
some sprinkles
100g Schoko Butterkekse (oder Karamellkekse)
30g Butter, geschmolzen
Für die Füllung:
600g Frischkäse, Zimmertemperatur
100g Mascarpone, Zimmertemperatur
100g Zucker (oder Xylit)
2 Eier (M), Zimmertemperatur
2 EL Sahne
1 TL Vanille Extrakt
Für die Dekoration:
8 Holzstäbchen/Eisstiele
etwas Buttercreme (pink, orange, braun oder schwarz)
100g Zartbitter Kuvertüre
50g Candy Melts (Pink) oder Ruby Chocolate
etwas Kokosöl
etwas Kirschsoße
Marshmallows
Kekse (z.B. Oreos und Biscoff Kekse)
schokolierte Nüsse & Rosinen
Zuckerstreusel
DIRECTIONS / ZUBEREITUNG
2. Place the chocolate (or caramel) cookies in a freezer bag and use a rolling pin to crush them – you want fine crumbs. Melt the butter, add to the bag and mix well. Transfer to the springform tin and press down to create a firm and smooth layer.
3. Add the cream cheese, mascarpone, sugar, eggs, and vanilla extract to a bowl and mix until well combined. Transfer to the prepared springform tin and smooth out the top. Now place the wrapped baking tin in a larger baking tin or casserole dish and fill that one with hot water. You want the springform tin with the cheesecake sitting in water, about halfway up the sides of the tin. Place in the center of the oven and bake for about 60-70 minutes. The filling should be firm around the edges, but still jiggle a bit in the center when you move the tin. Remove from the oven and let sit in the water for about 10 minutes more, then take out and let cool down completely on a wire rack. Place the cooled cheesecake in the fridge for at least 6 hours (or overnight).
4. When the cheesecake is cooled, remove it from the tin and cut into 8 pieces with a hot knife (just let some hot water run over the knife and dry). Insert a popsicle stick into each piece of the cake. If the cheesecake is soft, it is better to place it in the freezer for 1-2 hours before decorating to make sure you can handle the cake easily.
5. Carefully melt the chocolate or candy melts in the microwave. Add some coconut oil if the chocolate seems too thick. Coat the cold cheesecake pieces with the chocolate – feel free to let the chocolate go over the edges. Let the chocolate dry. Exception: for the graveyard decoration, you have to continue while the chocolate is still runny.
Graveyard decoration:
Crumble the cookies and sprinkle them on top of the still-runny chocolate. Also, press the “tombstone” cookie into the cheesecake immediately. Let the chocolate set and then continue decorating.
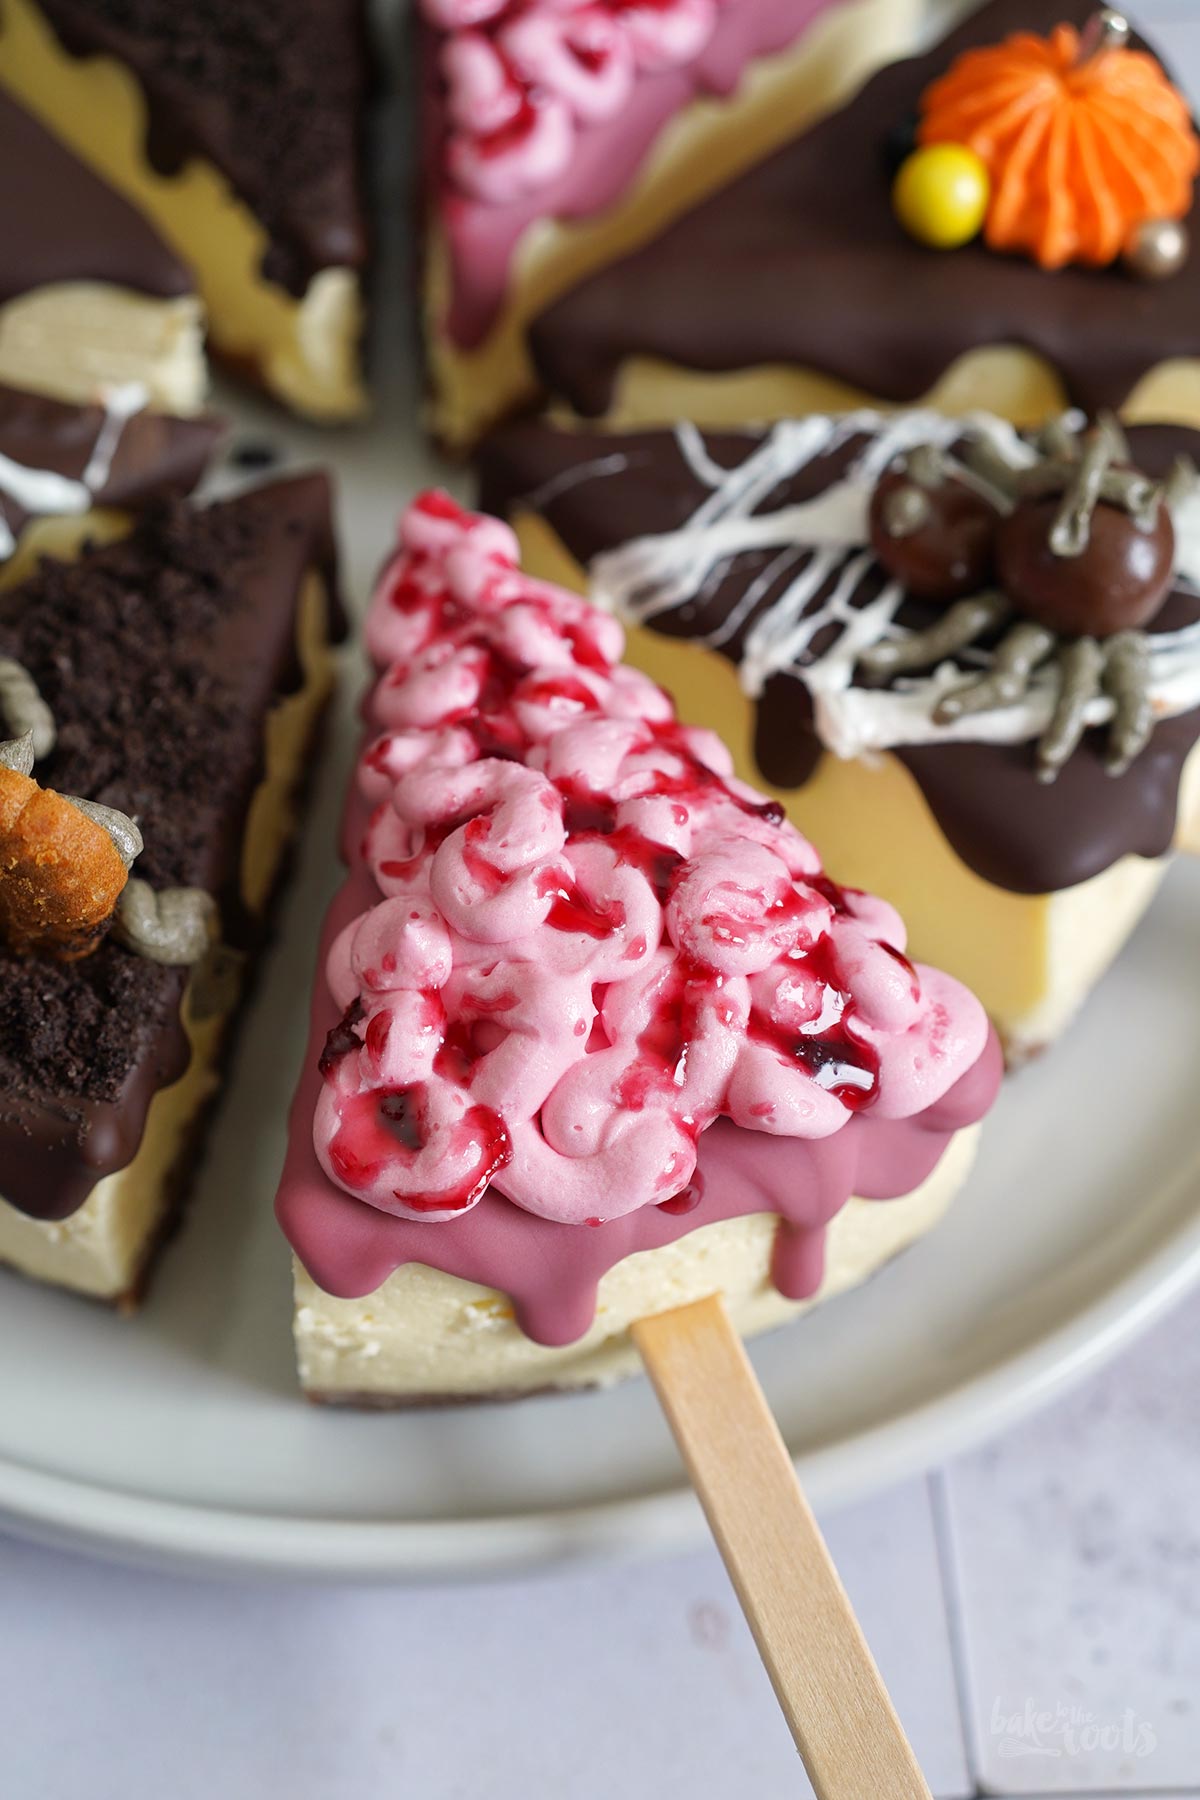
Bloody brain decoration:
Color some buttercream pink and fill it into a piping bag with a small round piping tip. Pipe small twists/coils onto the cheesecakes with pink chocolate. Let the buttercream cool thoroughly, then brush the brains with some cherry sauce.
Pumpkin decoration:
Color some buttercream with orange food color and fill it into a piping bag with a star tip. Pipe small pumpkins on top of cheesecakes (with dark chocolate) and decorate some more with sugar sprinkles to your liking.
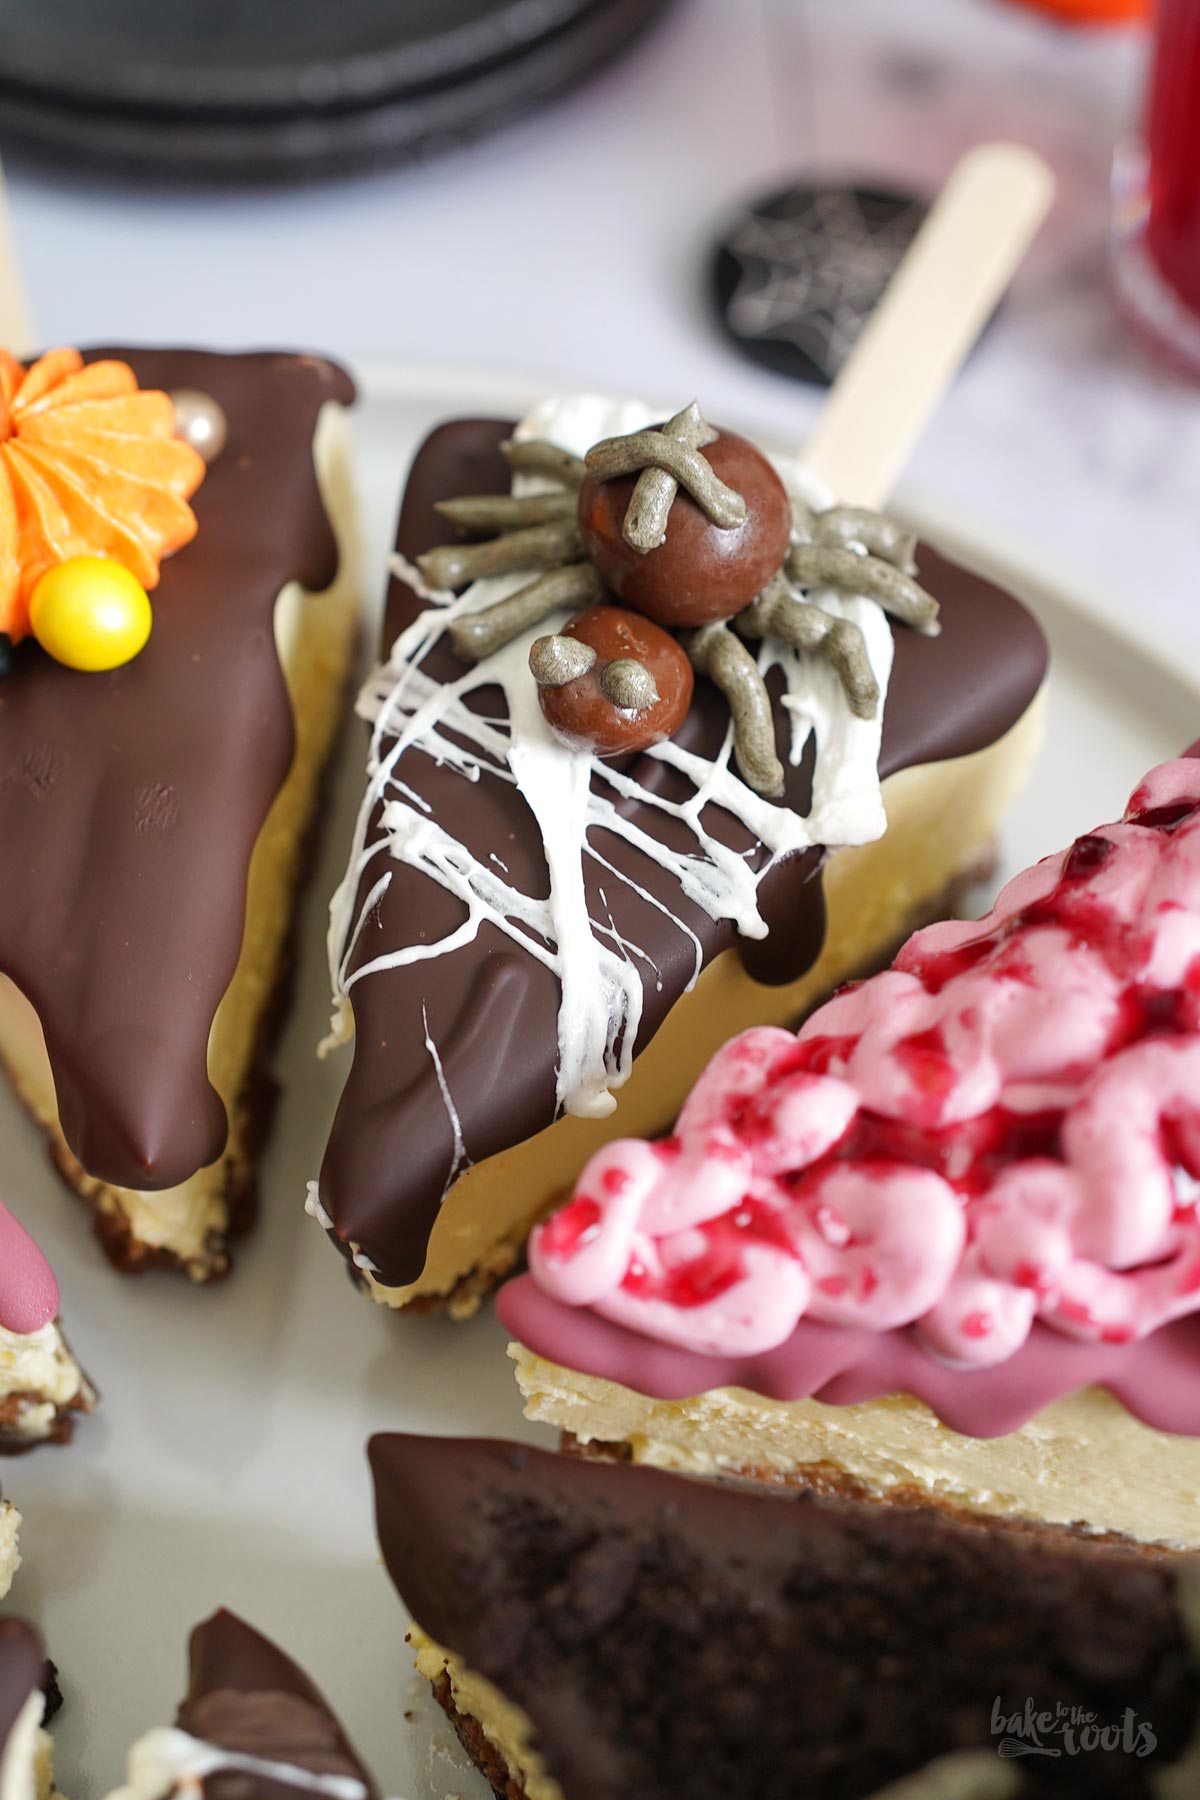
Spiderweb decoration:
Let the cheesecake (with dark chocolate) cool thoroughly before decorating – the chocolate should be really cold. Heat up a marshmallow in a small bowl in the microwave for a few seconds until it puffs up. Take out, wait a moment and then mash it between your fingers, pull it apart, and stretch the resulting “strings” directly over the cheesecake. Let cool. For the spiders, stick chocolate-coated hazelnuts and raisins onto the spiderweb with some melted chocolate, then use brown/black buttercream or melted chocolate to finish the spiders with spider legs, a cross on top, and some eyes ;)
Refrigerate all cheesecakes until ready to serve.
2. Die Schokokekse (oder Karamellkekse) in einen Gefrierbeutel füllen und mit einem Nudelholz zu feinen Krümeln verarbeiten. Die Butter schmelzen und in den Beutel dazugeben – alles gut vermischen und dann in die Springform füllen und fest zu einer glatten Schicht zusammendrücken.
3. Frischkäse, Mascarpone, Zucker, Eier und Vanille Extrakt in einer Schüssel gut verrühren – geht prima ohne elektrische Gerätschaften ;) Die Käsekuchenmasse in die vorbereitete Form füllen und glatt streichen. Die in Alufolie eingeschlagene Form dann in eine größere Auflaufform stellen und rundum mit heißem Wasser auffüllen. Die Form sollte etwa zur Hälfte im Wasser stehen. In die Mitte des Ofens stellen und für etwa 60-70 Minuten backen. Die Füllung sollte an den Rändern fest sein, darf in der Mitte aber noch etwas wackeln, wenn man an der Form rüttelt. Aus dem Ofen nehmen und noch etwa 10 Minuten im Wasser stehen lassen, dann herausholen und auf einem Kuchengitter abkühlen lassen. Den abgekühlten Cheesecake dann noch mindestens 6 Stunden (oder über Nacht) in den Kühlschrank stellen.
4. Wenn der Käsekuchen gut durchgekühlt ist, aus der Form lösen und mit einem heißen Messer in 8 Stücke schneiden. In jedes Kuchenstück einen Holzstäbchen/Eisstiel hineinstecken. Sollte der Käsekuchen recht weich sein, besser noch einmal für 1-2 Stunden ins Eisfach stellen.
5. Die Schokolade bzw. Candy Melts in der Mikrowelle vorsichtig schmelzen. Damit die Schokolade etwas besser fließt, etwas Kokosöl dazugeben und unterrühren. Die kalten Käsekuchenstücke mit der Schokolade bestreichen – darf gerne am Rand überlaufen. Die Schokolade trocknen lassen. Ausnahme: bei der Grabstein Deko muss man dekorieren, wenn die Schokolade noch flüssig ist.
Grabstein Dekoration:
Kekse zerbröckeln und auf die noch flüssige Schokolade streuen. Den “Grabstein” Keks ebenfalls sofort in den Käsekuchen stecken. Schokolade fest werden lassen und dann weiter dekorieren.
Gehirn Dekoration:
Buttercreme rosa einfärben und in einen Spritzbeutel mit kleiner runder Tülle einfüllen. Kleine Windungen auf die Käsekuchen (mit pinker Schokolade) aufspritzen. Einmal gut durchkühlen lassen und dann mit etwas Kirschsoße die Gehirnwindungen einstreichen.
Pumpkin Dekoration:
Buttercreme orange einfärben und in einen Spritzbeutel mit Sterntülle füllen. Kleine Kürbisse auf die Käsekuchen (mit dunkler Schokolade) aufspritzen und dann nach Belieben mit Zuckerstreuseln dekorieren.
Spiderweb Dekoration:
Den Käsekuchen (mit dunkler Schokolade) gut durchkühlen lassen vor dem Dekorieren – Schokolade sollte wirklich kalt sein. Dann einen Marshmallow in einer kleinen Schüssel in der Mikrowelle einige Sekunden erhitzen, bis er sich aufbläht. Herausholen, einen Moment warten und dann mit den Fingern zerdrücken, die Masse auseinander ziehen und die entstandenen “Fäden” direkt über den Käsekuchen spannen. Abkühlen lassen. Für die Spinnen schokolierte Haselnüsse und Rosinen mit etwas geschmolzener Schokolade auf die Spinnfäden kleben und dann mit brauner/schwarzer Buttercreme oder Schokolade noch Spinnenbeine, Kreuz und Augen auf die Spinne aufspritzen ;)
Alle Käsekuchen bis zum Servieren in den Kühlschrank stellen.
Craving more? Keep in touch on Facebook, Twitter, Instagram and Pinterest for new post updates and more. You can also contact me with any questions or inquiries!
Here is a version of the recipe you can print easily.
Print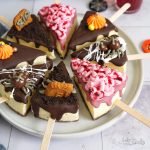
Halloween Cheesecakes on Sticks
- Prep Time: 00:45
- Cook Time: 01:10
- Total Time: 08:00
- Yield: 8 1x
- Category: Cheesecake
- Cuisine: America
- Diet: Vegetarian
Description
Halloween is all about decorations. Even cheesecakes are not safe from being decorated: Halloween Cheesecakes on Sticks. Funny and bloody cute ;P
Ingredients
For the base:
3.5 oz. (100g) chocolate butter cookies (or caramel cookies)
1 oz. (30g) butter, melted
For the filling:
21 oz. (600g) cream cheese, at room temperature
3.5 oz. (100g) mascarpone, room temperature
1/2 cup (100g) sugar (or xylitol)
2 medium eggs, at room temperature
2 tbsp. heavy cream
1 tsp. vanilla extract
For the decoration:
8 popsicle sticks
some buttercream (pink, orange, brown, or black)
3.5 oz. (100g) dark chocolate coating
1.8 oz. (50g) candy melts (pink) or ruby chocolate
some coconut oil
some cherry sauce
some marshmallows
some cookies (e.g. Oreos and Biscoff cookies)
some chocolate-covered nuts & rains
some sprinkles
Instructions
1. Preheat the oven to 325°F (160°C). Line a 7 inches (18cm) springform tin with baking parchment, then wrap it in aluminum foil so you can place it in a water bath later on. Let the ingredients for the filling come to room temperature.
2. Place the chocolate (or caramel) cookies in a freezer bag and use a rolling pin to crush them – you want fine crumbs. Melt the butter, add to the bag and mix well. Transfer to the springform tin and press down to create a firm and smooth layer.
3. Add the cream cheese, mascarpone, sugar, eggs, and vanilla extract to a bowl and mix until well combined. Transfer to the prepared springform tin and smooth out the top. Now place the wrapped baking tin in a larger baking tin or casserole dish and fill that one with hot water. You want the springform tin with the cheesecake sitting in water, about halfway up the sides of the tin. Place in the center of the oven and bake for about 60-70 minutes. The filling should be firm around the edges, but still jiggle a bit in the center when you move the tin. Remove from the oven and let sit in the water for about 10 minutes more, then take out and let cool down completely on a wire rack. Place the cooled cheesecake in the fridge for at least 6 hours (or overnight).
4. When the cheesecake is cooled, remove it from the tin and cut into 8 pieces with a hot knife (just let some hot water run over the knife and dry). Insert a popsicle stick into each piece of the cake. If the cheesecake is soft, it is better to place it in the freezer for 1-2 hours before decorating to make sure you can handle the cake easily.
5. Carefully melt the chocolate or candy melts in the microwave. Add some coconut oil if the chocolate seems too thick. Coat the cold cheesecake pieces with the chocolate – feel free to let the chocolate go over the edges. Let the chocolate dry. Exception: for the graveyard decoration, you have to continue while the chocolate is still runny.
Graveyard decoration:
Crumble the cookies and sprinkle them on top of the still-runny chocolate. Also, press the “tombstone” cookie into the cheesecake immediately. Let the chocolate set and then continue decorating.
Bloody brain decoration:
Color some buttercream pink and fill it into a piping bag with a small round piping tip. Pipe small twists/coils onto the cheesecakes with pink chocolate. Let the buttercream cool thoroughly, then brush the brains with some cherry sauce.
Pumpkin decoration:
Color some buttercream with orange food color and fill it into a piping bag with a star tip. Pipe small pumpkins on top of cheesecakes (with dark chocolate) and decorate some more with sugar sprinkles to your liking.
Spiderweb decoration:
Let the cheesecake (with dark chocolate) cool thoroughly before decorating – the chocolate should be really cold. Heat up a marshmallow in a small bowl in the microwave for a few seconds until it puffs up. Take out, wait a moment and then mash it between your fingers, pull it apart, and stretch the resulting “strings” directly over the cheesecake. Let cool. For the spiders, stick chocolate-coated hazelnuts and raisins onto the spiderweb with some melted chocolate, then use brown/black buttercream or melted chocolate to finish the spiders with spider legs, a cross on top, and some eyes ;)
Refrigerate all cheesecakes until ready to serve.
Notes
Enjoy decorating!
Links marked with an asterisk (*) are affiliate links (advertising/Werbung) to Amazon Germany. If you click on one of those links and buy something via this link, I will get a commission for that sale. The price of whatever you buy is not affected in any way by this.