
Hello Monday! Let’s start the week with a piece of this espresso-sweetness-madness ;)
I hope you’re on the sweet side with me today. This cake is a bomb! Really. It is not like other “boring” cakes – this cake is a “wooomph” in your mouth (and brain eventually as soon as the sugar and espresso kicks in) ;)
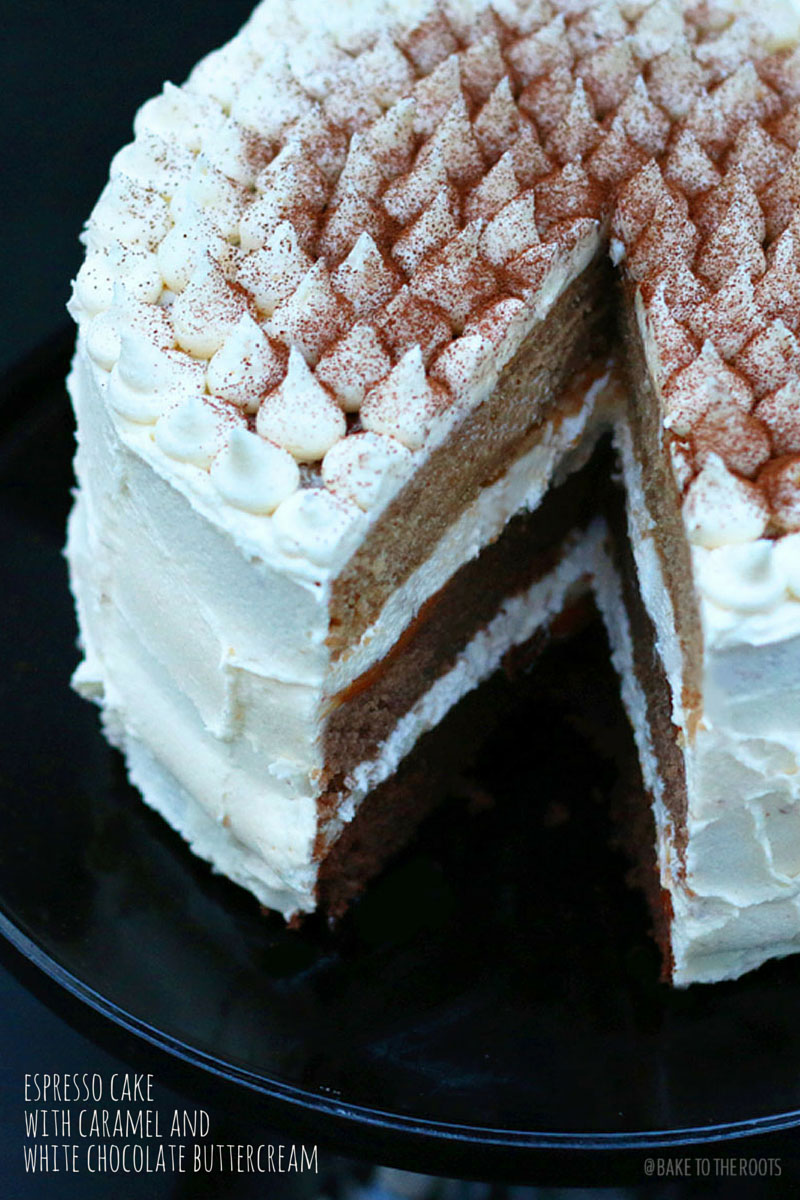
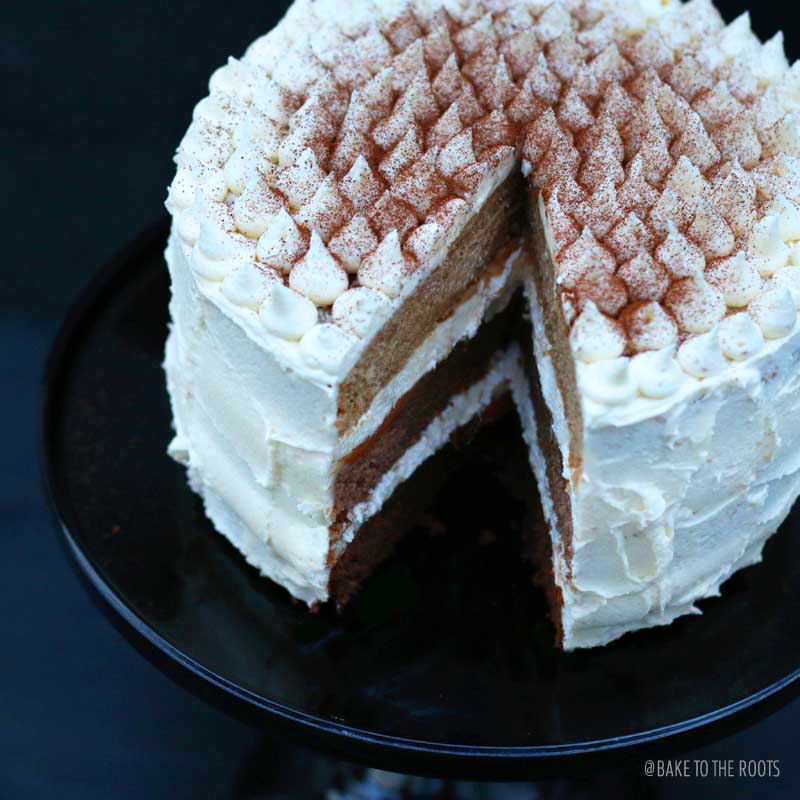
This cake is made with fresh brewed espresso (I used the strongest I could find). A bit dense I have to admit – similar to a brownie maybe – but packed with great coffee flavor. It is combined with homemade caramel sauce and a white chocolate buttercream which makes it a flavor explosion in your mouth. You really have to like sweet cakes, otherwise this will probably be too much for you. Or my recommendation – just take a thin slice ;)
INGREDIENTS / ZUTATEN
1 cup (240ml) espresso, cooled
1/2 cup (115g) butter
1 1/4 cup (250g) sugar
3 eggs
1/2 cup (120g) crème fraîche
1/3 cup (75ml) vegetable oil
1 tsp. vanilla extract
2 1/2 cups (320g) all-purpose flour
2 tsp. baking powder
pinch of salt
4 tsp. cocoa powder
For the caramel sauce:
1 cup (200g) granulated sugar
6 tbsp. (90g) butter
1/2 cup (120ml) heavy cream
For the buttercream:
7 oz. (200g) white chocolate
1 1/8 cup (250g) butter
2 3/4 – 3 1/8 cups (350-400g) confectioner’s sugar
1-3 tsp. crème fraîche or heavy cream (optional)
For the decoration:
cocoa powder or instant espresso powder (optional)
240ml Espresso, abgekühlt
115g Butter
250g Zucker
3 Eier
120g Crème fraîche
75ml Pflanzenöl
1 TL Vanille Extrakt
320g Mehl (Type 405)
2 TL Backpulver
Prise Salz
4 TL Kakao
Für die Karamellsauce:
200g Zucker
90g Butter
120ml Sahne
Für die Buttercreme:
200g Weiße Schokolade
250g Butter
350-400g Puderzucker
1-3 TL Crème fraîche oder Sahne (optional)
Für die Dekoration:
Kakao oder Instant Espresso Pulver (optional)
This cake takes some time to prepare. If you have several springform tins, you can save a bit time by baking more than one cake layer at a time – with only one springform tin, you have to do the baking step three times – but that works well – either way. I recommend baking the cake layers a day in advance and store them in an airtight container until you need them – means less work to do on the day you want to finish and serve that cake.
Make sure you do not spread the caramel all over the cake – if you do so, it will spill on the sides and might ruin your buttercream coating on the sides. It is also better to keep the caramel in the middle, so the layers stay where they should when the cake warmes up a bit on the coffee table. The caramel sauce liquifies as soon as the cake gets warmer and may cause a “mudslide” and a collapsing cake. Happened to me the first time I made this cake in summer and the temperature was more than 30°C in the apartment ;)
You can also use this recipe to make a “naked cake” version. Use a bit more caramel sauce – it can overflow on the sides a bit. Make the buttercream layer thicker and do not coat the sides. Decorate the top nicely, maybe with some chopped nuts and you will have a great looking naked cake :)
DIRECTIONS / ZUBEREITUNG
2. In a large bowl beat the butter and sugar on high speed until light and fluffy. Add the eggs one by one, mixing well after each addition. In a second, smaller bowl mix crème fraîche with oil and vanilla extract. Add to the butter mixture and mix until all is well combined.
3. Mix flour, baking powder and salt. Add to the batter, alternating with the cooled espresso in several portions and mix until all is combined. Transfer 1/3 of the batter into the first springform tin. Add 2 teaspoons of cocoa powder to the remaining batter and mix until incorporated. Transfer half of the batter in the second springform. Add again 2 teaspoons of cocoa powder to the batter and mix again. Trasfer to the last springform tin. You can do all of this with only one baking tin – just takes longer. Bake for 26-30 minutes in the middle of the oven until a toothpick inserted in the center comes out clean. Let cool down a bit in the baking tin. Remove from the tin and let cool down completely on a wire rack.
4. For the caramel sauce add the sugar to a saucepan over medium heat, stirring constantly with a wooden spoon. The sugar will melt into an amber-colored liquid as you continue to stir. Be careful not to burn the sugar (or yourself). Add the butter in small pieces – be careful, it will bubble a lot. Sir until the butter has melted completely. Add the heavy cream slowly and carefully – once again, it will bubble a lot. Allow the mix to boil for a minute while stirring constantly. Remove from the heat and let cool down. You don’t need all of the caramel sauce for the cake – you can store the sauce in an airtight container up to 2 weeks in the fridge and use it for other cakes or cupcakes.
5. For the buttercream melt the white chocolate in a heatproof bowl over simmering water. Set aside and let cool down a bit. Add the butter to a large bowl and beat on high speed until light and fluffy. Add the cooled chocolate and mix until well combined. Add the confectioner’s sugar and mix on low speed first and then on high speed for about 5 minutes. Add some crème fraîche if your buttercream is too thick (optional) until you get the desired consistency.
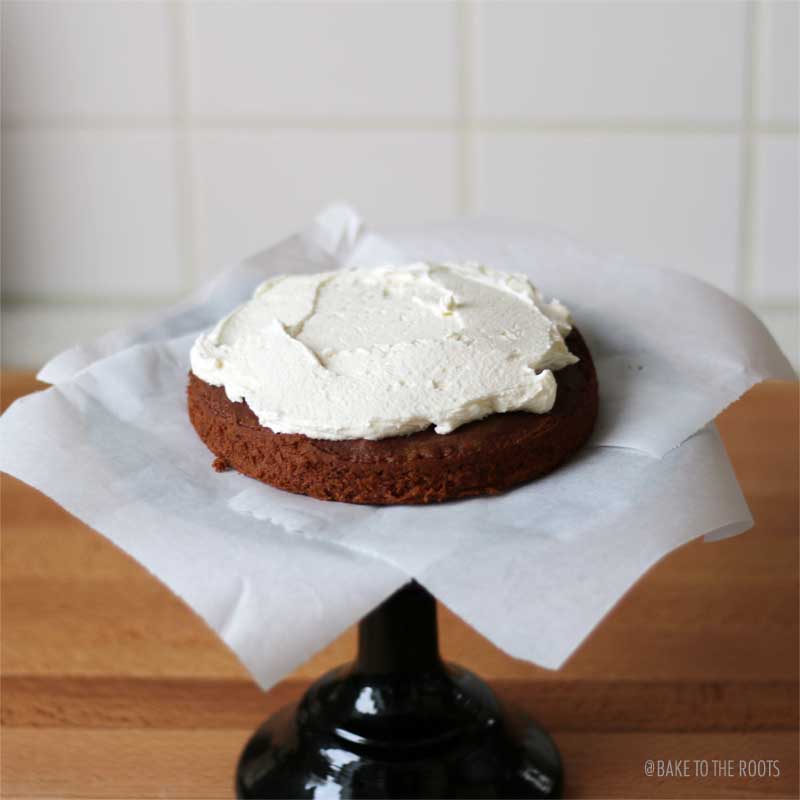
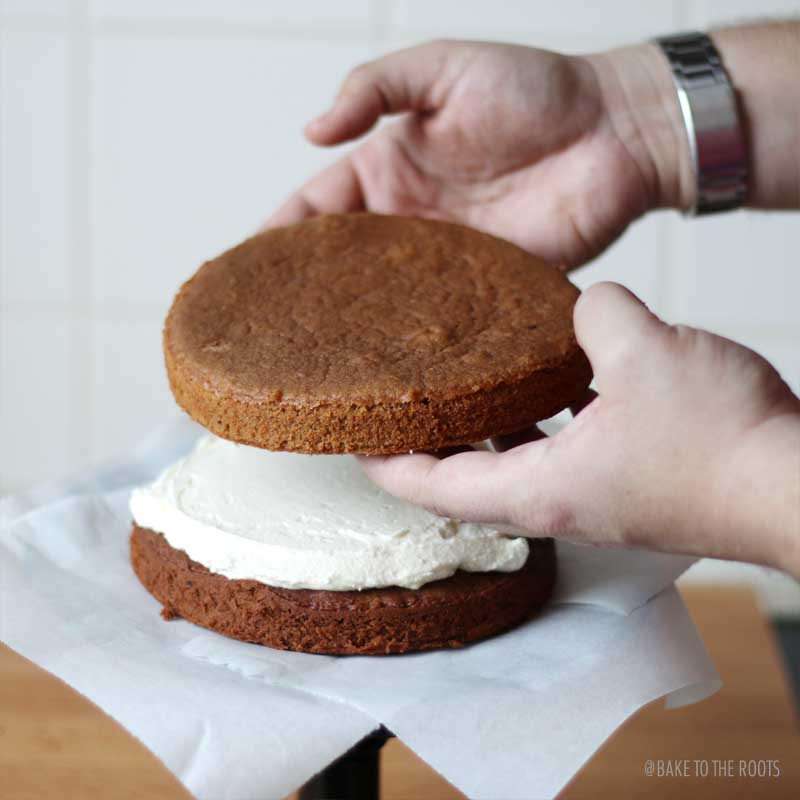
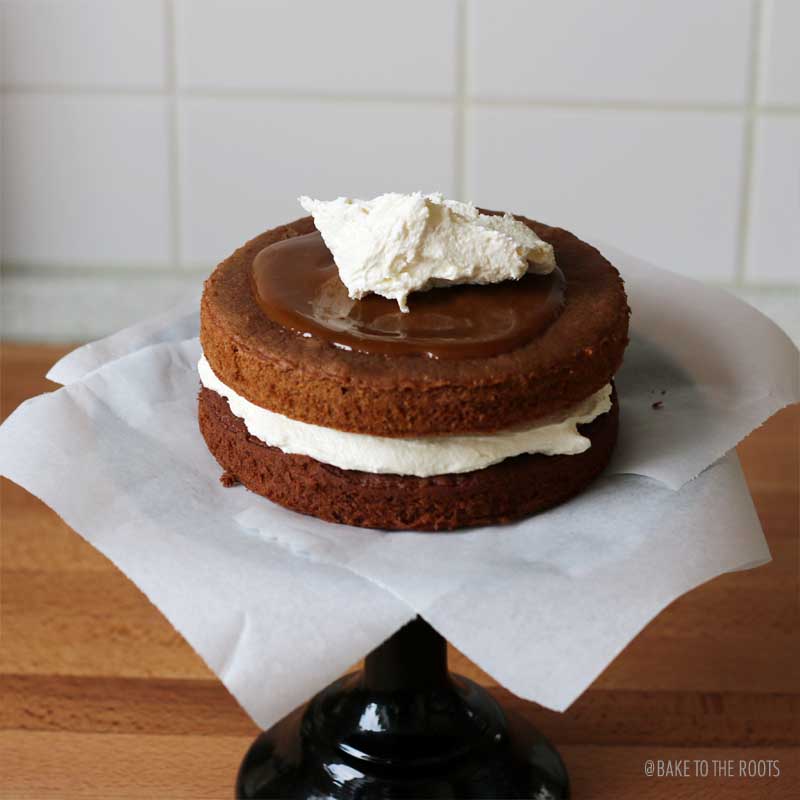
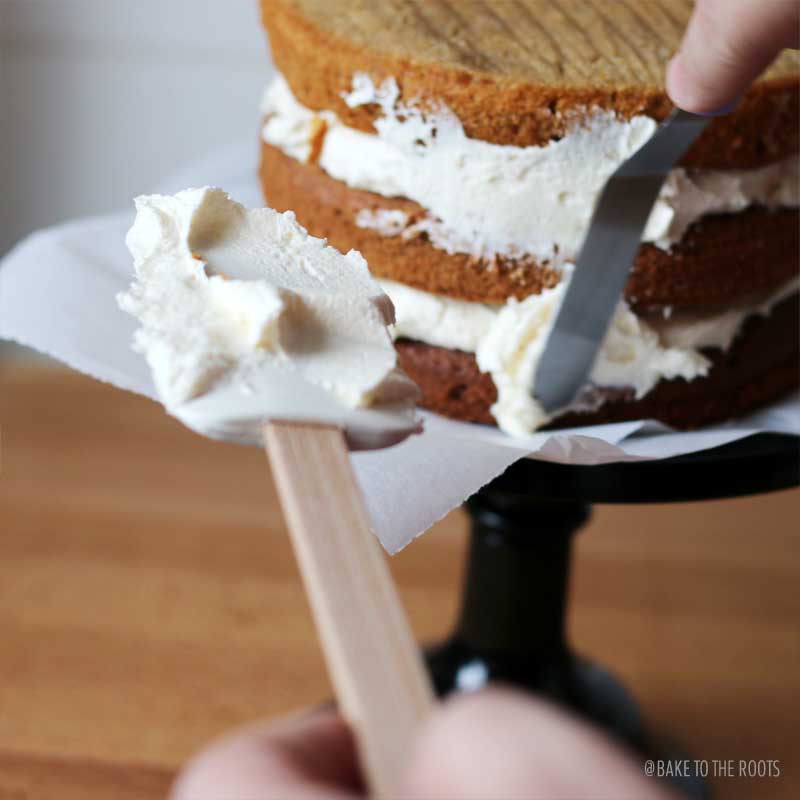
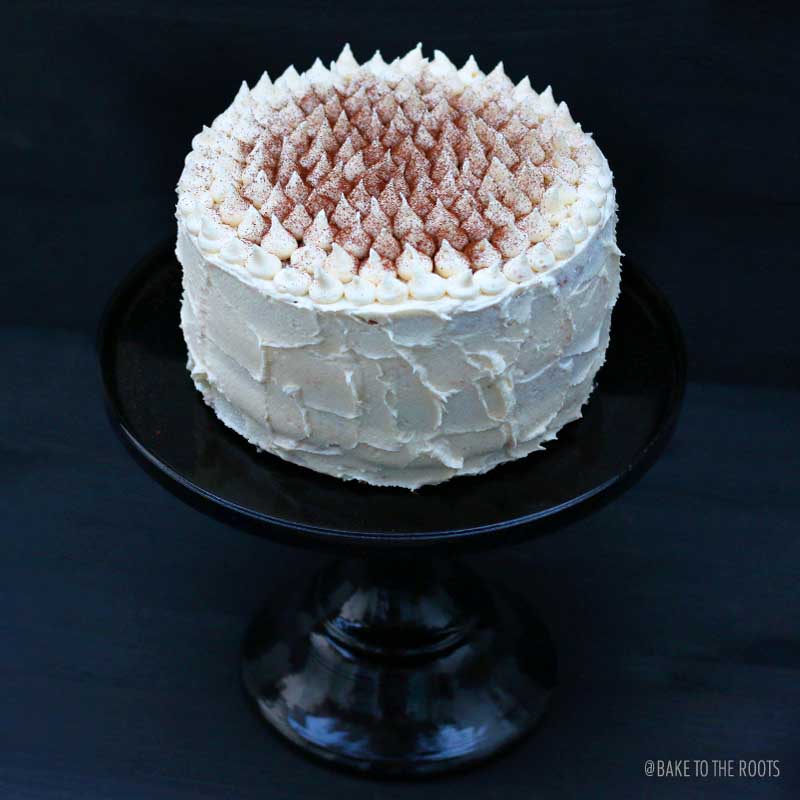
6. As soon as the cake layers have cooled completely, you can start building your cake by placing the darkest cake layer on a cake plate. I recommend placing some cutted pieces of baking parchment under the cake, so you can frost the cake easily without making a big mess on the plate and remove the paper when you’re done. Add a small amount of the caramel sauce on the first cake layer – the caramel should not be spread all over the cake, leave a 1/2 inch uncovered on the edge. Add some buttercream on top of the caramel and create an even layer. The caramel should be covered completely and not leak out on the sides. Top with the second (slightly darker) remaining cake layer and press a bit on the buttercream layer. Add again some caramel and buttercream like you did on the first layer and add the last cake layer. Cover the sides with a thin layer of buttercream (crumb coat) and place in the fridge for about 30 minutes to cool down a bit (Note: use two wooden skewers and stick them through all layers to avoid the cake to shift to one side while cooling). As soon as the cake is cool enough, add another layer of buttercream on the sides – you can do a structured surface or try to make it clean and flat – whatever you like best. Fill the remaining buttercream in a piping bag and decorate the top. Dust with cocoa powder or instant espresso powder (optional).
2. In einer großen Schüssel Zucker und Butter aufschlagen, bis alles hell und luftig ist. Eier einzeln zugeben und jeweils gut unterrühren. In einer kleinen Schüssel die Crème fraîche mit dem Öl und Vanille Extrakt verrühren und dann zum Butter-Ei Mix zugeben und gut verrühren.
3. Mehl, Backpulver und Salz vermischen. Abwechselnd mit dem abgekühlten Espresso in mehreren Portionen zum Teig zugeben und verrühren. 1/3 des Teiges in eine Backform geben. Zum restlichen Teig zwei Teelöffel Kakao zugeben und unterrühren. Hälfte vom Teig in eine zweite Backform geben. Zum restlichen Teig noch einmal zwei Teelöffel Kakao zugeben und unterrühren. Teig in die letzte Backform geben (man kann das ganze auch nacheinander mit nur einer Backform machen, dauert dann nur etwas länger). Für 26-30 Minuten in der Mitte das Backofens backen. Mit einem Zahnstocher testen, ob noch Teig kleben bleibt und erst herausnehmen, wenn der Zahnstocher sauber herauskommt. In der Form etwas abühlen lassen, dann herausnehmen und auf einem Kuchengitter komplett auskühlen lassen.
4. Für die Karamellsauce den Zucker in einem Topf bei mittlerer Hitze unter ständigem rühren mit einem Holzlöffel langsam verflüssigen. Der Zucker sollte eine leicht goldene Farbe bekommen. Vorsicht, der Zucker verbrennt schnell! Die Butter nach und nach in kleinen Stücken zugeben – auch hier vorsichtig sein, die Masse schäumt stark auf. So lange rühren, bis die Butter komplett aufgelöst ist. Die Sahne langsam und vorsichtig zugeben und ständig rühren – auch hier schäumt die Masse wieder stark auf. Die Karamellsauce ca. 1 Minute unter ständigem rühren kochen lassen und dann vom Herd nehmen und abkühlen lassen. Für die Torte wird nicht die ganze Karamellsauce benötigt – in einem luftdichten Behälter hält sich die Karamellsauce bis zu zwei Wochen und kann für andere Kuchen oder Cupcakes verwendet werden.
5. Für die Buttercreme die weiße Schokolade über heissem Wasserbad schmelzen. Zur Seite stellen und etwas abkühlen lassen. In einer großen Schüssel die Butter aufschlagen, bis sie hell und luftig ist. Die abgekühlte Schokolade zugeben und unterrühren. Puderzucker zugeben und alles erst langsam und dann auf höchster Stufe für ca. 5 Minuten aufschlagen. Falls die Buttercreme zu fest wird, die Crème fraîche löffelweise zugeben und unterrühren bis die gewünschte Konsistenz erreicht ist.
6. Wenn die Böden komplett ausgekühlt sind, mit dem dunkelsten anfangen und auf eine Tortenplatte legen. Ich lege immer zugeschnittenes Butterbrotpapier unter den untersten Boden – das lässt sich dann leicht rausziehen, wenn man fertig ist und die Platte bleibt sauber. Eine kleine Menge Karamellsauce darauf streichen – nach Außen einen ca. 1cm breiten Rand lassen. Buttercreme auf das Karamell auftragen und bis zum Rand glattstreichen. Darauf achten, dass das Karamell bedeckt ist und nicht an den Seiten rausläuft. Den zweiten dunkleren Boden auflegen und etwas andrücken. Wie beim ersten Boden verfahren – erst Karamellsauce sowie eine weitere Schicht Buttercreme auftragen und dann den letzten Boden auflegen und andrücken. Die Seiten der Torte mit einer dünnen Schicht Buttercreme (Crumb Coat) bestreichen und dann für ca. 30 Minuten in den Kühlschrank stellen (Tipp: man kann die Kuchenschichten mit zwei Holzspießen fixieren, damit nichts verrutscht). Wenn die Torte durchgekühlt ist, eine weitere Schicht Buttercreme auf die Seiten auftragen – glatt oder strukturiert, je nach Belieben. Restliche Buttercreme in einen Spritzbeutel füllen und kleine Tupfen auf die Oberseite der Torte spritzen – von Außen nach Innen arbeiten und die Tupfen möglichst eng aneinander setzen. Nach Belieben noch mit Kakao oder Instant Espresso Pulver bestäuben.
Craving more? Keep in touch on Facebook, Twitter, Instagram and Pinterest for new post updates and more. You can also contact me with any questions or inquiries!
Here is a version of the recipe you can print easily.
Print
Espresso Cake with Caramel and White Chocolate Buttercream
- Prep Time: 90
- Cook Time: 30
- Total Time: 180
Ingredients
For the cake
- 1 cup (240ml) espresso, cooled
- 1/2 cup (115g) butter
- 1 1/4 cup (250g) sugar
- 3 eggs
- 1/2 cup (120g) crème fraîche
- 1/3 cup (75ml) vegetable oil
- 1 tsp. vanilla extract
- 2 1/2 cups (320g) all-purpose flour
- 2 tsp. baking powder
- pinch of salt
- 4 tsp. cocoa powder
For the caramel sauce
- 1 cup (200g) granulated sugar
- 6 tbsp. (90g) butter
- 1/2 cup (120ml) heavy cream
For the buttercream
- 7 oz. (200g) white chocolate
- 1 1/8 cup (250g) butter
- 2 3/4 – 3 1/8 cups (350-400g) confectioner’s sugar
- 1-3 tsp. crème fraîche
For the decoration
- cocoa powder or instant espresso powder (optional)
Instructions
- Start by making the espressp and letting it cool down. Preheat the oven to 350˚F (175°C). Prepare three 7 inches (18cm) springform tins with baking parchment and grease the sides of the tins.
- In a large bowl beat the butter and sugar on high speed until light and fluffy. Add the eggs one by one, mixing well after each addition. In a second, smaller bowl mix crème fraîche with oil and vanilla extract. Add to the butter mixture and mix until all is well combined.
- Mix flour, baking powder and salt. Add to the batter, alternating with the cooled espresso in several portions and mix until all is combined. Transfer 1/3 of the batter into the first springform tin. Add 2 teaspoons of cocoa powder to the remaining batter and mix until incorporated. Transfer half of the batter in the second springform. Add again 2 teaspoons of cocoa powder to the batter and mix again. Trasfer to the last springform tin. You can do all of this with only one baking tin – just takes longer. Bake for 26-30 minutes in the middle of the oven until a toothpick inserted in the center comes out clean. Let cool down a bit in the baking tin. Remove from the tin and let cool down completely on a wire rack.
- For the caramel sauce add the sugar to a saucepan over medium heat, stirring constantly with a wooden spoon. The sugar will melt into an amber-colored liquid as you continue to stir. Be careful not to burn the sugar (or yourself). Add the butter in small pieces – be careful, it will bubble a lot. Sir until the butter has melted completely. Add the heavy cream slowly and carefully – once again, it will bubble a lot. Allow the mix to boil for a minute while stirring constantly. Remove from the heat and let cool down. You don’t need all of the caramel sauce for the cake – you can store the sauce in an airtight container up to 2 weeks in the fridge and use it for other cakes or cupcakes.
- For the buttercream melt the white chocolate in a heatproof bowl over simmering water. Set aside and let cool down a bit. Add the butter to a large bowl and beat on high speed until light and fluffy. Add the cooled chocolate and mix until well combined. Add the confectioner’s sugar and mix on low speed first and then on high speed for about 5 minutes. Add some crème fraîche if your buttercream is too thick (optional) until you get the desired consistency.
- As soon as the cake layers have cooled completely, you can start building your cake by placing the darkest cake layer on a cake plate. I recommend placing some cutted pieces of baking parchment under the cake, so you can frost the cake easily without making a big mess on the plate and remove the paper when you’re done. Add a small amount of the caramel sauce on the first cake layer – the caramel should not be spread all over the cake, leave a 1/2 inch uncovered on the edge. Add some buttercream on top of the caramel and create an even layer. The caramel should be covered completely and not leak out on the sides. Top with the second (slightly darker) remaining cake layer and press a bit on the buttercream layer. Add again some caramel and buttercream like you did on the first layer and add the last cake layer. Cover the sides with a thin layer of buttercream (crumb coat) and place in the fridge for about 30 minutes to cool down a bit (Note: use two wooden skewers and stick them through all layers to avoid the cake to shift to one side while cooling). As soon as the cake is cool enough, add another layer of buttercream on the sides – you can do a structured surface or try to make it clean and flat – whatever you like best. Fill the remaining buttercream in a piping bag and decorate the top. Dust with cocoa powder or instant espresso powder (optional).
Notes
- Enjoy baking!
Nutrition
- Serving Size: 8


Hmmm, gleich mal gebookmarkt. Sieht fantastisch aus :)
Liebe Grüße,
Daniela
The cake is lovely and it sounds incredible!
Thxs! It’s a really delicious cake :)
Cheers!