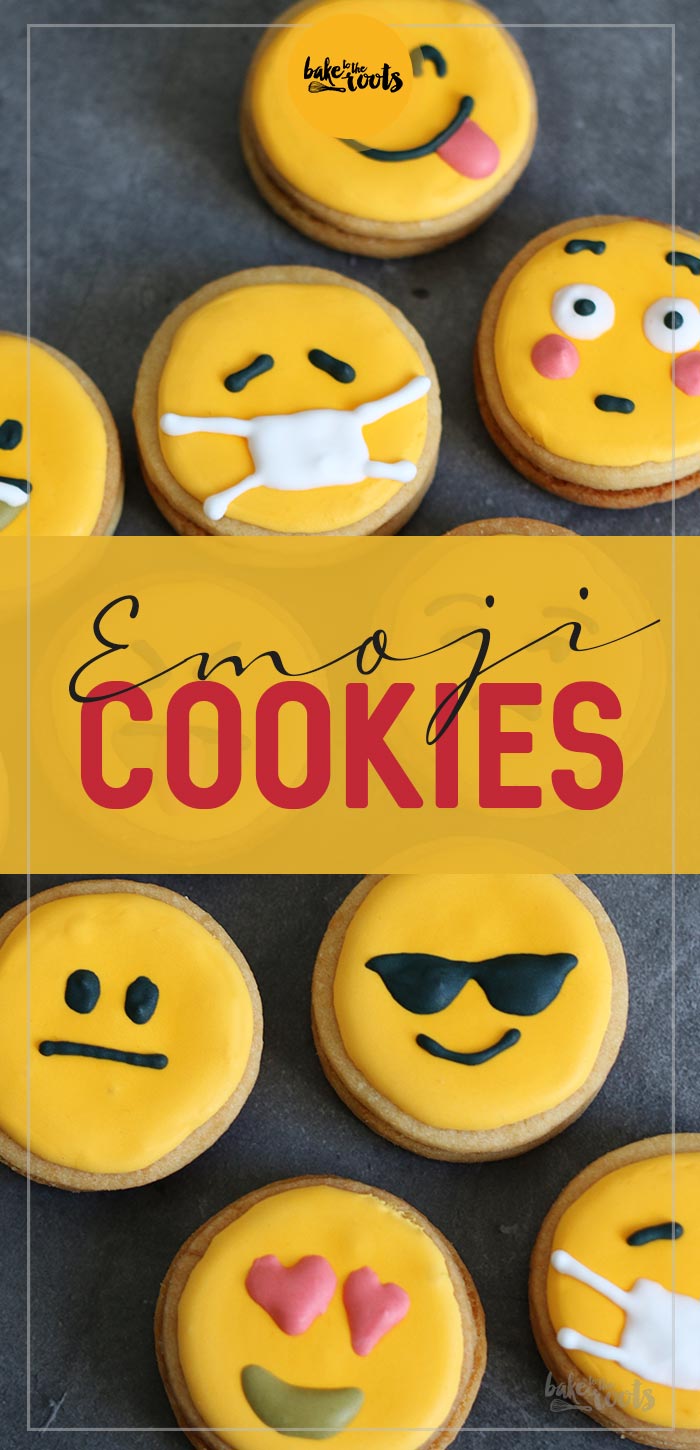
Happy Cookie Friday! The week is almost over and the weekend is coming up – this means I got a fresh batch of cookies for you today! No “classic” American cookies this time, but still something nice and sweet: Emoji Sandwich Cookies! Say something with cookies without having to speak at all ;P
I’m a huge fan of classic chocolate chip cookies or cookies with chocolate, nuts, and stuff like that. They are my favorite cookie recipes I basically bake all the time. But once in a while, I like to make other cookies too… or bakes that are related to cookies but are not really cookies. Like these Cookie Dough Brownie Balls I made last week, for example. Obviously no cookies, but with the cookie dough inside they are (somehow) part of the “cookie family” ;)
Well… and then there are other cookies I hardly make because they are a bit labor-intense ;) Sugar cookies with decorations aka. Royal Icing Cookies are nothing I do on a regular basis. Once in a blue moon maybe. It’s not because I don’t like them – I have the utmost respect for people that are able to make those cookies look good with royal icing. I don’t do them because a) I don’t have a steady hand to get all those delicate decorations looking good and b) I am just too lazy to work on cookies for hours and hours ;P
Really – hats off to all the creative people who know how to create something nice looking with royal icing. I know the basics by now, but planning a cookie project like that stresses me out as soon as I have the plain cookies and the icing in front of me. It always feels like a job that will take days to finish. Best example: my “Dia de los Muertos Cookies”. It was fun decorating the first 4-5 cookies but after that, it got a bit exhausting ;))) Same with my Halloween Haunted Gingerbread House. The planning, baking, and assembling of the house was a lot of fun, but after the third hour of decorating the house with royal icing I almost wanted to kill myself ;P
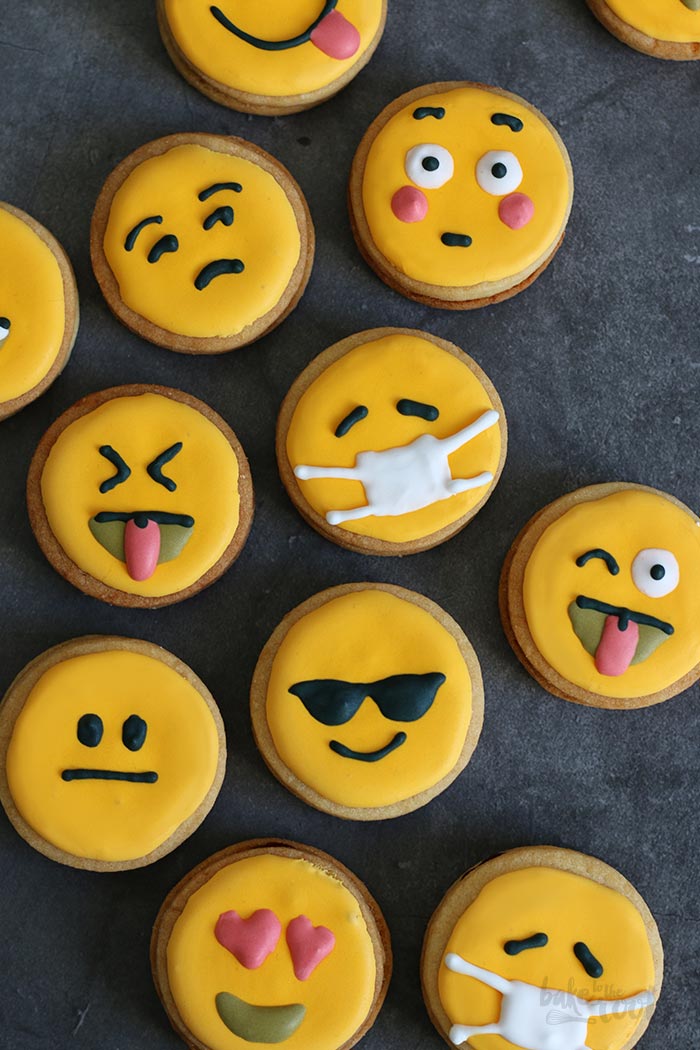
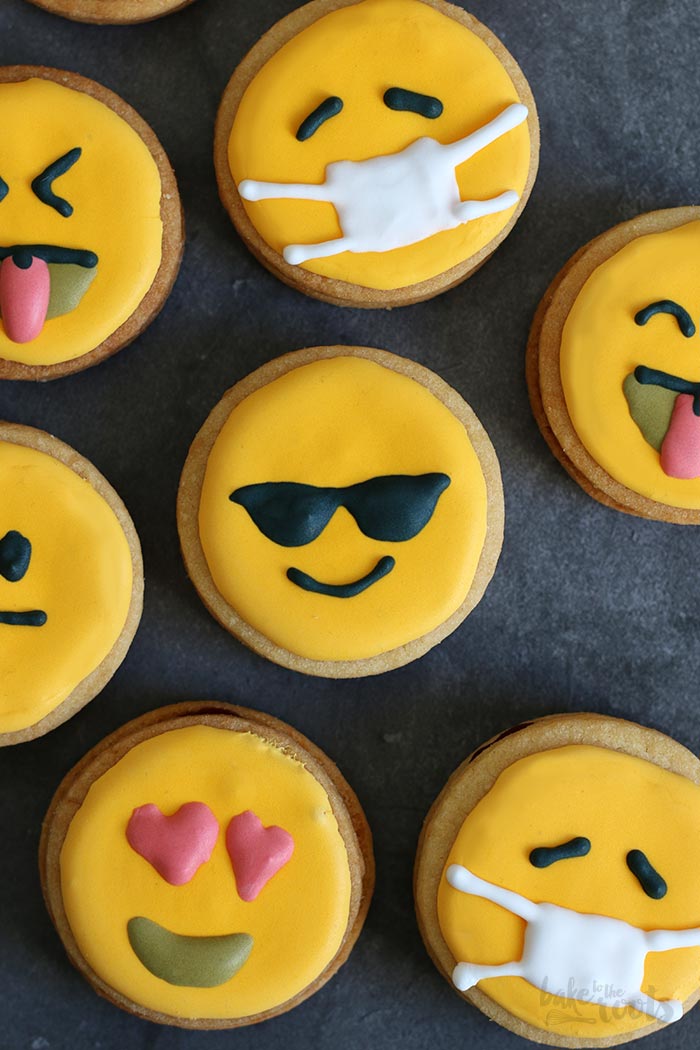
I don’t want to complain – despite my two left hands both projects – scull cookies and haunted house turned out pretty good, I think. I’m actually quite satisfied with my Emoji Cookies, too. The edges are a bit wobbly and the lines are bit crooked, but I think you can recognize the Emoji I wanted to do…

Why do you make Emoji Cookies, you may ask since I am not really a fan of working with royal icing?! Well… that’s actually quite simple. Covid-19 made me do it ;)
I’m a bit annoyed by the current debate here in Germany about wearing a mask in public. Those people that think it’s against human rights and their personal rights being asked wearing a mask when going out to a supermarket or anywhere else where you get close to other people… they make me angry. Really. But I am a nice person and hardly yelling at people, so I decided I’d make emoji cookies with a face mask to show people it’s OK to wear a mask and to remember them using the masks. I know – they are a bit annoying to wear – but they reduce the risk of spreading the virus and getting the virus from other people if you are in closed spaces like a supermarket or public transportation. It doesn’t matter if I personally feel safe without a mask – others don’t and just out of respect for the people around you, you should stick to it and wear a mask where it is necessary. My two cents ;P
Besides the emojis with face masks, I also made other emoji faces, as you can see in the pictures. If you don’t share my opinion about masks, one of the cookies with a face that sticks the tongue out is probably more suitable for you ;P All others grab a cookie with a face mask and in case you see a person in the supermarket wearing the mask under the chin instead of covering mouth and nose – give him/her that cookie with a smile under your own mask :P
INGREDIENTS / ZUTATEN
For the dough:
1 3/4 cups (225g) all-purpose flour
2/3 cup (75g) confectioners’ sugar
pinch of salt
2/3 cup (150g) butter
1 egg yolk
Für das Royal Icing:
0.5 oz. (15g) egg white
1/4 tsp. cream of tartar
pinch of salt
1 cup (130g) confectioners’ sugar
2-4 tbsp. water
food color (yellow, black, red, etc.)
For the filling:
about 1/2 jar (5 oz.) raspberry jam (without seeds)
Für den Teig:
225g Mehl (Type 405)
75g Puderzucker
Prise Salz
150g Butter
1 Eigelb
Für das Royal Icing:
15g Eiweiß
1/4 TL reiner Weinstein
Prise Salz
130g Puderzucker
2-4 EL Wasser
Lebensmittelfarbe (gelb, schwarz, rot, etc.)
Für die Füllung:
etwa 1/2 Glas (ca. 140g) Himbeermarmelade (ohne Kerne)

DIRECTIONS / ZUBEREITUNG
2. Preheat the oven to 350˚F (175°C). Line several baking sheets with baking parchment. Roll out half of the dough (keep the rest on the side) thinly on a floured surface. Use a round cookie cutter with a diameter of about 2 inches (5cm) and cut out an even number of cookies. Place the cookies on the baking sheets, collect the remaining dough and roll out again to cut out more cookies until all dough is used.
3. Place one baking sheet at a time in the oven and bake for about 8-9 minutes – the cookies should not get much color here. Take out of the oven and let cool down on a wire rack. Repeat with the remaining cookies.
4. For the royal icing add the egg white with salt, and cream of tartar to a bowl and mix until foamy. Gradually add the confectioners’ sugar and mix in. Mix on high speed for about 10-15 minutes to get a nice and smooth icing. Use a rubber spatula to scrape down the sides of the bowl from time to time so everything gets mixed in. Gradually add small amounts of water to thin out the icing a bit until you get the right consistency. For me, it’s perfect when the icing is thick and flowing a bit but not really liquid. Take small amounts (1 tbsp. or less) of icing out of the bowl and transfer to smaller bowls to color (black, red, etc.) – most of the icing should be colored yellow as the base for the emoji cookies. The bowls with the icing that are not in use should be covered with plastic wrap and stored in the fridge so nothing dries out.
5. Fill a piping bag with a small round tip with the yellow royal icing and decorate half of the cookies with it. Depending on how thick/liquid your icing is you can draw a circle first on the cookies and fill that completely immediately. If your icing is a bit thinner I recommend letting that circle dry first for a moment (1-2 minutes) and then flood the circle so the icing is not spilling over the edges. Let dry for several hours (at least 2 hours I’d say) and then continue decorating the cookies with the remaining colored icing to create the emoji faces. Let dry everything overnight.
6. Mix the raspberry jam to soften it and add about 1/2 to 1 tsp. of the jam on each of the non-decorated cookies and top with a decorated cookie. Store in a tin box – separate the cookies with sandwich paper.
2. Den Ofen auf 175°C (350°F) vorheizen. Mehrere Bleche mit Backpapier auslegen. Den Teig halbieren und auf einer bemehlten Fläche dünn ausrollen. Mit runden Ausstechern (Ø 5cm/2 inches) eine gerade Anzahl von Plätzchen ausstechen. Auf die Bleche setzen und die Teigreste mit dem restlichen Teig verkneten und weitere Plätzchen ausstechen.
3. Jeweils ein Backblech in den Ofen schieben und etwa 8-9 Minuten backen – die Plätzchen sollten nur wenig Farbe bekommen haben. Auf einem Kuchengitter etwas abkühlen lassen. Mit den restlichen Plätzchen wiederholen.
4. Für das Royal Icing das Eiweiß mit Salz und Weinstein in eine Schüssel geben und schaumig schlagen, dann nach und nach den Puderzucker dazugeben und unterrühren. Für etwa 10-15 Minuten auf höchster Stufe aufschlagen – zwischendurch immer wieder einmal das Icing vom Rand abkratzen, damit sich alles gleichmäßig verbindet. Nach und nach kleine Mengen Wasser dazugeben, bis die Konsistenz des Royal Icings leicht fließend, aber nicht flüssig ist. Mehrere kleine Mengen (etwa 1 EL) vom Royal Icing in Schüsseln geben und einfärben (schwarz, rot, etc.), den Großteil gelb einfärben als Grundlage für die Emojis. Alle Schüsseln mit Royal Icing, die gerade nicht verwendet werden, mit Klarsichtfolie abdecken, damit nichts austrocknet und in den Kühlschrank stellen.
5. Das gelbe Royal Icing in einen Spritzbeutel mit kleiner runder Tülle einfüllen und die Hälfte der Cookies damit dekorieren. Je nachdem wie dickflüssig euer Icing ist, könnt ihr als Erstes einen Kreis auf die Cookies aufspritzen und den dann auch sofort füllen. Wenn das Icing etwas dünner ist, empfiehlt es sich, den Kreis einen kleinen Moment antrocknen zu lassen (1-2 Minuten) und dann erst zu füllen, damit nichts überläuft. Cookies mehrere Stunden (min. 2 Stunden) trocknen lassen, dann mit dem restlichen eingefärbten Royal Icing die Emoji Gesichter aufspritzen. Über Nacht trocknen lassen.
6. Himbeermarmelade einmal durchrühren und dann die nicht dekorierten Cookies mit etwa 1/2 bis 1 TL Marmelade bestreichen und dann einen dekorierten Cookie draufsetzen und leicht zusammendrücken. In einer Blechdose lagern und die Lagen mit Butterbrotpapier trennen.
Craving more? Keep in touch on Facebook, Twitter, Instagram and Pinterest for new post updates and more. You can also contact me with any questions or inquiries!
Here is a version of the recipe you can print easily.
Print
Emoji Sandwich Cookies
- Prep Time: 01:30
- Cook Time: 00:09
- Total Time: 14:00
- Yield: 24 1x
- Category: Cookies
- Cuisine: International
Description
Show your feelings with some Emoji Sandwich Cookies… no words needed – these little fellas tell it all ;P
Ingredients
Instructions
Notes
Enjoy decorating!