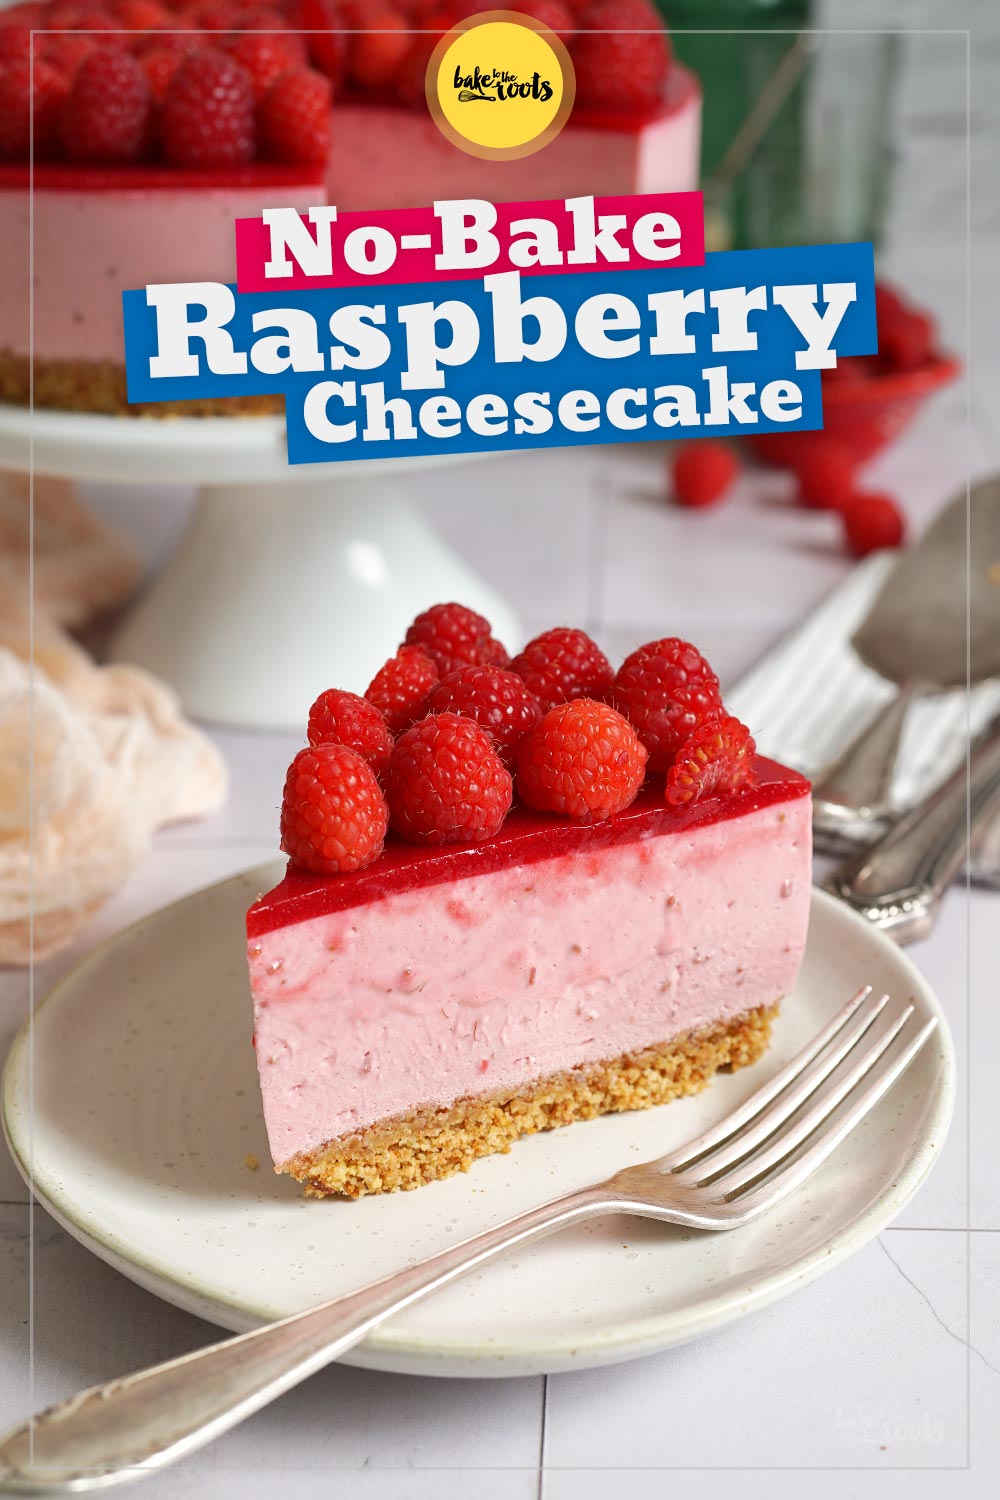
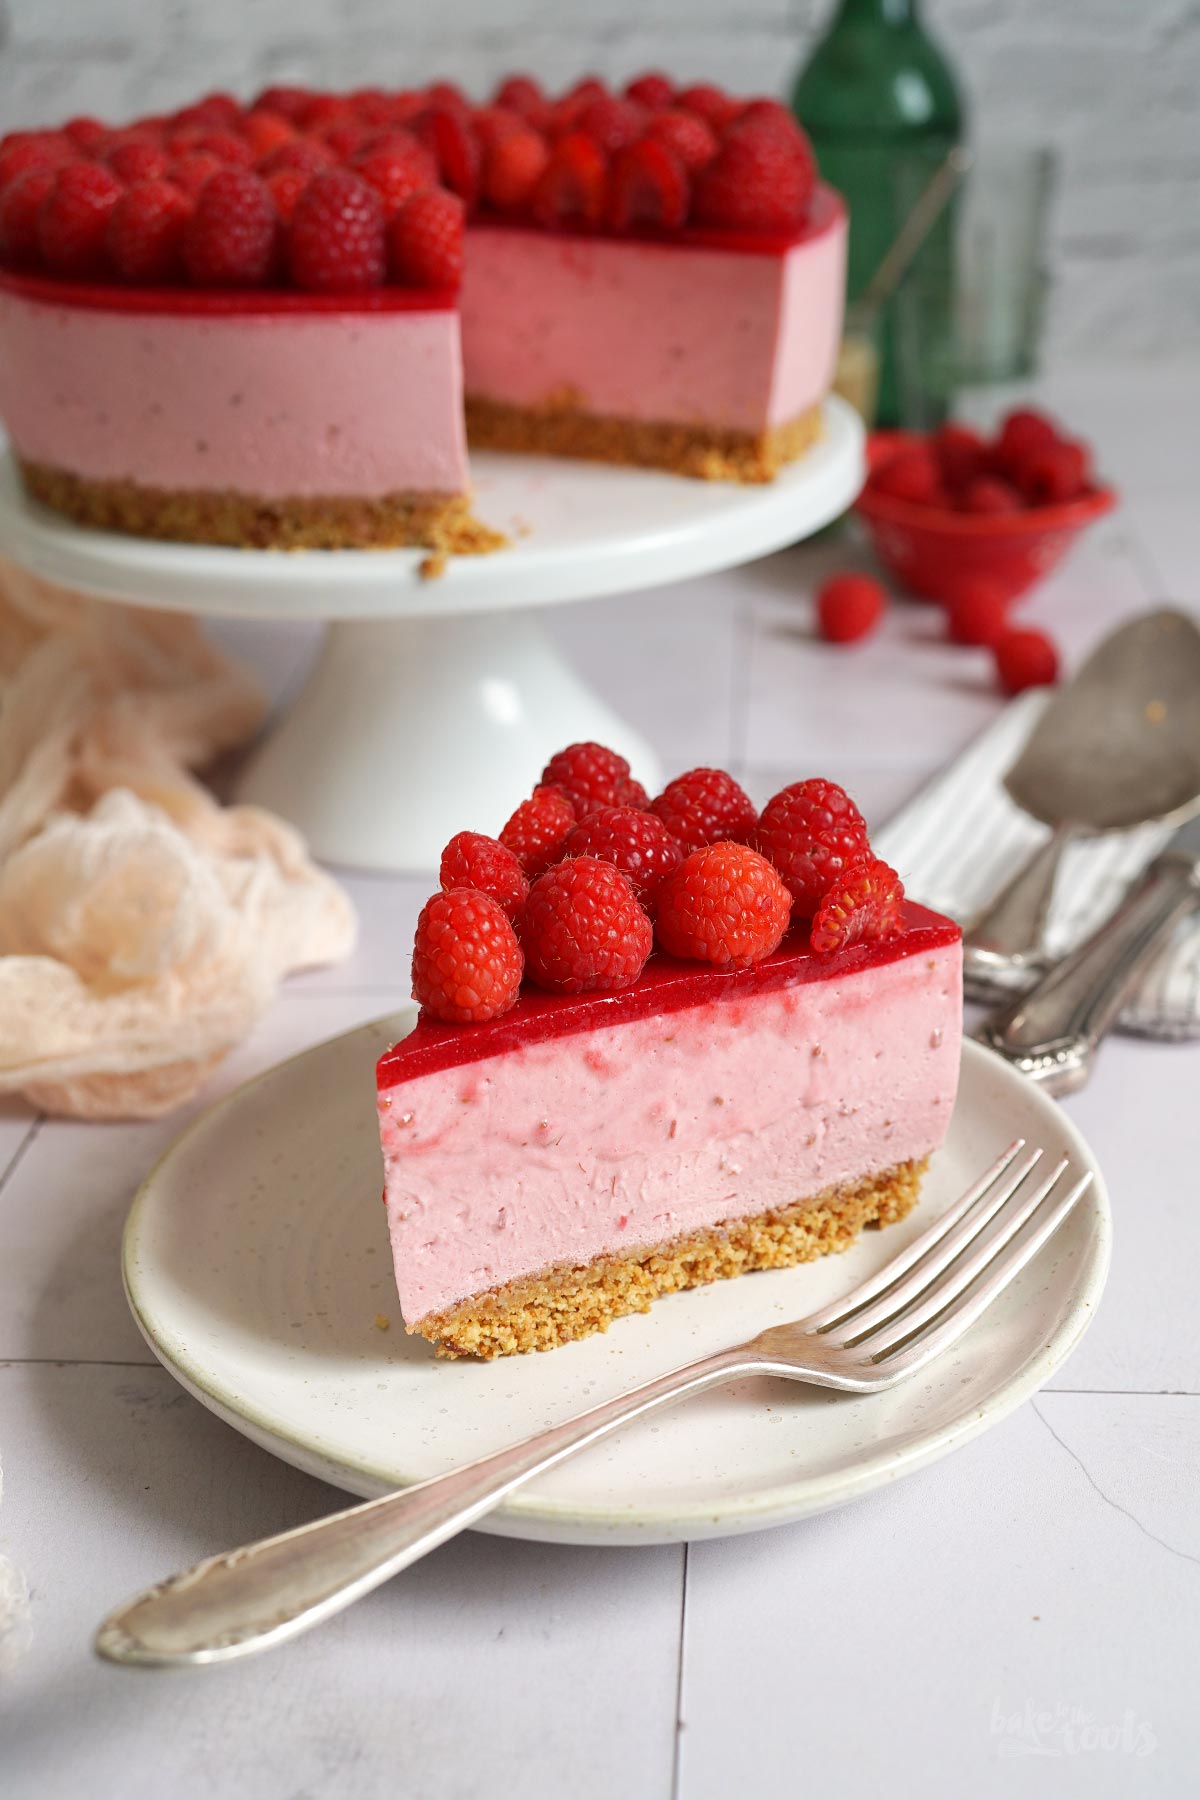
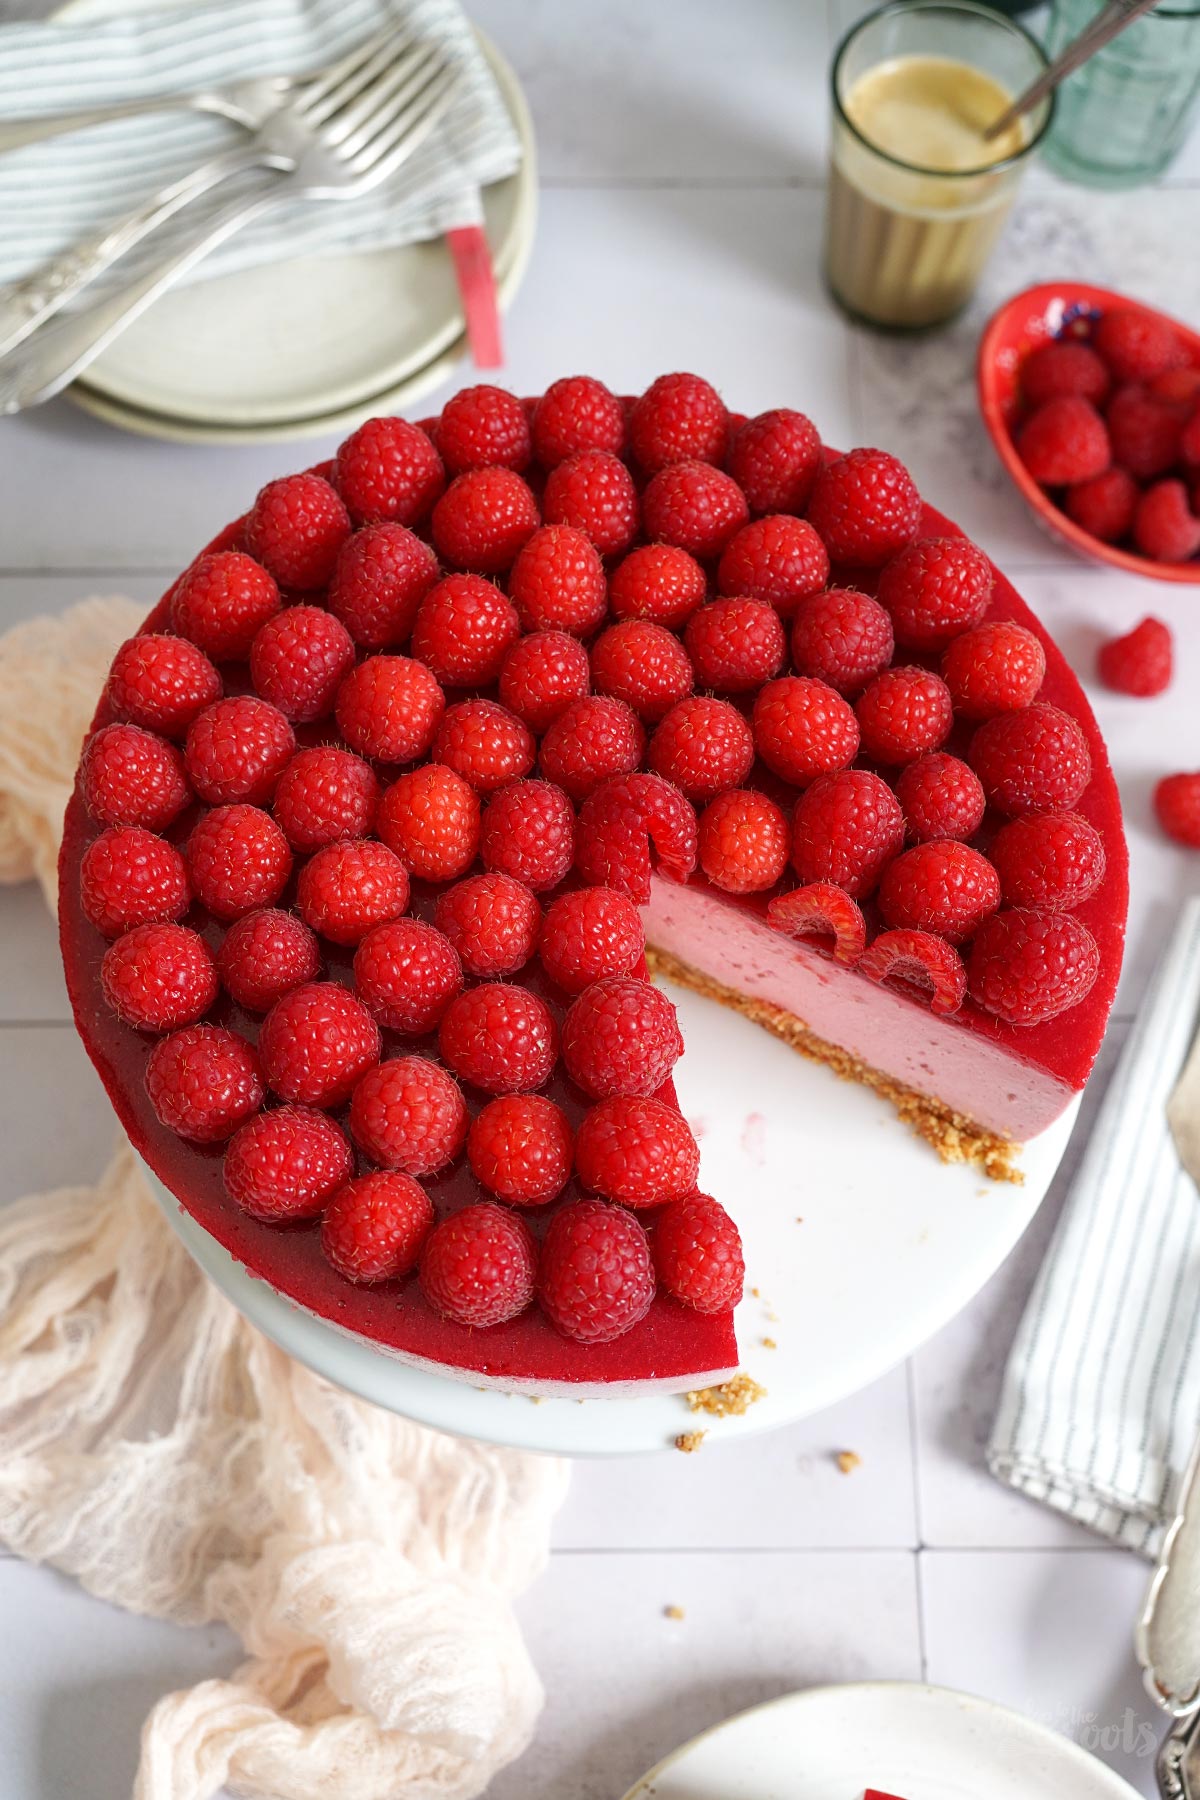
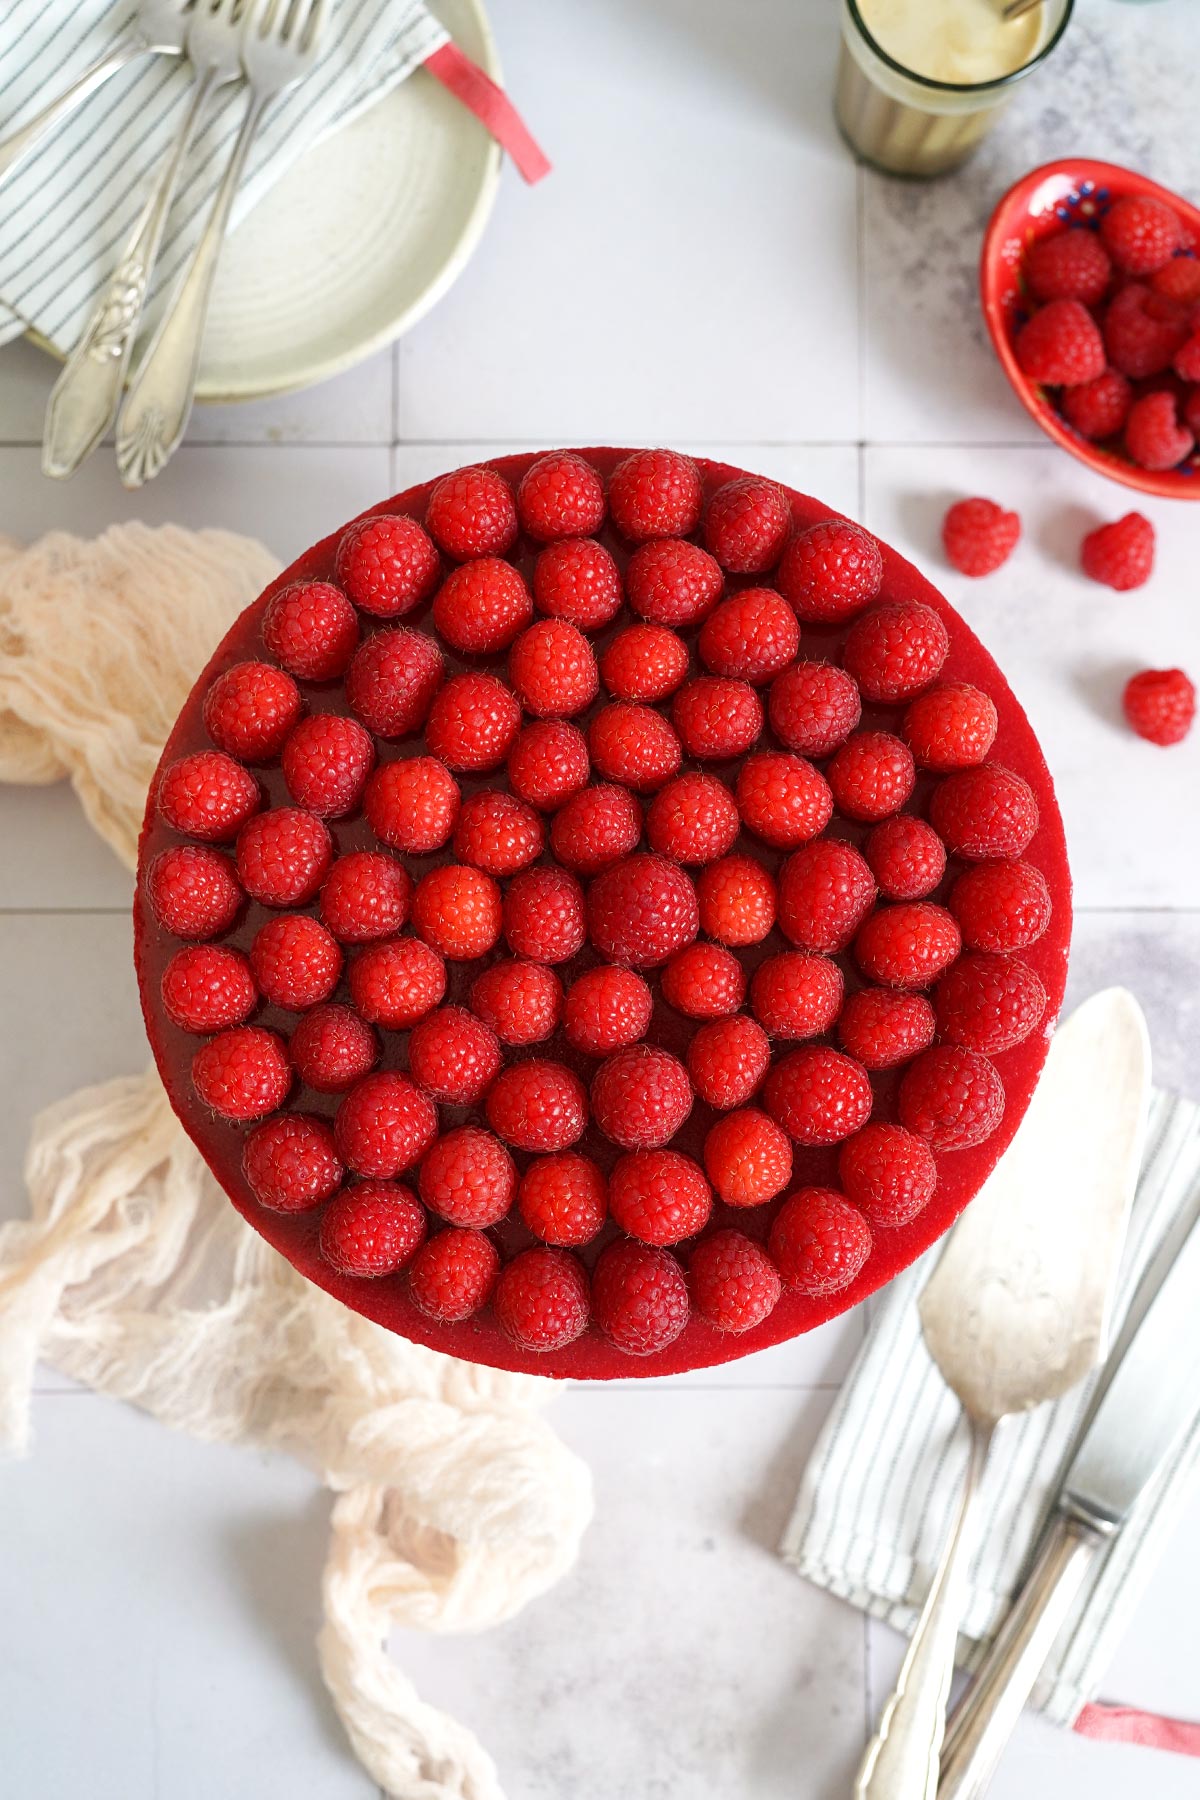
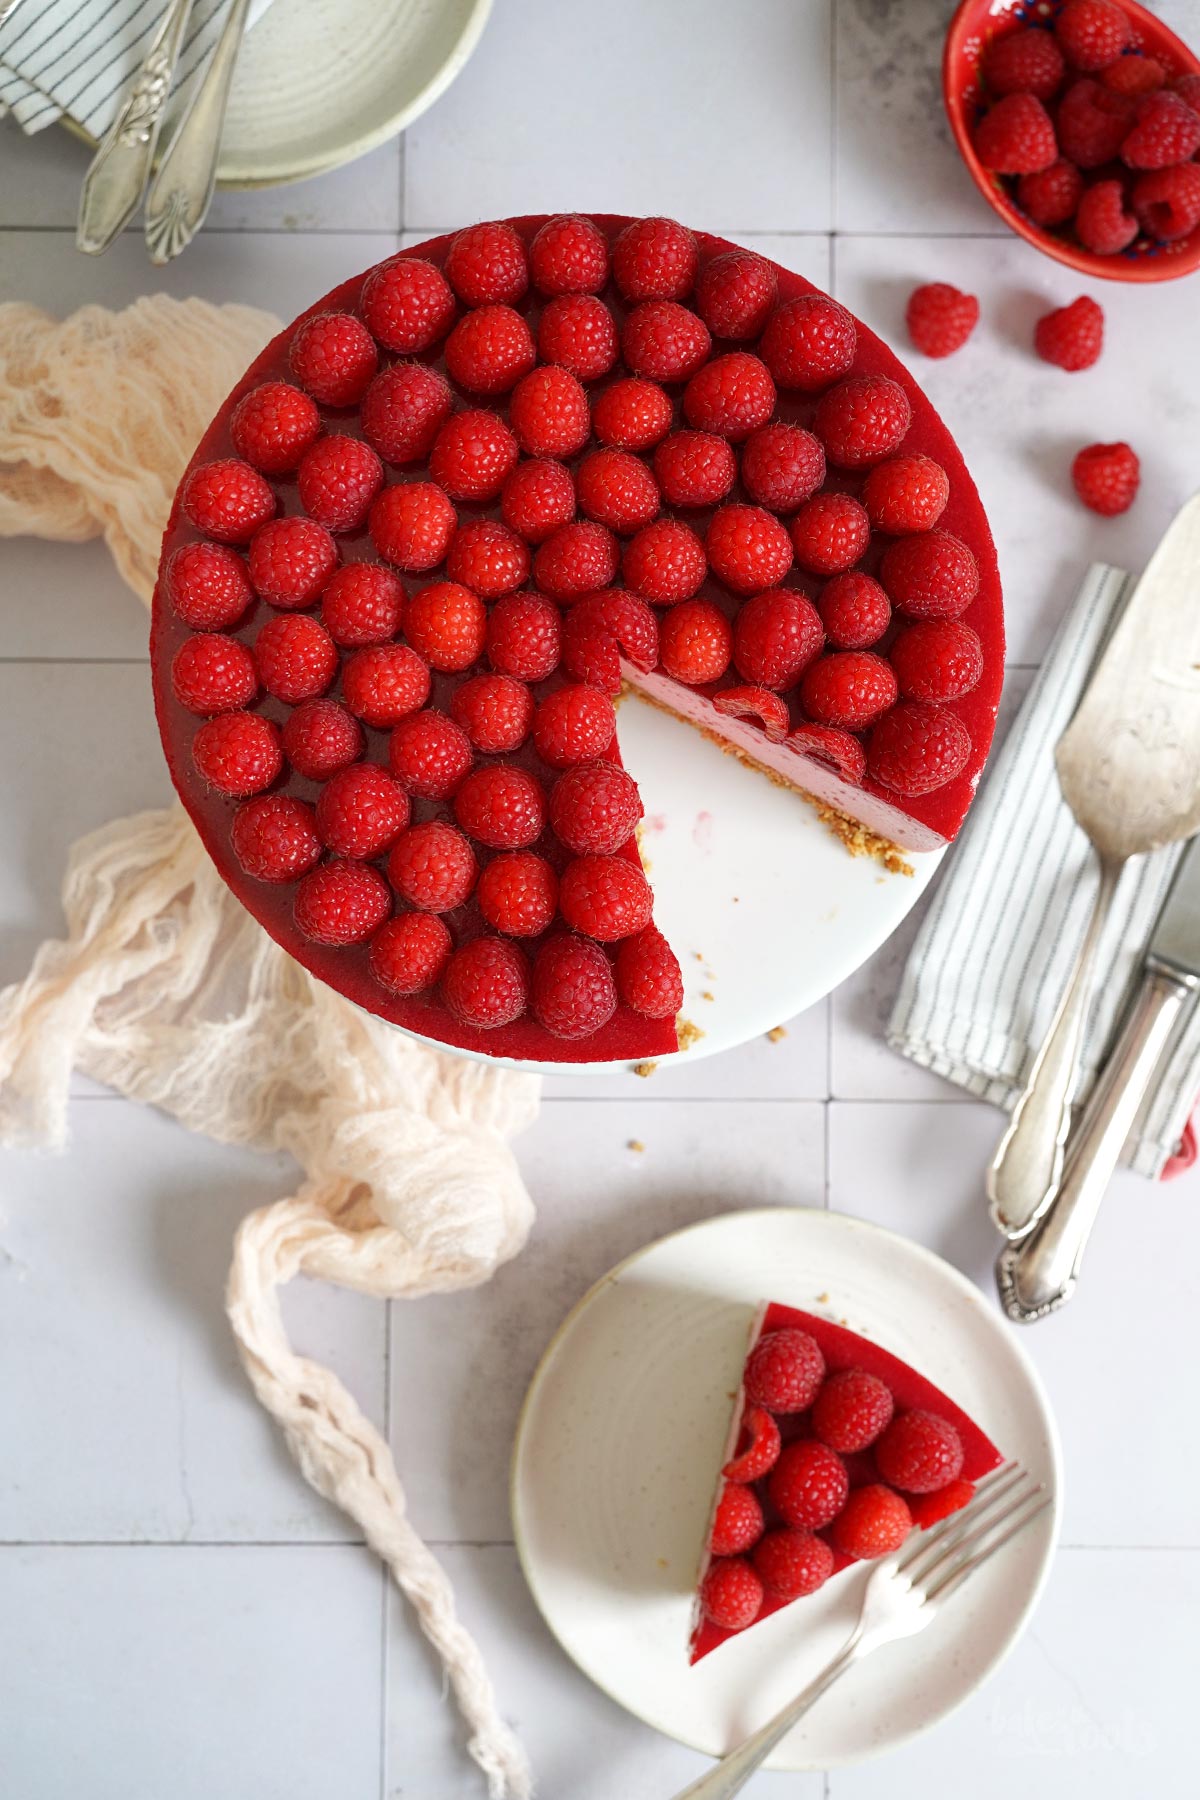
We are huge raspberry fans and everything you can do with those berries. The little red-pink berries are really delicious! Whenever we can grab some (at a good price) from the farmers market, we love to make something delicious like this No-Bake Raspberry Cheesecake. Not only does it taste wonderful, it also looks really great, doesn’t it?! Serve something like that with a cup of coffee and everyone will be very happy!
We have a small raspberry bush on our terrace for many years already. Unfortunately, the plant only produces a few raspberries each year, never enough for a cake or anything like that. You can snack on them throughout the summer, but at the end it’s only a handful. Our French bulldog is getting most of them to be honest. He loves them.
When I was young, we had several large raspberry bushes in our garden. With the berries from these bushes, we could have easily made five or more of these cheesecakes here. But did we do it back then? Nope. I think it was mainly birds that helped themselves to the berries. Well, someday we’ll have a garden again, and then we’ll plant everything our hearts desire… berries, fruit, and veggies!
Enough of the chitchat. Back to the cheesecake! When preparing this cake, you don’t necessarily need fresh raspberries. The cheesecake mixture and the layer on top can both be made with frozen berries. This means, in theory, you can prepare and serve this cheesecake even in the deepest depths of winter. When using frozen raspberries, you can also save some money. Frozen berries are normally cheaper than the fresh ones…
Even though there is a wide variety of fruits and berries available in summer, raspberries are not among the cheapest berries at the farmers market. They are quite delicate berries that need to be harvested and transported with great care. Once damaged, raspberries quickly begin to spoil. That’s why a small bowl of fresh raspberries in the fridge can sometimes turn into a Petri dish with mushroom cultures within a few hours.
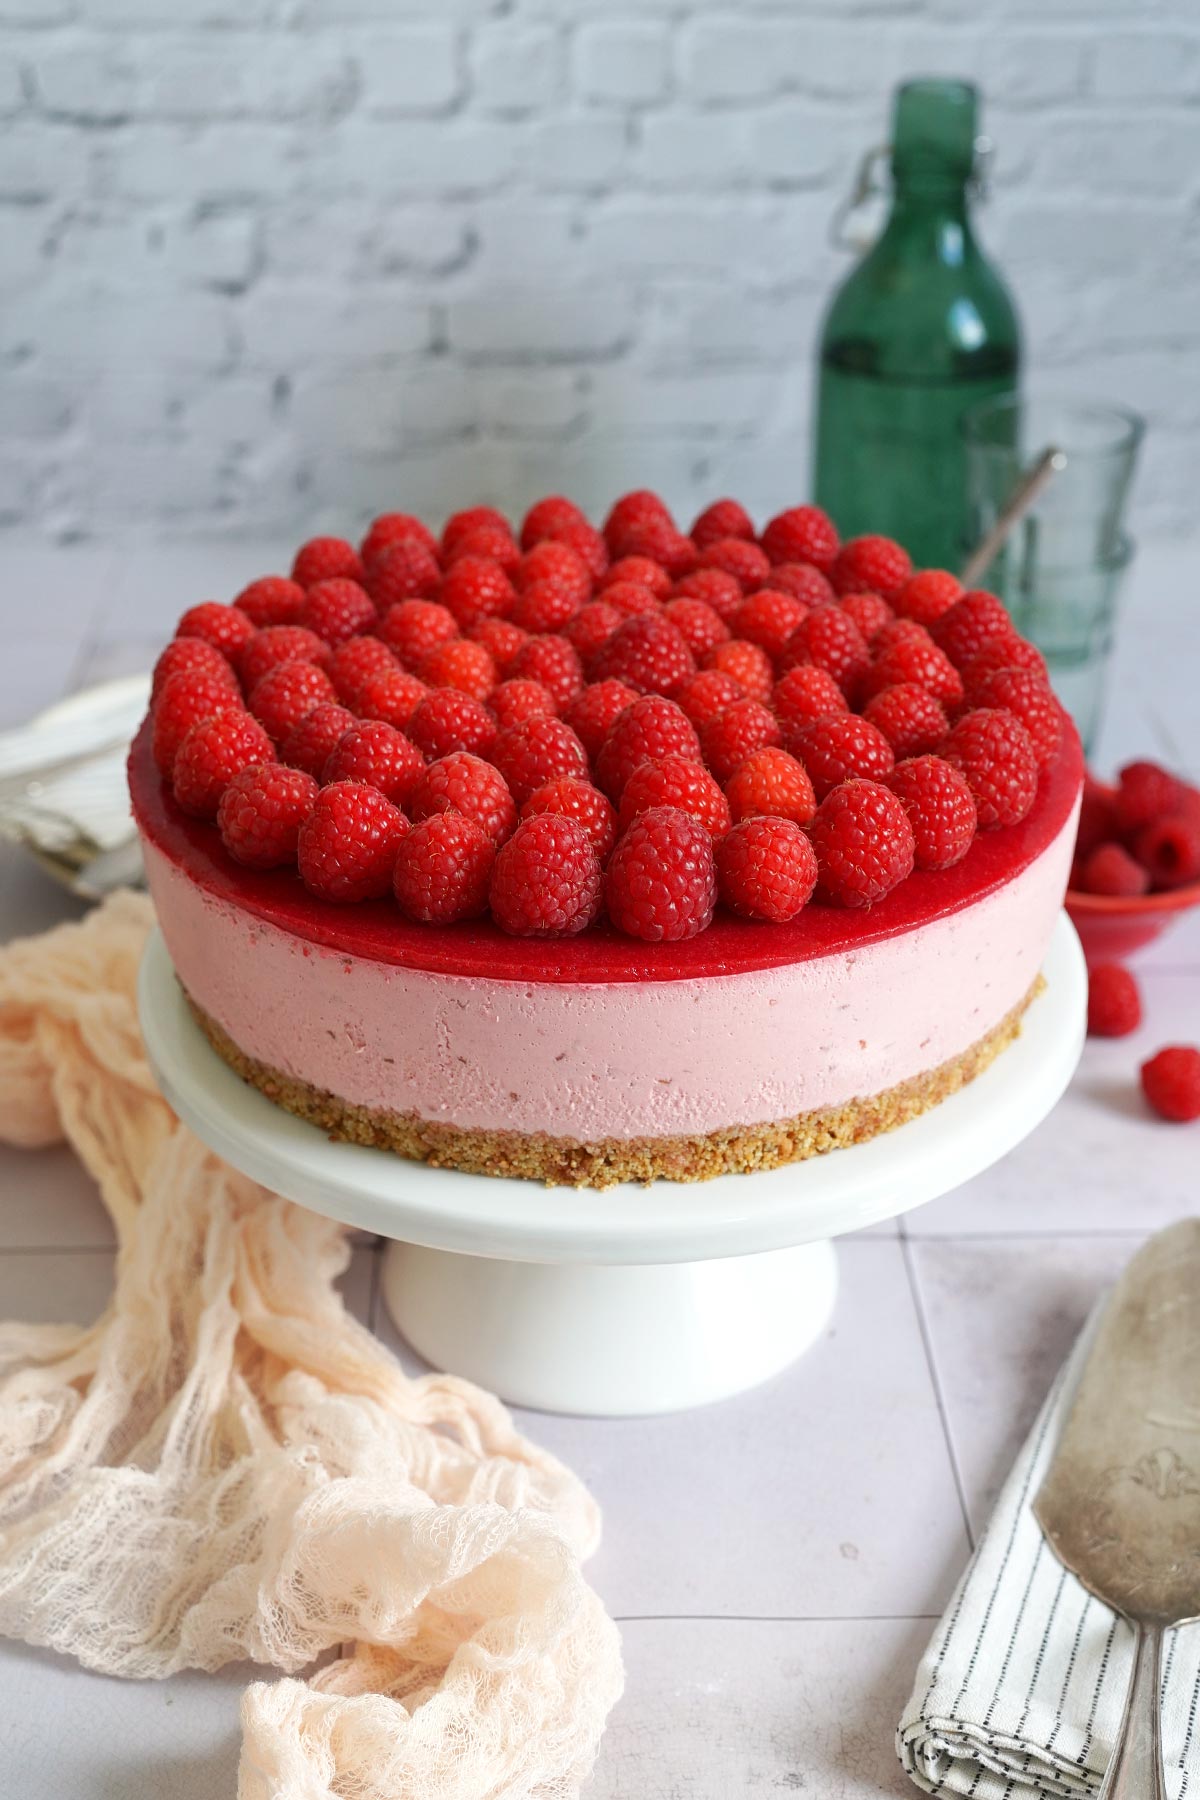
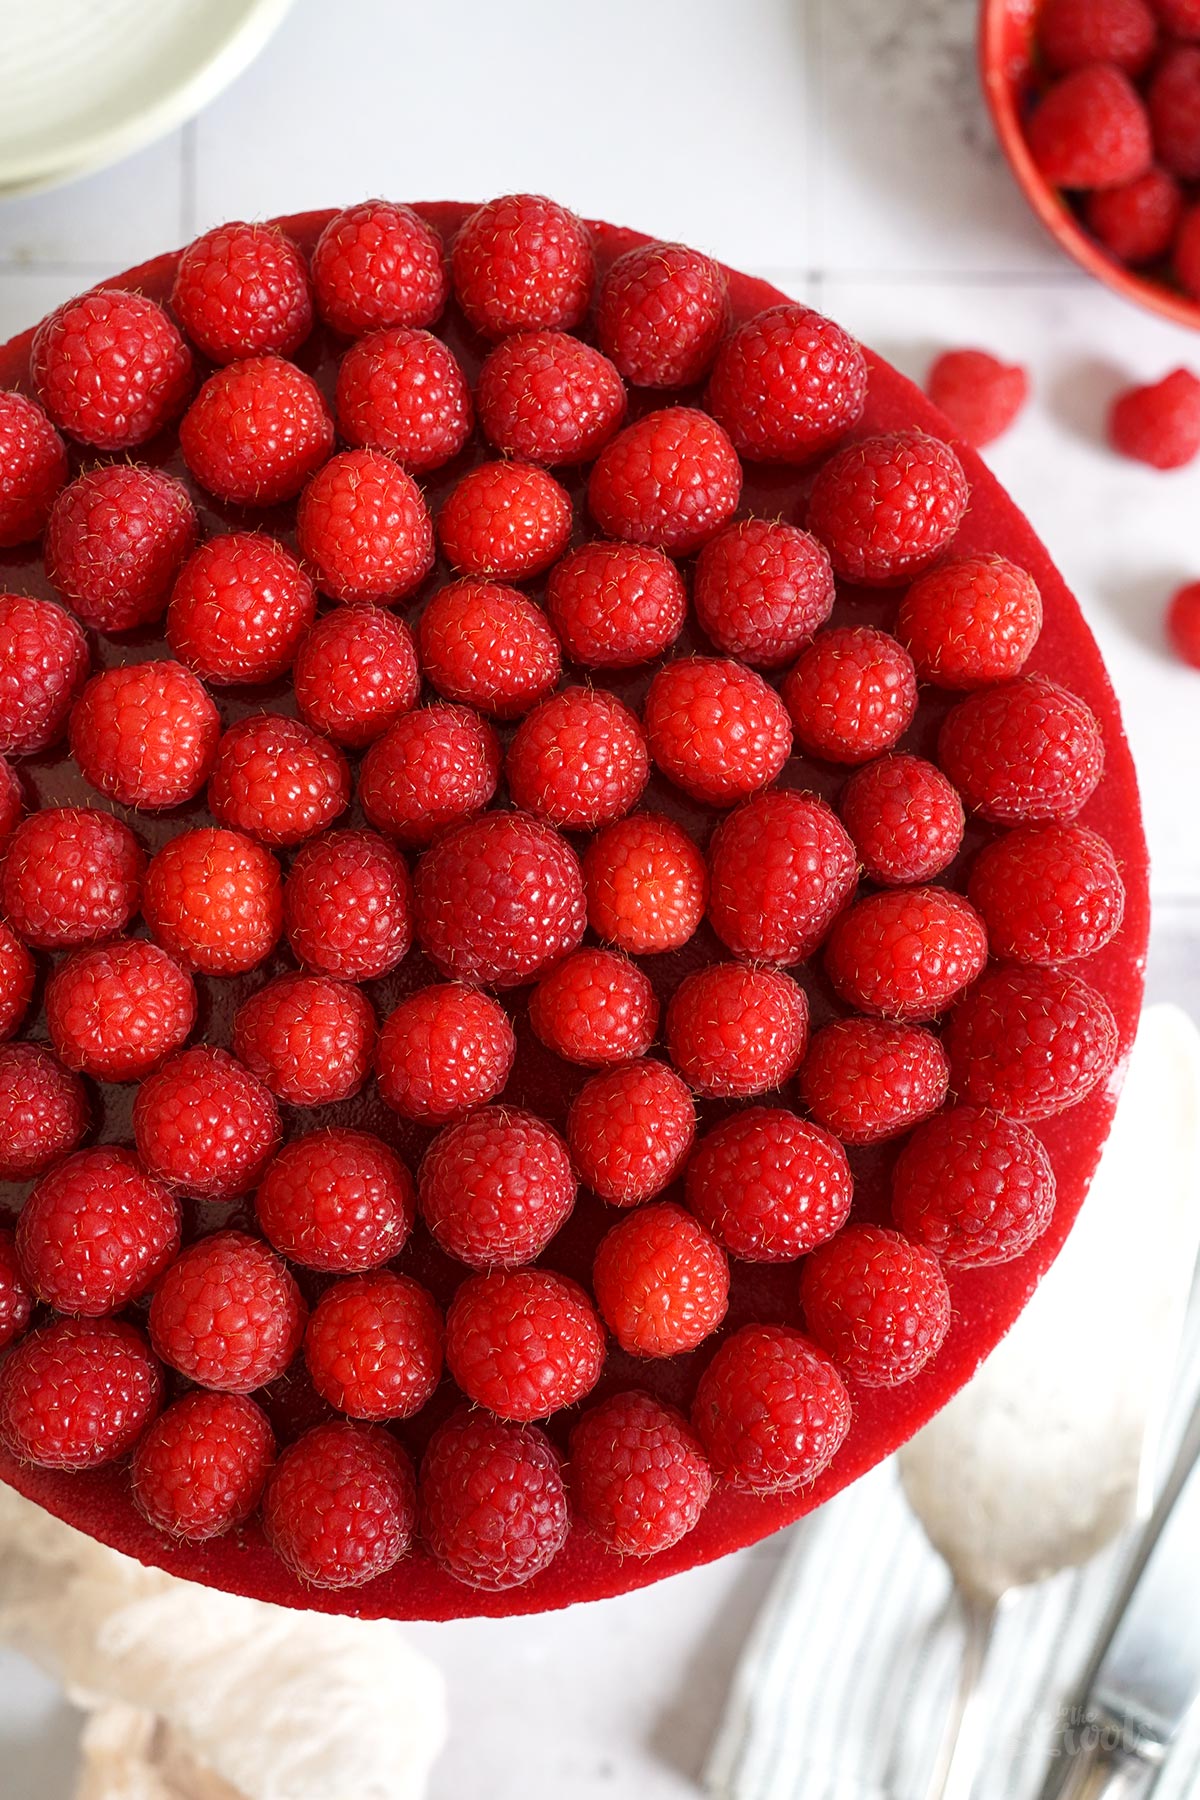
If you want to decorate the cake with raspberries, as shown in the pictures, you’ll have to use fresh raspberries (unfortunately). In this case, there’s no way around biting the bullet, or better said, the more expensive raspberry.
To be honest, the cheesecake looks great even without the raspberry decoration on top. The berry layer on its own provides enough color already – no need to top that with additional fresh raspberries if you don’t want to. We were just lucky because the raspberries were on sale the week we were preparing the cake… so we got quite a lot of them. Leftovers ended up in the freezer… for the next cake!

If you generally like raspberries and cheesecake, you might also want to try our Baked Raspberry Cheesecake. We like to prepare that one with fresh raspberries, but you can use frozen berries as well. After baking, fresh and frozen berries have the same consistency anyway.
Do you prefer no-bake cakes? How about a No-Bake Cheesecake with Cherry Topping? That one is also very delicious and can be made with any type of cherries – fresh, frozen, or canned cherries. Any of them can be turned into a delicious cherry compote. The one that’s on top of that equally delicious cheesecake.
INGREDIENTS / ZUTATEN
For the base:
7 oz. (200g) Cantuccini*
2 tbsp. brown sugar (or xylitol)
1/4 cup (60g) butter, melted
For the raspberry purée:
12.4 oz. (350g) frozen or fresh raspberries
1 tsp. lemon juice
For the filling:
6 sheets of gelatin
14 oz. (400g) cream cheese
7 oz. (200g) sour cream
1/4 cup (50g) sugar (or xylitol)
1 tsp. vanilla extract
7 oz. (200g) cold heavy cream, whipped
For the raspberry topping:
2 sheets of gelatin
9 oz. (250g) frozen or fresh raspberries
1 tbsp. sugar (or xylitol)
1/2 tsp. vanilla extract
fresh raspberries for decoration
Für den Boden:
200g Cantuccini*
2 EL brauner Zucker (oder Xylit)
60g Butter, geschmolzen
Für das Himbeerpüree:
350g TK-Himbeeren (oder frische Himbeeren)
1 TL Zitronensaft
Für die Füllung:
6 Blätter Gelatine
400g Frischkäse
200g Schmand
50g Zucker (oder Xylit)
1 TL Vanille Extrakt
200g kalte Sahne, aufgeschlagen
Für den Himbeerspiegel:
2 Blätter Gelatine
250g TK- Himbeeren (oder frische Himbeeren)
1 EL Zucker (oder Xylit)
1/2 TL Vanille Extrakt
frische Himbeeren für die Dekoration

DIRECTIONS / ZUBEREITUNG
1. Add the Cantuccini for the base either to the bowl of a food processor and crush them, or use a freezer bag and a rolling pin to get fine crumbs. Next, add the sugar and mix in. Melt the butter (e.g. in the microwave), add it to the crumbs, and mix until well combined. Pour the moist crumbs into an 8-inch (20 cm) baking tin with a loose bottom* and press down to create a compact layer. Place in the fridge until ready to use.
2. Add the frozen raspberries together with the lemon juice to a small saucepan and heat up until the raspberries start to break down. Remove from the heat and purée with an immersion blender*. Let cool down.
3. Break the gelatin leaves in half and place them in a small bowl of cold water. Let them soak for about 5-7 minutes. Meanwhile, mix the cream cheese, sour cream, sugar (or xylitol), and vanilla extract in a large bowl until well combined. Add the cooled raspberry purée and stir in.
4. Squeeze out the soaked gelatin leaves to get rid of excess water, then place them in a small saucepan. Let the gelatin dissolve over low heat. Add about 2-3 tablespoons of the cream cheese mixture to the saucepan and stir well. Pour this mixture into the large bowl and stir until well combined. Whisk the heavy cream in a tall bowl until stiff peaks form, then gradually and gently fold it into the cream cheese mixture. Pour this mixture into the prepared baking tin, smooth out the top, and place it in the fridge for at least 8 hours (or overnight).
5. Add the raspberries, sugar, and vanilla extract to a saucepan. Heat up until the berries start to break down. Remove from the heat and let cool down for a moment, then press the berries through a fine mesh sieve to get rid of the small raspberry seeds. Add the gelatin leaves for the raspberry layer to a small bowl with cold water and let them soak for 5-7 minutes.
6. Squeeze out the soaked gelatin leaves to get rid of excess water, then place them in a small saucepan. Let the gelatin leaves dissolve over low heat, then add the raspberry sauce and mix well. Let cool down completely. Before the mixture sets, pour it onto the cake and spread evenly. Let cool down (in the fridge) for at least 1 hour.
7. Carefully remove the cheesecake from the tin, place it on a serving plate, and decorate it with additional fresh raspberries. The cake is best when served chilled.
Tips:
+ If you don’t want raspberry seeds in the cream cheese mixture, you can pass the purée through a sieve before using it in the cream. In this case, however, it’s recommended to use some more raspberries to compensate for the loss of mass.
+ To save a little time, you can pour the raspberry sauce for the topping onto the cake a little earlier than mentioned in the recipe. The cheesecake should be firm enough after about 4 hours in the fridge to continue with the raspberry topping.
1. Die Cantuccini für den Boden entweder in eine Küchenmaschine geben und zerkleinern, oder in einem Gefrierbeutel mit einem Nudelholz bearbeiten, bis feine Brösel entstehen. Zucker dazugeben und untermischen. Die Butter schmelzen, zu den Bröseln dazugeben und alles gut vermengen. Die feuchten Brösel in eine 20cm Backform mit Hebeboden* füllen und zu einer kompakten Schicht zusammenpressen. Bis zur weiteren Verwendung in den Kühlschrank stellen.
2. TK-Himbeeren mit dem Zitronensaft in einen kleinen Topf geben und erhitzen, bis sie anfangen zu zerfallen. Vom Herd ziehen und mit einem Pürierstab* pürieren. Abkühlen lassen.
3. Gelatine für die Füllung in eine kleine Schüssel mit kaltem Wasser legen und etwa 5-7 Minuten quellen lassen. Frischkäse, Schmand, Zucker (oder Xylit) und Vanille Extrakt in einer großen Schüssel verrühren. Das abgekühlte Himbeerpüree dazugeben und unterrühren.
4. Die eingeweichte Gelatine ausdrücken, um überschüssiges Wasser loszuwerden und dann in einen kleinen Topf geben und bei geringer Hitzezufuhr auflösen lassen. Etwa 2-3 Esslöffel der Frischkäsemischung dazugeben und gut verrühren. Diese Mischung dann zur großen Schüssel dazugeben und alles gut verrühren. Die Sahne in einer separaten Schüssel steif schlagen, dann vorsichtig unter die Frischkäsemischung unterheben. Die Frischkäsemasse in die vorbereitete Form füllen, glatt streichen und dann für mindestens 8 Stunden (oder über Nacht) in den Kühlschrank stellen.
5. Die Himbeeren für den Himbeerspiegel zusammen mit dem Zucker und Vanille Extrakt in einen kleinen Topf geben und erwärmen, bis die Beeren zerfallen. Den Topf vom Herd ziehen, die Mischung etwas abkühlen lassen und dann durch ein feines Sieb streichen, um die kleinen Himbeerkerne loszuwerden. Die Gelatine in eine kleine Schüssel mit kaltem Wasser legen und etwa 5-7 Minuten quellen lassen.
6. Als Nächstes die eingeweichte Gelatine leicht ausdrücken und dann in einem kleinen Topf bei geringer Hitzezufuhr auflösen lassen. Die Himbeersoße dazugeben und alles gut verrühren – komplett abkühlen lassen. Bevor die Mischung fest wird, auf den Kuchen gießen und gleichmäßig verteilen. Für mindestens 1 Stunde (im Kühlschrank) fest werden lassen.
7. Den Käsekuchen vorsichtig aus der Form lösen, auf eine Servierplatte setzen und mit zusätzlichen frischen Himbeeren dekorieren. Gut gekühlt servieren.
Tipps:
+ Wer keine Himbeerkerne in der Frischkäsemischung möchte, kann das Püree vor dem Verarbeiten noch durch ein Sieb streichen – hier empfiehlt sich dann allerdings, etwas mehr Himbeeren zu verwenden, um den Masseverlust auszugleichen.
+ Um etwas Zeit zu sparen, kann man die Soße für den Himbeerspiegel auch schon etwas früher auf den Kuchen gießen – nach etwa 4 Stunden Kühlzeit sollte der Cheesecake schon fest genug sein, damit sich hier nichts mehr vermischt.

Craving more? Keep in touch on Facebook, Instagram and Pinterest for new post updates and more. You can also contact me with any questions or inquiries!
Here is a version of the recipe you can print easily.
Print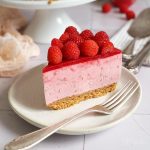
No-Bake Raspberry Cheesecake
- Prep Time: 00:40
- Cook Time: 00:00
- Total Time: 10:00
- Yield: 1 1x
- Category: Cheesecakes
- Cuisine: International
- Diet: Vegetarian
Description
This No-Bake Raspberry Cheesecake is the perfect cake for all raspberry fanboys and girls! A delicious delight for a hot summer day! It’s so good!
Ingredients
For the base:
7 oz. (200g) Cantuccini*
2 tbsp. brown sugar (or xylitol)
1/4 cup (60g) butter, melted
For the raspberry purée:
12.4 oz. (350g) frozen or fresh raspberries
1 tsp. lemon juice
For the filling:
6 sheets of gelatin
14 oz. (400g) cream cheese
7 oz. (200g) sour cream
1/4 cup (50g) sugar (or xylitol)
1 tsp. vanilla extract
7 oz. (200g) cold heavy cream, whipped
For the raspberry topping:
2 sheets of gelatin
9 oz. (250g) frozen or fresh raspberries
1 tbsp. sugar (or xylitol)
1/2 tsp. vanilla extract
fresh raspberries for decoration
Instructions
1. Add the Cantuccini for the base either to the bowl of a food processor and crush them, or use a freezer bag and a rolling pin to get fine crumbs. Next, add the sugar and mix in. Melt the butter (e.g. in the microwave), add it to the crumbs, and mix until well combined. Pour the moist crumbs into an 8-inch (20 cm) baking tin with a loose bottom* and press down to create a compact layer. Place in the fridge until ready to use.
2. Add the frozen raspberries together with the lemon juice to a small saucepan and heat up until the raspberries start to break down. Remove from the heat and purée with an immersion blender*. Let cool down.
3. Break the gelatin leaves in half and place them in a small bowl of cold water. Let them soak for about 5-7 minutes. Meanwhile, mix the cream cheese, sour cream, sugar (or xylitol), and vanilla extract in a large bowl until well combined. Add the cooled raspberry purée and stir in.
4. Squeeze out the soaked gelatin leaves to get rid of excess water, then place them in a small saucepan. Let the gelatin dissolve over low heat. Add about 2-3 tablespoons of the cream cheese mixture to the saucepan and stir well. Pour this mixture into the large bowl and stir until well combined. Whisk the heavy cream in a tall bowl until stiff peaks form, then gradually and gently fold it into the cream cheese mixture. Pour this mixture into the prepared baking tin, smooth out the top, and place it in the fridge for at least 8 hours (or overnight).
5. Add the raspberries, sugar, and vanilla extract to a saucepan. Heat up until the berries start to break down. Remove from the heat and let cool down for a moment, then press the berries through a fine mesh sieve to get rid of the small raspberry seeds. Add the gelatin leaves for the raspberry layer to a small bowl with cold water and let them soak for 5-7 minutes.
6. Squeeze out the soaked gelatin leaves to get rid of excess water, then place them in a small saucepan. Let the gelatin leaves dissolve over low heat, then add the raspberry sauce and mix well. Let cool down completely. Before the mixture sets, pour it onto the cake and spread evenly. Let cool down (in the fridge) for at least 1 hour.
7. Carefully remove the cheesecake from the tin, place it on a serving plate, and decorate it with additional fresh raspberries. The cake is best when served chilled.
Notes
+ If you don’t want raspberry seeds in the cream cheese mixture, you can pass the purée through a sieve before using it in the cream. In this case, however, it’s recommended to use some more raspberries to compensate for the loss of mass.
+ To save a little time, you can pour the raspberry sauce for the topping onto the cake a little earlier than mentioned in the recipe. The cheesecake should be firm enough after about 4 hours in the fridge to continue with the raspberry topping.
Links marked with an asterisk (*) are affiliate links (advertising/Werbung) to Amazon Germany. If you click on one of those links and buy something via this link, I will get a commission for that sale. The price of whatever you buy is not affected in any way by this.