Last week I made a batch of colorful Polka Dot Christmas Cookies. They did not really have the typical “Christmas Cookie Look & Feel” but who cares ;) Today’s cookies are probably also not very “Christmas season-appropriate” for most people – but I really like these Llama & Cactus Christmas Cookies. They are fun to look at and fun to prepare – that’s all that counts!

I am (admittedly) not a big fan of cookies with royal icing. Sugar cookies with royal icing look great if someone has a hand for this kind of decoration, but those cookies are generally a bit too sweet for me with all that sugar. I have the same problem with cakes that are decorated with fondant. Great looks, but eating all that sugar… no way ;) Not only because I am a diabetic and want to eat less sugar – it really does not taste good. It’s just very sweet. That’s all. Almost nobody I know likes that ;P
Anyway. If you ignore all the sugar – there is a lot you can do with royal icing ;) I am still learning when it comes to decorating cookies with that sugar glaze. It can be fun. Unless you have to do the same stuff over and over again for several hours or if you got to work with 20 different piping bags – that job then quickly turns into hard labor. Like working on an assembly line. Not my favorite things to do in life :P
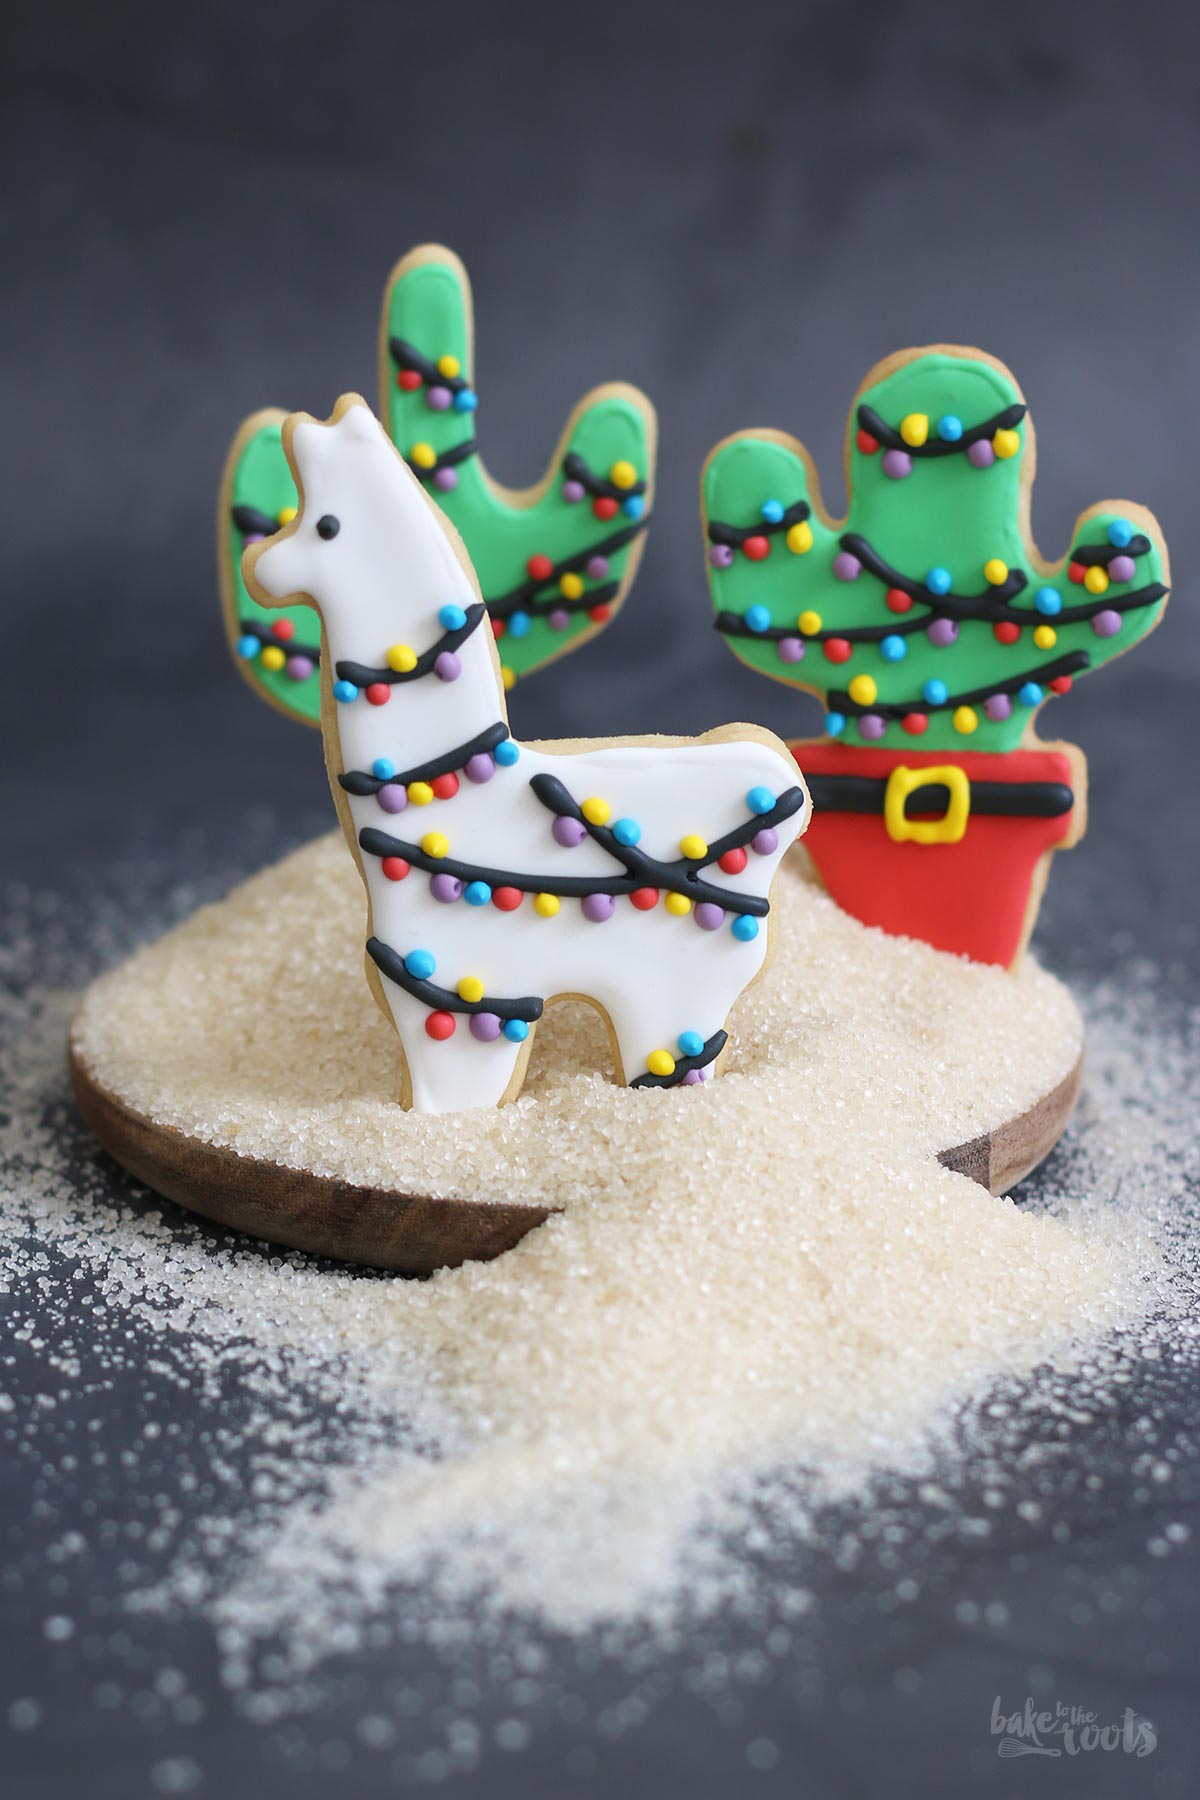
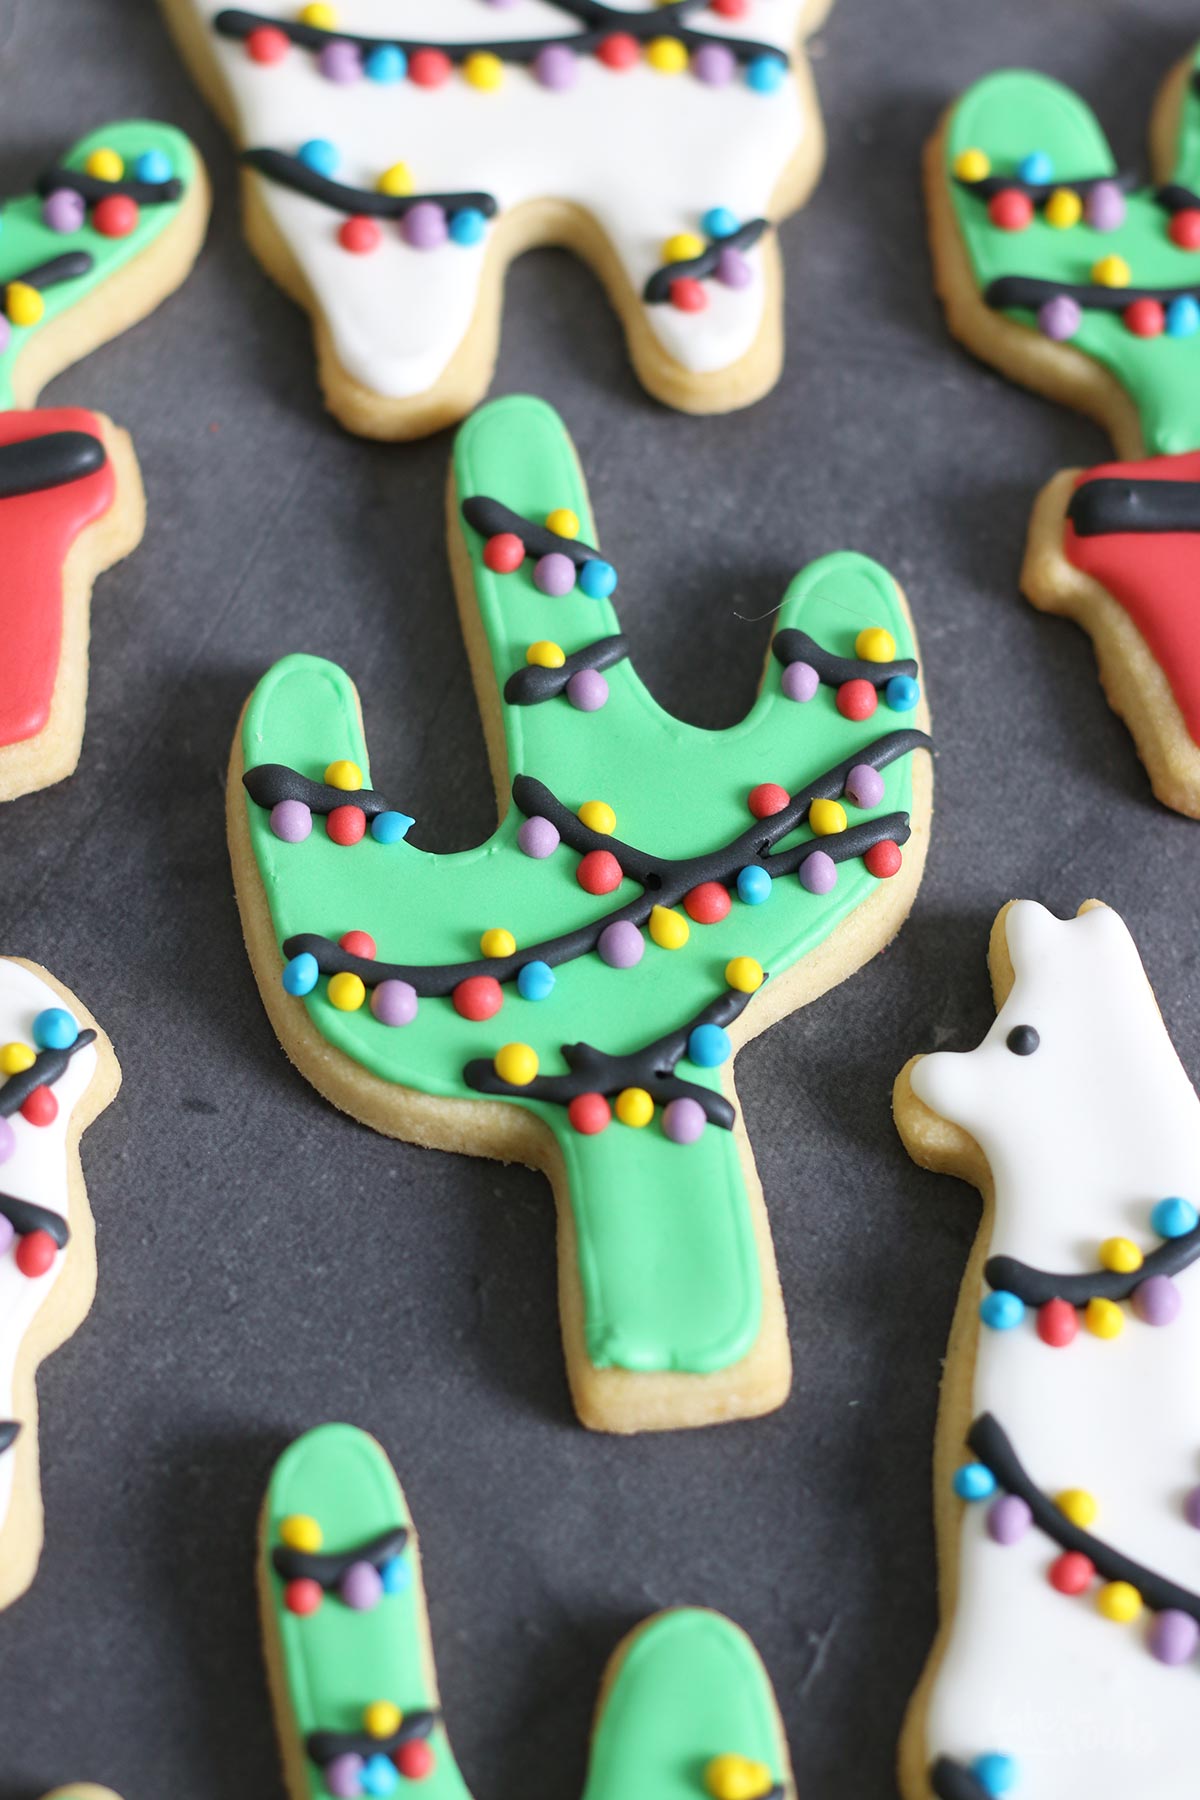
Well… these cookies are actually not that complicated and do not require hours of work. The take some time to do because you have to wait for the royal icing to dry here and there, but besides that – pretty easy job. Some lines and dots are not that complicated to do. Even if you don’t have a steady hand ;P

You have to start with a layer of royal icing for the base. Then this layer has dried long enough, you can finish the cookies with the Christmas lights and other decorations. The result will be cute and colorful and I am pretty sure everybody will love them… at least that’s what happened here with my cookies ;) I did not eat the cookies myself though. Just tried one to check if they were good. Most of them were gifted to friends – the ones I kept were used to decorate Christmas gifts or the centerpiece on our dinner table. There is no need to eat all of them (or any of them) if you use them for decorations ;P
INGREDIENTS / ZUTATEN
For the cookies:
1 3/4 cups (220g) all-purpose flour
1/2 cup (70g) confectioners‘ sugar
1 pinch of salt
2/3 cup (150g) cold butter
1 small egg
1/2 tsp. vanilla extract
For the royal icing:
10.6 oz. (300g) confectioners’ sugar
2 tbsp. meringue powder*
1.7 fl. oz. (50ml) water, plus maybe more for thinning the icing
some drops of lemon or vanilla flavor (optional)
food colors (e.g. red, yellow, blue, green, and black)*
Für die Cookies:
220g Mehl (Type 405)
70g Puderzucker
1 Prise Salz
150g kalte Butter
1 Ei (S)
1/2 TL Vanille Extrakt
Für das Royal Icing:
300g Puderzucker
2 EL Eiweißpulver*
50ml Wasser, plus ggf. etwas mehr
ein paar Tropfen Zitrone- oder Vanille-Aroma (optional)
Lebensmittelfarben (.z.B. Rot, Gelb, Blau, Grün und Schwarz)*
If you don’t like overly sugary cookies, you can do the cookies without the first layer of sugar glaze. Just decorate regular plain cookies with strings of Christmas lights and that’s it! Looks nice and works well with other cookie shapes too. Hearts, for example ;)

DIRECTIONS / ZUBEREITUNG
2. Preheat the oven to 350°F (175°C). Line a baking sheet with baking parchment and set aside. Divide the dough in half (keep one half in the fridge) and roll out thinly on a lightly floured surface. Use a Llama and cactus cookie cutter* to cut out as many cookies as possible. Collect leftover dough and roll out again. Place the cookies on the prepared baking sheet and bake for about 10 minutes – they should not get much of a color. Take out of the oven and let cool down on the baking sheet for some time, then transfer to a wire rack to cool down completely. Bake more cookies with the remaining dough sitting in the fridge.
3. For the royal icing add the confectioners’ sugar and meringue powder to a large bowl and mix to combine. Gradually add water and the flavoring (optional) and mix with a handheld mixer or your kitchen machine. At first, the mix will probably have a texture like wet sand or streusel but the more water you add the more it will look like icing. Be careful not to add too much water or the icing will get runny – you want a thick and only slightly runny texture. Mix for 2-3 minutes until everything is well combined. If the icing forms a peak when you pull out the hand mixer and it slowly curves down, then the consistency is right for the borders. For flooding consistency, you have to add a bit more water so the icing is a bit runnier.
4. Color the royal icing with different food colors – leave some white for the Llamas – and fill it into piping bags. Use the thicker icing to pipe borders along the edges of the cookies and flood the surface inside the borders with the slightly runnier icing. Use a toothpick if necessary to push the icing into all corners. Let the cookies dry overnight and place the rest of the icing in an airtight container and place it in the fridge. Decorate the cookies further with Christmas lights the next day and let them dry again overnight. After that, you can store them in a tin box (with paper in between) without destroying the decorations.
2. Den Ofen auf 175°C (350°F) Ober-/Unterhitze vorheizen. Ein Backblech mit Backpapier auslegen und zur Seite stellen. Den Teig halbieren und auf einer leicht bemehlten Fläche dünn ausrollen (Rest im Kühlschrank lassen). Mit Lama und Kaktus Ausstechern* Teiglinge ausstechen und auf das vorbereitete Blech setzen – Teigreste sammeln und erneut ausrollen. Für etwa 10 Minuten backen – die Kekse sollten kaum Farbe bekommen haben. Aus dem Ofen holen und erst auf dem Blech kurz abkühlen lassen und dann auf einem Kuchengitter komplett abkühlen lassen. Mit dem restlichen Teig noch mehr Kekse ausstechen und backen.
3. Für das Royal Icing den Puderzucker mit Eiweißpulver in einer großen Schüssel vermischen. Etwas Wasser und ein paar Tropfen Aroma (optional) dazugeben und mit einem Handmixer oder der Küchenmaschine verrühren. Zu Anfang wird es erst nach Streuseln aussehen, dann einfach nach und nach mehr Wasser dazugeben, aber vorsichtig, damit ihr plötzlich nicht zu viel Wasser im Icing habt – die Masse sollte recht dickflüssig und zäh sein. Für etwa 2-3 Minuten mixen. Wenn das Icing beim Herausziehen des Handmixers eine Spitze bildet, die sich langsam nach unten biegt, dann passt die Konsistenz für die Umrandungen. Für das Icing zum “Fluten” der Cookies innerhalb der Umrandungen müsst ihr etwas mehr Flüssigkeit dazugeben, damit es leichter fließt.
4. Das Icing dann mit verschiedenen Lebensmittelfarben einfärben, für die Lamas einen Teil weiß lassen und dann in Spritzbeutel einfüllen. Mit einem dickflüssigeren Icing erst eine dünne Umrandung entlang der Ränder eines Cookies aufspritzen, dann mit der etwas flüssigeren Version desselben Icings den inneren Bereich füllen und ggf. mit einem Zahnstocher bis zu den Rändern drücken. Cookies über Nacht trocknen lassen und den Rest des Icings in einem luftdichten Behälter in den Kühlschrank stellen. Am nächsten Tag dann die Lichterketten und sonstige Deko aufspritzen und erneut über Nacht trocknen lassen – erst danach sind die Cookies fertig und können in einer Blechdose gelagert (mit Papier dazwischen) werden.
Craving more? Keep in touch on Facebook, Twitter, Instagram and Pinterest for new post updates and more. You can also contact me with any questions or inquiries!
Here is a version of the recipe you can print easily.
Print
Llama & Cactus Christmas Cookies
- Prep Time: 00:45
- Cook Time: 00:10
- Total Time: 17:00
- Yield: 30 1x
- Category: Cookies
- Cuisine: America
- Diet: Vegetarian
Description
Why always the same old Christmas cookies? How about some cute Royal Icing cookies that look like Lamas and Cactuses with Christmas Lights ;)
Ingredients
For the cookies:
1 3/4 cups (220g) all-purpose flour
1/2 cup (70g) confectioners‘ sugar
1 pinch of salt
2/3 cup (150g) cold butter
1 small egg
1/2 tsp. vanilla extract
For the royal icing:
10.6 oz. (300g) confectioners’ sugar
2 tbsp. meringue powder*
1.7 fl. oz. (50ml) water, plus maybe more for thinning the icing
some drops of lemon or vanilla flavor (optional)
food colors (e.g. red, yellow, blue, green, and black)*
Instructions
1. Add the flour, confectioners‘ sugar, and salt to a large bowl and mix to combine. Add the cold butter in small pieces and cut into even smaller pieces with a pastry blender*. Whisk the egg and add together with the vanilla extract to the bowl – mix with a fork first, then use your hands to create a nice and smooth dough. Try to work quickly so the butter is not melting. Wrap into plastic wrap and place in the fridge for at least 1 hour or overnight.
2. Preheat the oven to 350°F (175°C). Line a baking sheet with baking parchment and set aside. Divide the dough in half (keep one half in the fridge) and roll out thinly on a lightly floured surface. Use a Llama and cactus cookie cutter* to cut out as many cookies as possible. Collect leftover dough and roll out again. Place the cookies on the prepared baking sheet and bake for about 10 minutes – they should not get much of a color. Take out of the oven and let cool down on the baking sheet for some time, then transfer to a wire rack to cool down completely. Bake more cookies with the remaining dough sitting in the fridge.
3. For the royal icing add the confectioners’ sugar and meringue powder to a large bowl and mix to combine. Gradually add water and the flavoring (optional) and mix with a handheld mixer or your kitchen machine. At first, the mix will probably have a texture like wet sand or streusel but the more water you add the more it will look like icing. Be careful not to add too much water or the icing will get runny – you want a thick and only slightly runny texture. Mix for 2-3 minutes until everything is well combined. If the icing forms a peak when you pull out the hand mixer and it slowly curves down, then the consistency is right for the borders. For flooding consistency, you have to add a bit more water so the icing is a bit runnier.
4. Color the royal icing with different food colors – leave some white for the Llamas – and fill it into piping bags. Use the thicker icing to pipe borders along the edges of the cookies and flood the surface inside the borders with the slightly runnier icing. Use a toothpick if necessary to push the icing into all corners. Let the cookies dry overnight and place the rest of the icing in an airtight container and place it in the fridge. Decorate the cookies further with Christmas lights the next day and let them dry again overnight. After that, you can store them in a tin box (with paper in between) without destroying the decorations.
Notes
Enjoy baking!
Links marked with an asterisk (*) are affiliate links (advertising/Werbung) to Amazon Germany. If you click on one of those links and buy something via this link, I will get a commission for that sale. The price of whatever you buy is not affected in any way by this.




 I love my job, but in between I love to bake and try new things in the kitchen. A lot of my friends and colleagues encourage me to bake - for a very simple reason: they get the leftovers - and it seems they like it most of the time ;)