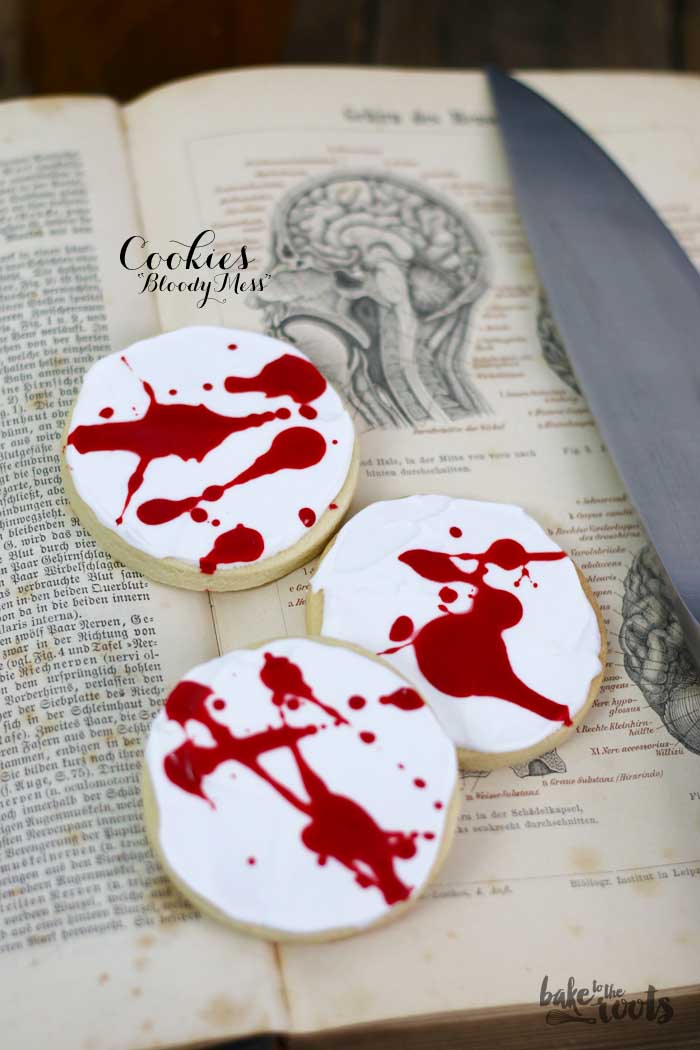
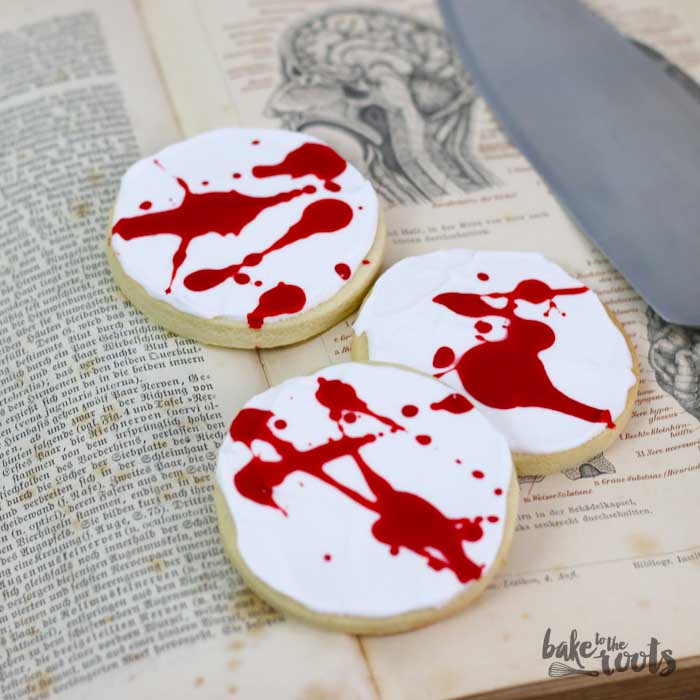
I think I made a little mess when I was trying to prepare a Bloody Mary the other day… Can someone call an ambulance? I think that would be a good idea…. the knife? I don’t know what you mean? What do you mean with “…a Bloody Mary is a drink”? What are you talking….?!
Happy Halloween folks! ;)
Well almost… still some days left until the fun begins. But you can never prepare too early for the festivities, right? Unfortunately I made a little mistake when preparing the Bloody Mary it seems… somebody told me it’s a drink made with tomato juice?! I think I have to re-write the recipe then…
Juust kidding…! Of course I know it’s a drink… made with blood, right? No? Well… tomato juice is fine as well. Can’t tell the difference anyways ;)
So what do you think of my little Halloween project? I really made a mess in my kitchen with that cookies – that was true – but with food color. Oh boy, that red is really sticking everywhere now! Make sure you have enough paper underneath when making these and maybe a rubber glove…. so nobody can identify your fingerprints :P
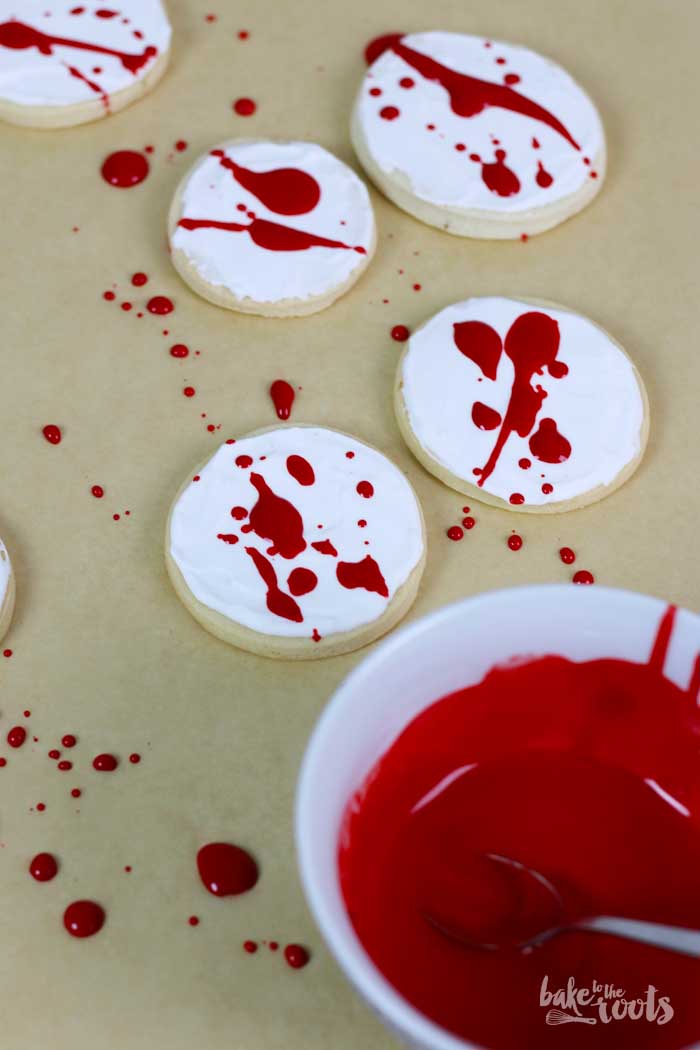
It is really fun to make this cookies! I met with a lot of food bloggers last weekend and one of them taught us to make cookies with royal icing. We made nice pumpkin cookies which looked really cute. That was basically the inspiration for these cookies. Well not the pumpkins, but cookies with royal icing – I wanted to do it at home and try for myself. As you can see, I failed. No – not the blood this time ;) Normally you should get a nice edge with the royal icing, but that just did not work for me, so I made the “rustic” version and used a spatula to spread the icing on top instead of piping it neatly. But when you spill blood over everything it doesn’t really matter… ;)
Back to the Bloody Mary! For those cookies you need a matching drink of course. First I thought about a drink called “Brain in a shot glass” – we were drinking that when I was young or better said younger – of course I was at an age where I was allowed to drink! ;) I think it was made of vodka, coffee liquor and some red liquor for the blood… as you can see I can’t really remember the ingredients, so I decided to go with the Bloody Mary. The name works better with the bloody cookies anyways ;) I used the recipe from the website uk.thebar.com* where you can find some really nice Halloween Cocktail Recipes (the one for the bloody mary can be found here). If you are not so much into Mary, why not try Maria? She prefers tequila. Or if you don’t care about names go with the Red Widdow – all of those drinks are based on a classic Bloody Mary ;) Don’t forget you have to have the legal drinking age to view the website! :) If you are not old enough, I can give you the recipe for the virgin drink version without alcohol… and now back to the cookies! Happy Halloween!

INGREDIENTS / ZUTATEN
For the cookies:
1 cup (230g) butter, at room temperature
1 cup (130g) confectioner’s sugar
1 large egg
2 tsp. vanilla extract
zest of one organic lemon
2 1/2 cups (325g) all-purpose flour
1/2 tsp. salt
For the royal icing:
1 egg white
1 1/2 cups (260g) confectioner’s sugar
1 tsp. water (plus more if needed)
some drops of lemon juice
red food color
Für die Cookies:
230g weiche Butter
130g Puderzucker
1 Ei (L)
2 TL Vanille Extrakt
1 Bio-Zitrone, Abrieb
325g Mehl (Type 405)
1/2 TL Salz
Für das Royal Icing:
1 Eiweiß
260g Puderzucker
1 TL Wasser (mehr falls notwendig)
ein paar Tropfen Zitronensaft
Rote Lebensmittelfarbe
DIRECTIONS / ZUBEREITUNG
2. Preheat the oven to 350˚F (175°C). Line two baking sheets with baking parchment. Roll out the dough on a floured surface and cut out round cookies the size you like. Place on the baking sheets and bake for 8-10 minutes – the cookies should only get a little bit of color. Take out of the oven and let cool down on the baking sheets for 3-5 minutes, then transfer to a wire rack and let cool down completely.
3. For the royal icing mix egg white, confectioner’s sugar, water and lemon juice in a bowl on medium-high speed for about 8-10 minutes until the mixture gets shiny and glossy. The consistency is good when you cut into the icing and the cut closes itself after 10 seconds – if not, add some more liquid or confectioner’s sugar depending if it is too thick or too runny. Fill the icing into a piping bag with a thin round tip and ice the cookies like a pro (pipe the outline first and then fill them out completely) or do it like me and use a spatula and just spread the icing on the cookies – looks a bit rustic. Let the cookies dry over night. Keep the remaining icing in an airtight container for later.
4. Add some more liquid to the remaining royal icing and color with red food color – the icing should be thick as blood, so you can sprinkle it easily over the cookies. Place the cookies on some paper and make the blood splatters. Let dry.
2. Den Ofen auf 175°C (350°F) vorheizen. Zwei Bleche mit Backpapier auslegen. Den Teig auf einer bemehlten Fläche ausrollen und runde Kekse ausstechen (in der größe, die Ihr haben wollt). Auf die Backbleche legen und für 8-10 Minuten backen – die Kekse sollten nur wenig Farbe bekommen haben. Aus dem Ofen nehmen und auf den Blechen für 3-5 Minuten abkühlen lassen und dann auf ein Kuchengitter legen und komplett auskühlen lassen.
3. Für das Royal Icing das Eiweiß mit dem Puderzucker, Wasser und Zitronensaft bei mittlerer Geschwindigkeit für etwa 8-10 Minuten aufschlagen – die Masse sollte glänzen. Die Konsistenz ist gut, wenn man z.B. mit einem Messer in das Icing schneidet, und sich der Schnitt von selbst nach etwa 10 Sekunden verschliesst. Sollte die Konsistenz noch nicht passen, einfach etwas Flüssigkeit oder Puderzucker zugeben und verrühren – je nachdem ob zu fest oder zu flüssig. Das Icing in einen Spritzbeutel mit einer kleinen Lochtülle füllen und die Cookies damit deokrieren – entweder so wie man sollte, mit einer Kontur zuerst und dann vorsichtig ausfüllen – oder so wie ich mit einer kleinen Palette glattstreichen. Sieht dann etwas “rustikaler” aus. Die Kekse über Nacht trocknen lassen. Icing Reste in einem luftdichten Behälter aufheben.
4. Zum restlichen Royal Icing etwas Flüssigkeit und rote Lebensmittelfarbe zugeben und alles zu einer “blutdicken” Masse verrühren – es sollte sich leicht über die Kekse klecksen lassen. Die Kekse auf Papier legen und mit dem “Blut” austoben. Trocknen lassen.
Craving more? Keep in touch on Facebook, Twitter, Instagram and Pinterest for new post updates and more. You can also contact me with any questions or inquiries!
Here is a version of the recipe you can print easily.

Halloween Cookies “Bloody Mess”
- Prep Time: 30
- Cook Time: 10
- Total Time: 720
- Yield: 30 1x
Ingredients
For the cookies
- 1 cup (230g) butter, at room temperature
- 1 cup (130g) confectioner’s sugar
- 1 large egg
- 2 tsp. vanilla extract
- zest of one organic lemon
- 2 1/2 cups (325g) all-purpose flour
- 1/2 tsp. salt
For the royal icing
- 1 egg white
- 1 1/2 cups (260g) confectioner’s sugar
- 1 tsp. water (plus more if needed)
- some drops of lemon juice
- red food color
Instructions
- In a large mixing bowl beat butter and confectioner’s sugar on medium-high speed until light and fluffy. Add the egg, vanilla extract and lemon zest and mix until well combined. Add flour and salt and mix until just combined. Wrap in plastic wrap and palce in the fridge for 1-2 hours.
- Preheat the oven to 350˚F (175°C). Line two baking sheets with baking parchment. Roll out the dough on a floured surface and cut out round cookies the size you like. Place on the baking sheets and bake for 8-10 minutes – the cookies should only get a little bit of color. Take out of the oven and let cool down on the baking sheets for 3-5 minutes, then transfer to a wire rack and let cool down completely.
- For the royal icing mix egg white, confectioner’s sugar, water and lemon juice in a bowl on medium-high speed for about 8-10 minutes until the mixture gets shiny and glossy. The consistency is good when you cut into the icing and the cut closes itself after 10 seconds – if not, add some more liquid or confectioner’s sugar depending if it is too thick or too runny. Fill the icing into a piping bag with a thin round tip and ice the cookies like a pro (pipe the outline first and then fill them out completely) or do it like me and use a spatula and just spread the icing on the cookies – looks a bit rustic. Let the cookies dry over night. Keep the remaining icing in an airtight container for later.
- Add some more liquid to the remaining royal icing and color with red food color – the icing should be thick as blood, so you can sprinkle it easily over the cookies. Place the cookies on some paper and make the blood splatters. Let dry.
Notes
- Happy Halloween!
*I partnered with uk.thebar.com for this post, that’s why I have to declare this post as Advertising here in Germany. All I wrote in this article is still based on my own opinion and has not been affected by anybody :)







 I love my job, but in between I love to bake and try new things in the kitchen. A lot of my friends and colleagues encourage me to bake - for a very simple reason: they get the leftovers - and it seems they like it most of the time ;)