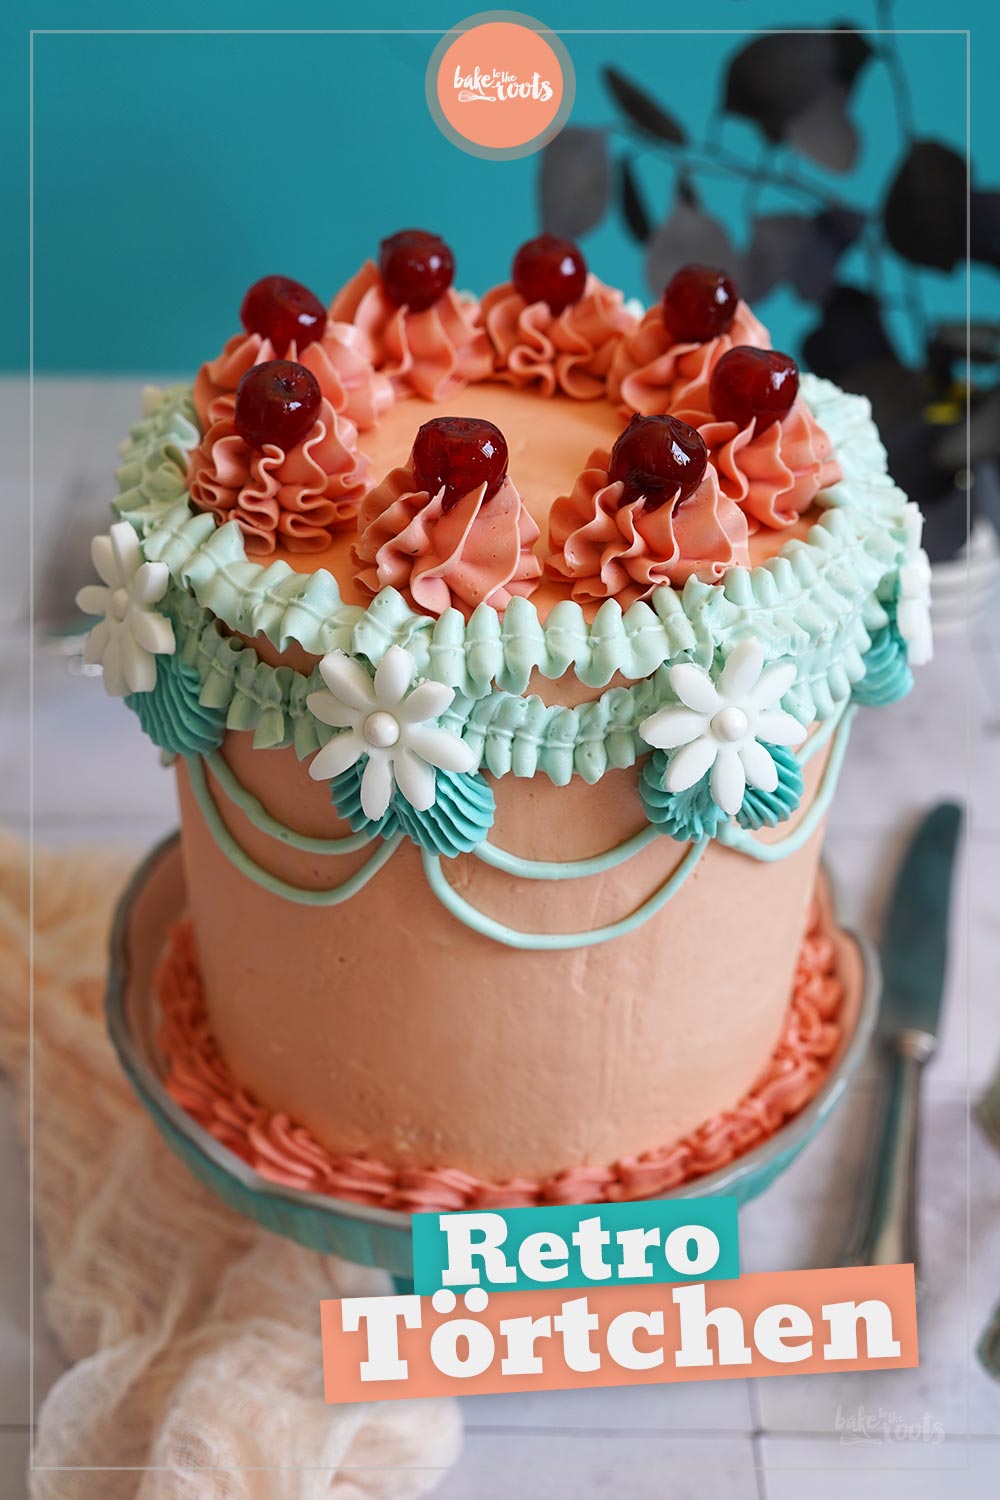
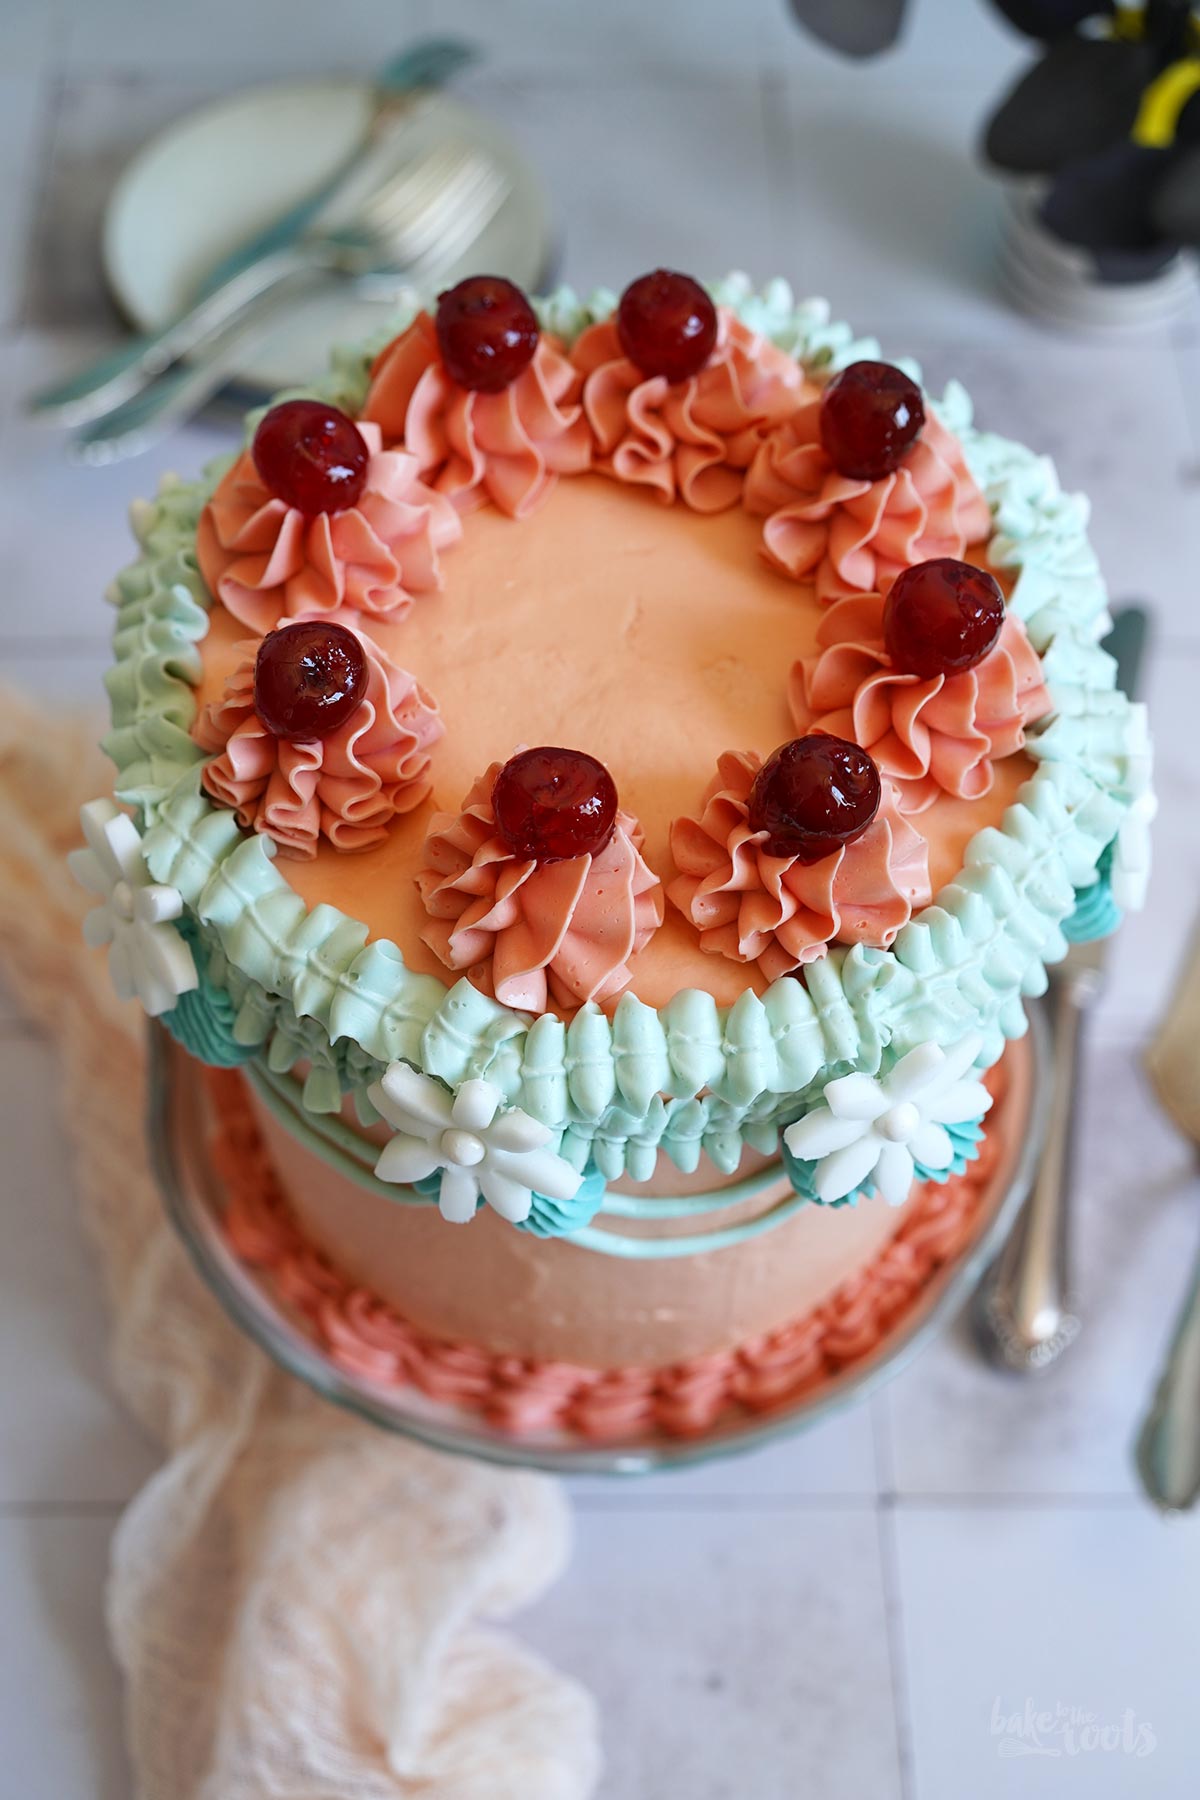
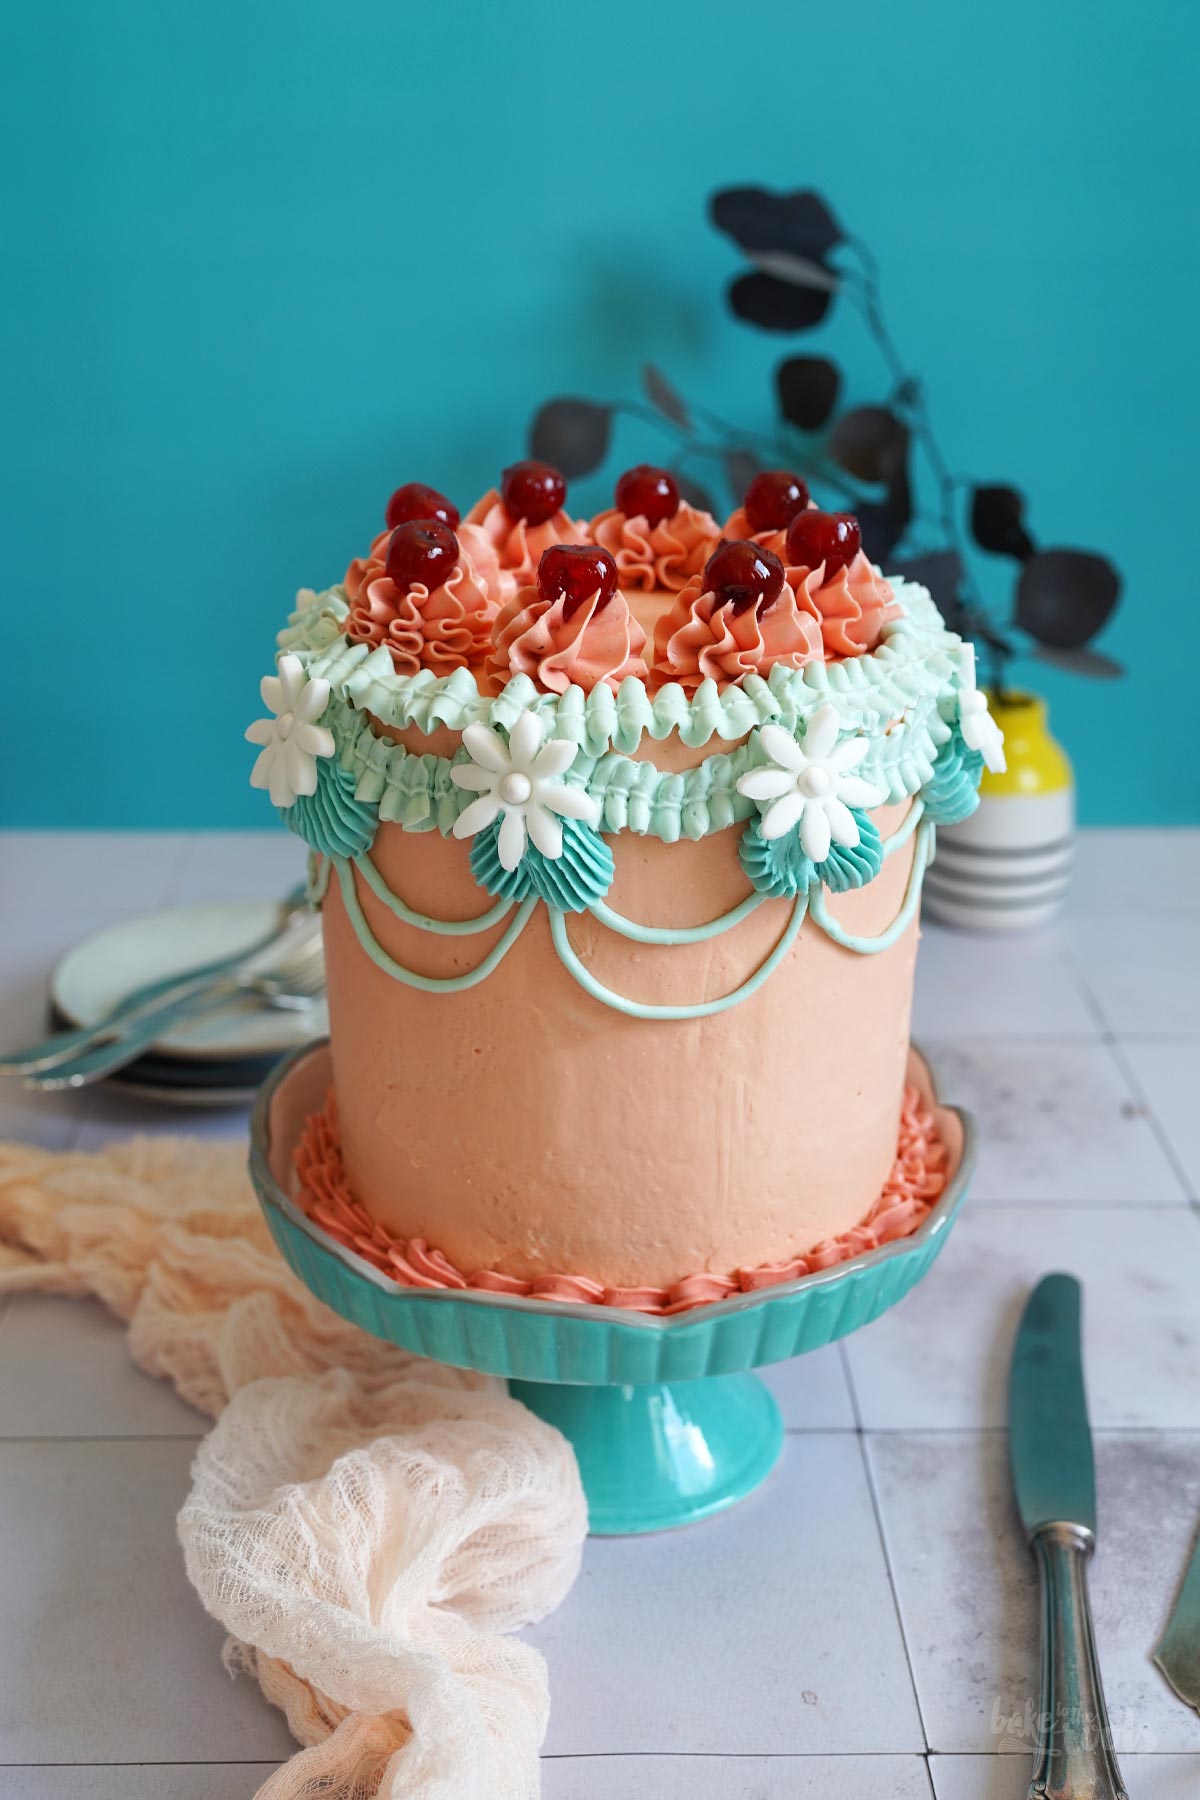
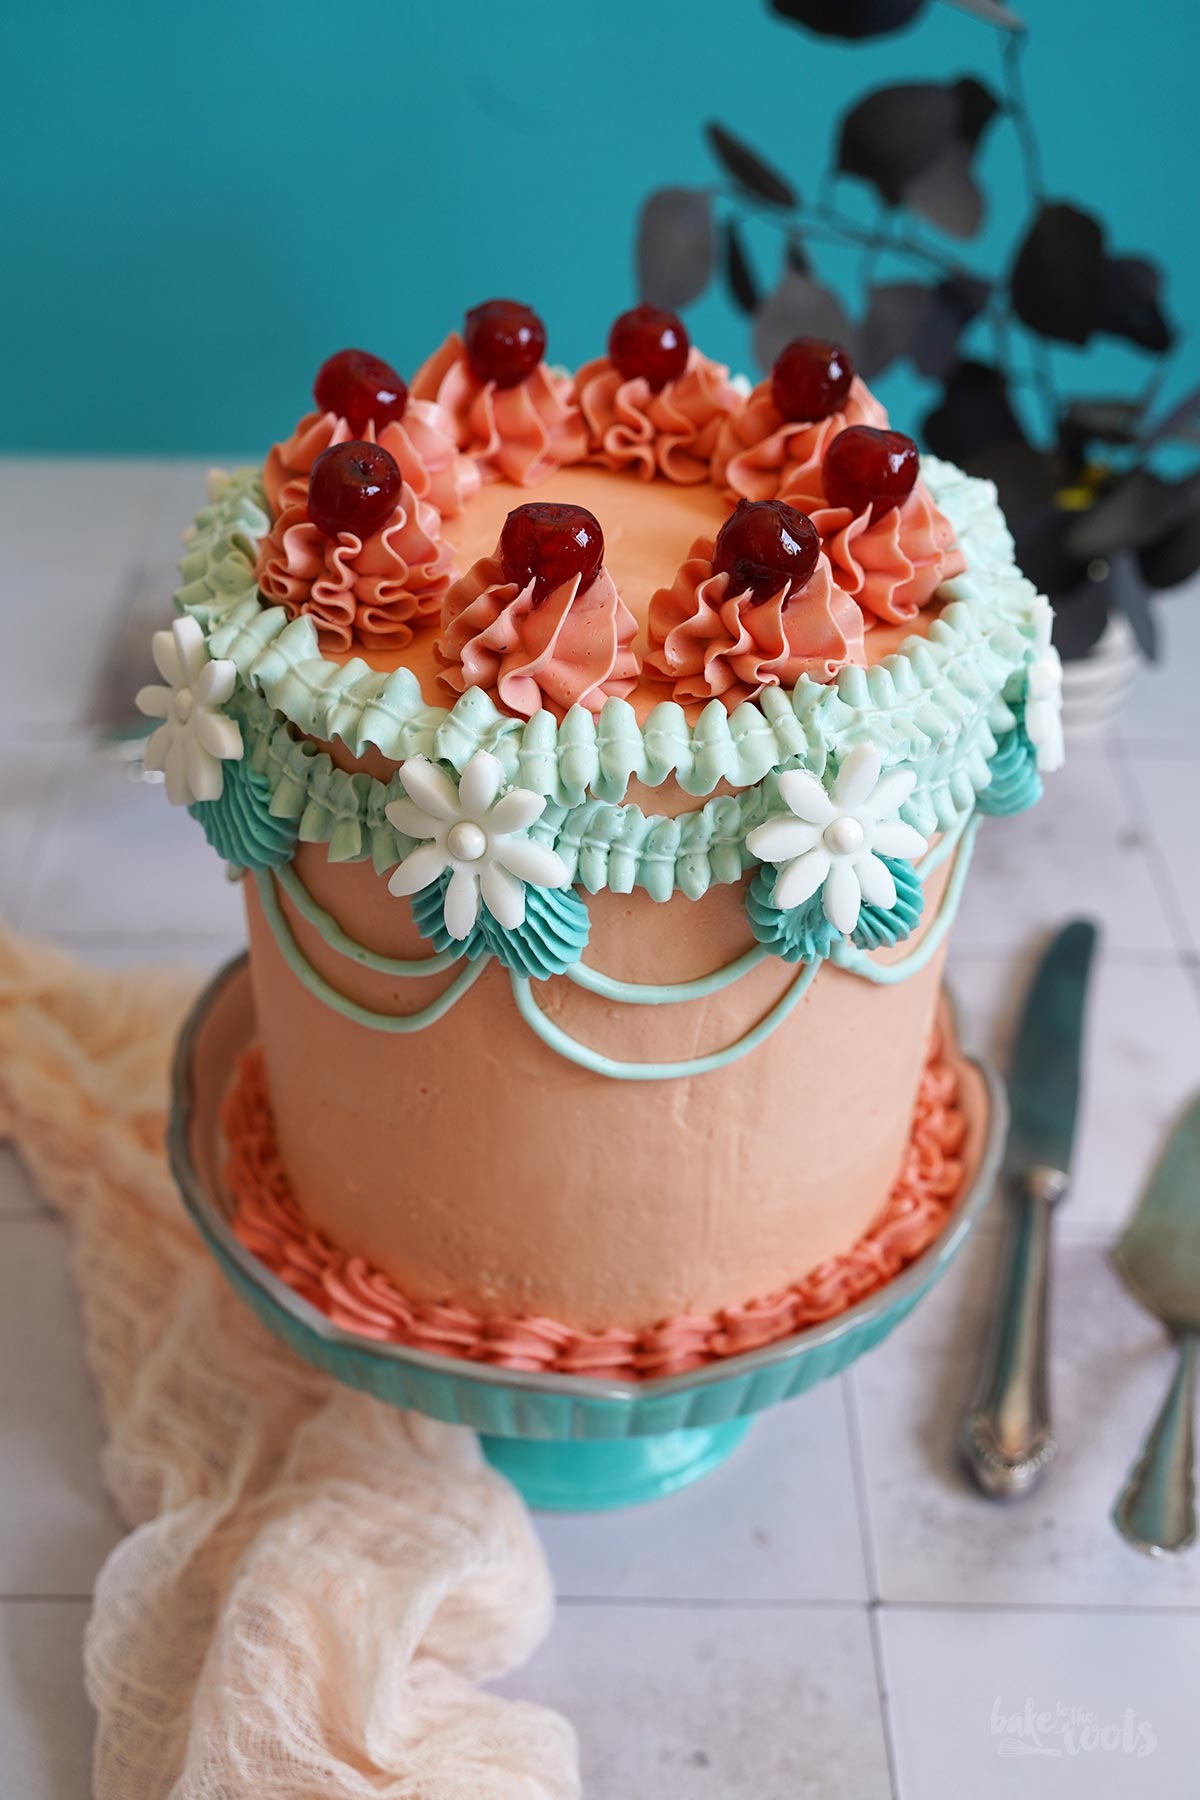
»More is more, and less is a bore« – something Iris Apfel said once. I could not agree more. Looking at this cake here. I am pretty sure she would like this Retro Buttercream Layer Cake here. It looks like it’s from the past, decorated so much it almost tips over. If you look at old cook books you will definitely find stuff like that – with even more decorations. There is actually a lot of empty space on this cake… should I have used more buttercream?
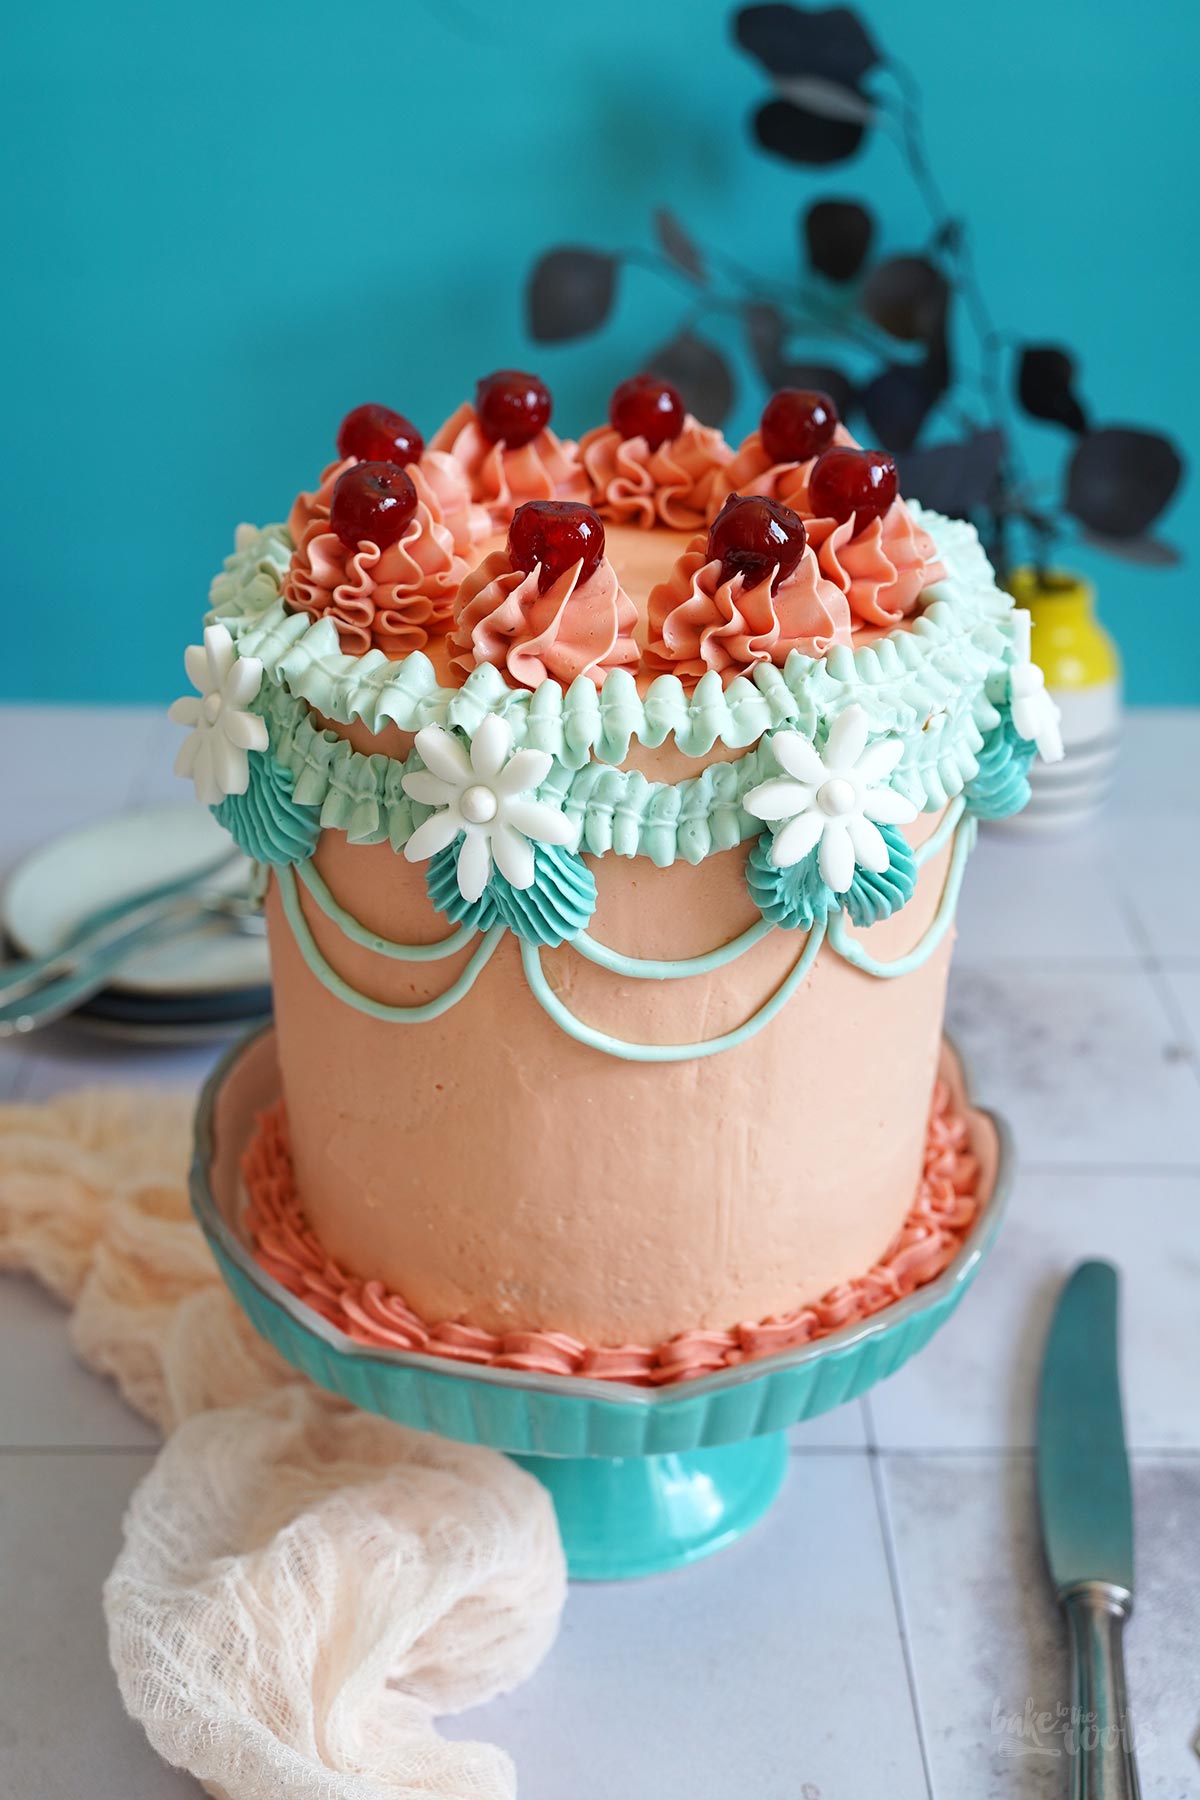
A lot of decorative elements on a cake is something you can still find today. The style itself changed but not the heavy load cakes sometimes have to carry on top. Back in the day it was a lot of buttercream – today you can find halved coconuts, whole pineapples, flowers and much more on cakes. I am all in on heavy decorations but an entire pineapple? That’s where I draw the line. Just kidding! Everybody should do what they like and if the cake tastes like pineapple why not decorate it with pineapples? Several entire pineapples if it pleases you!
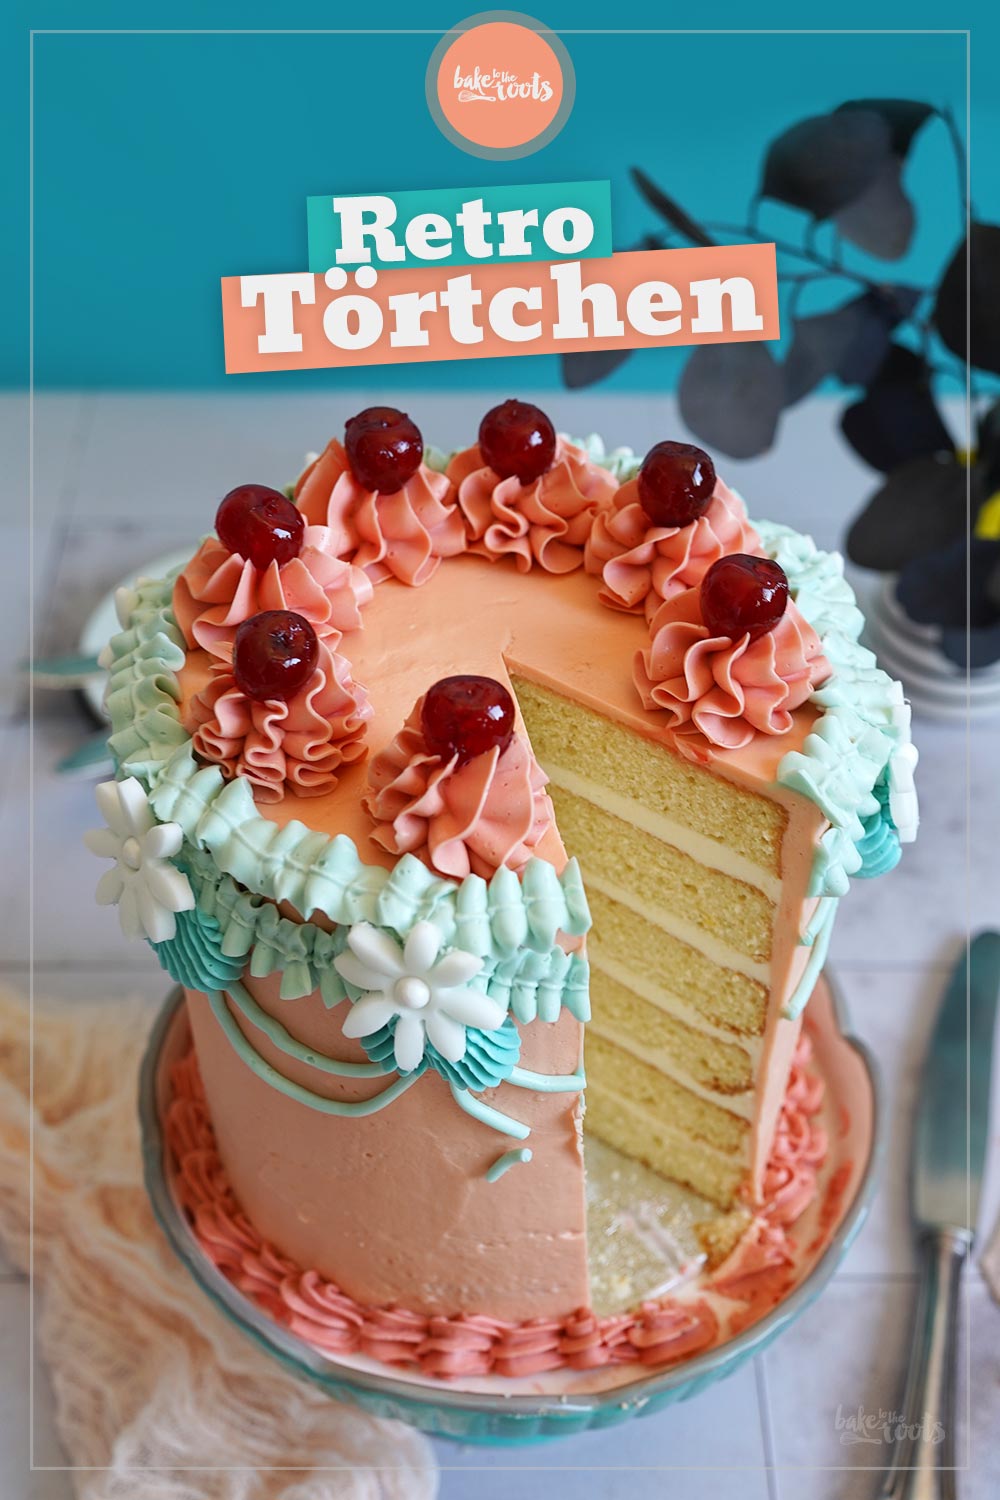
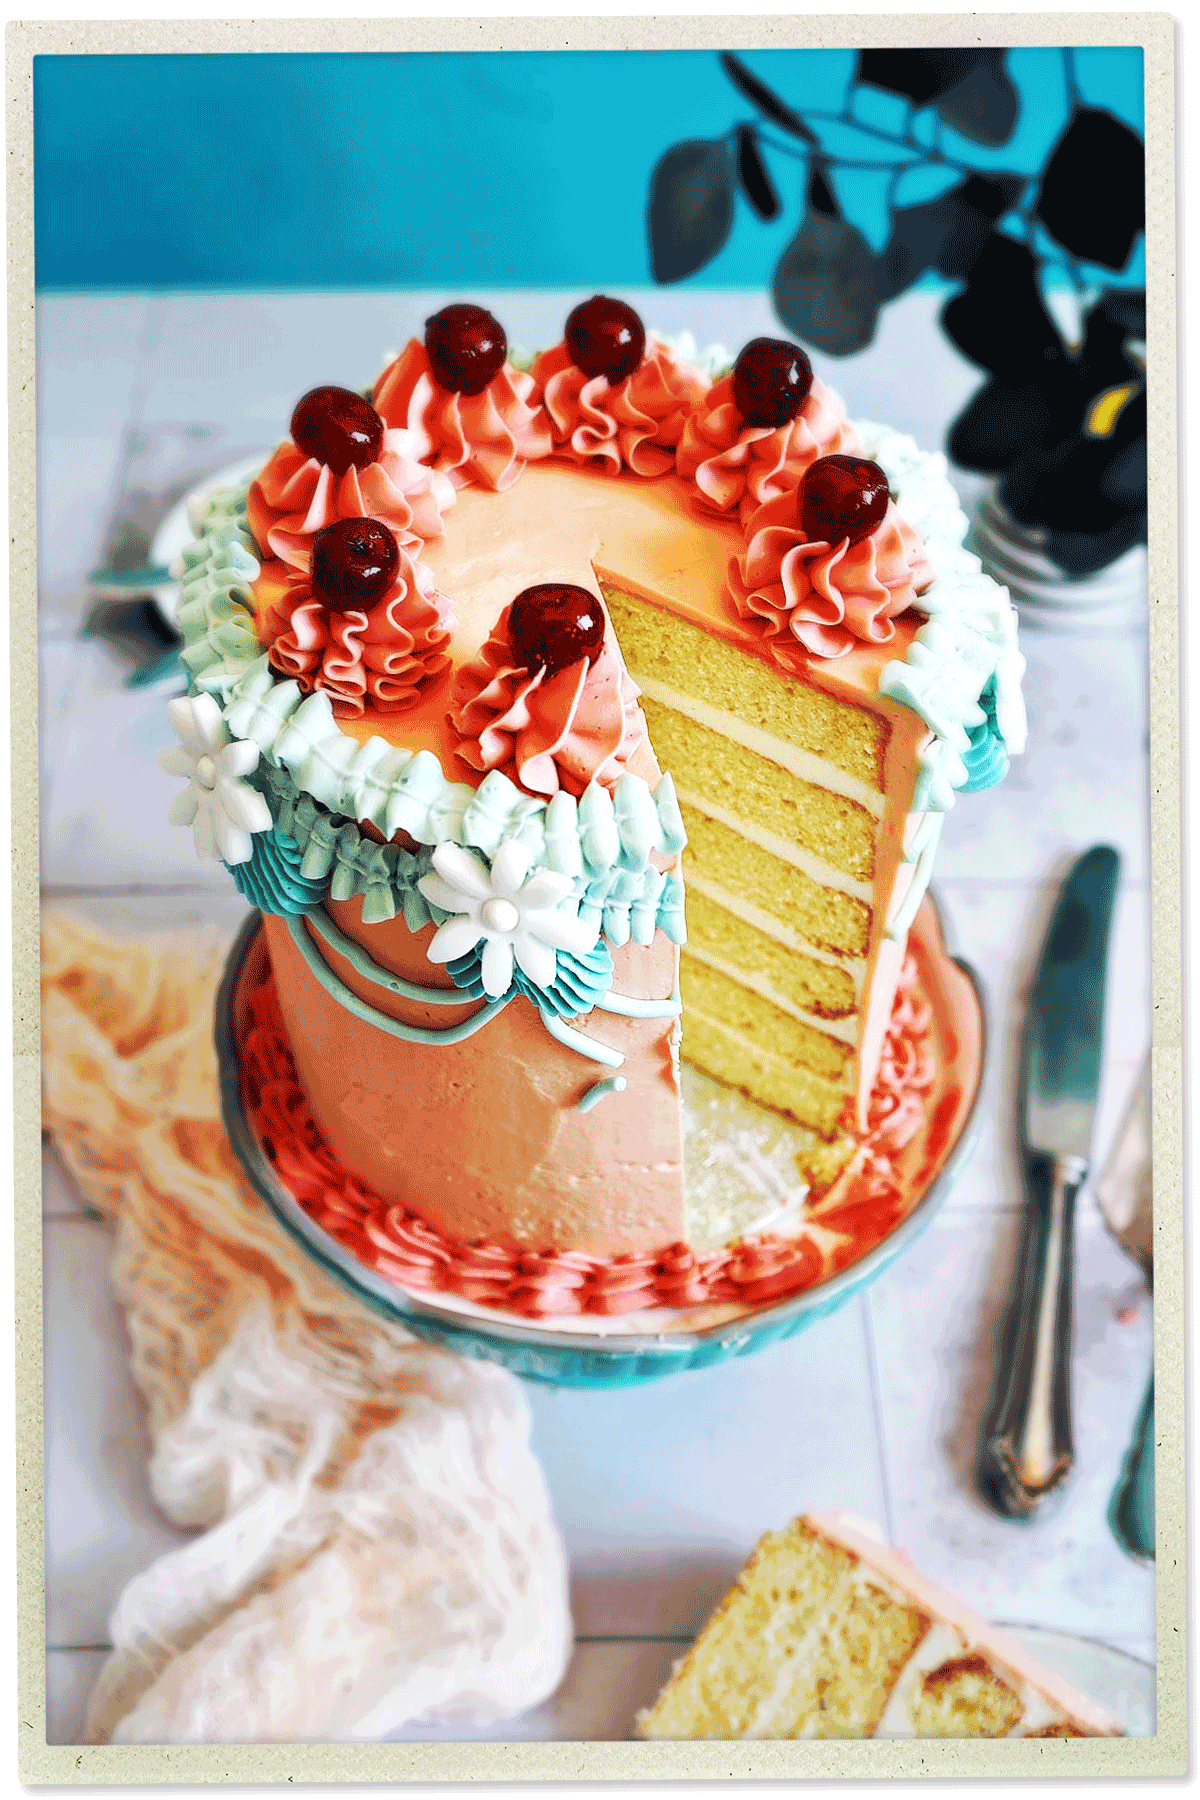
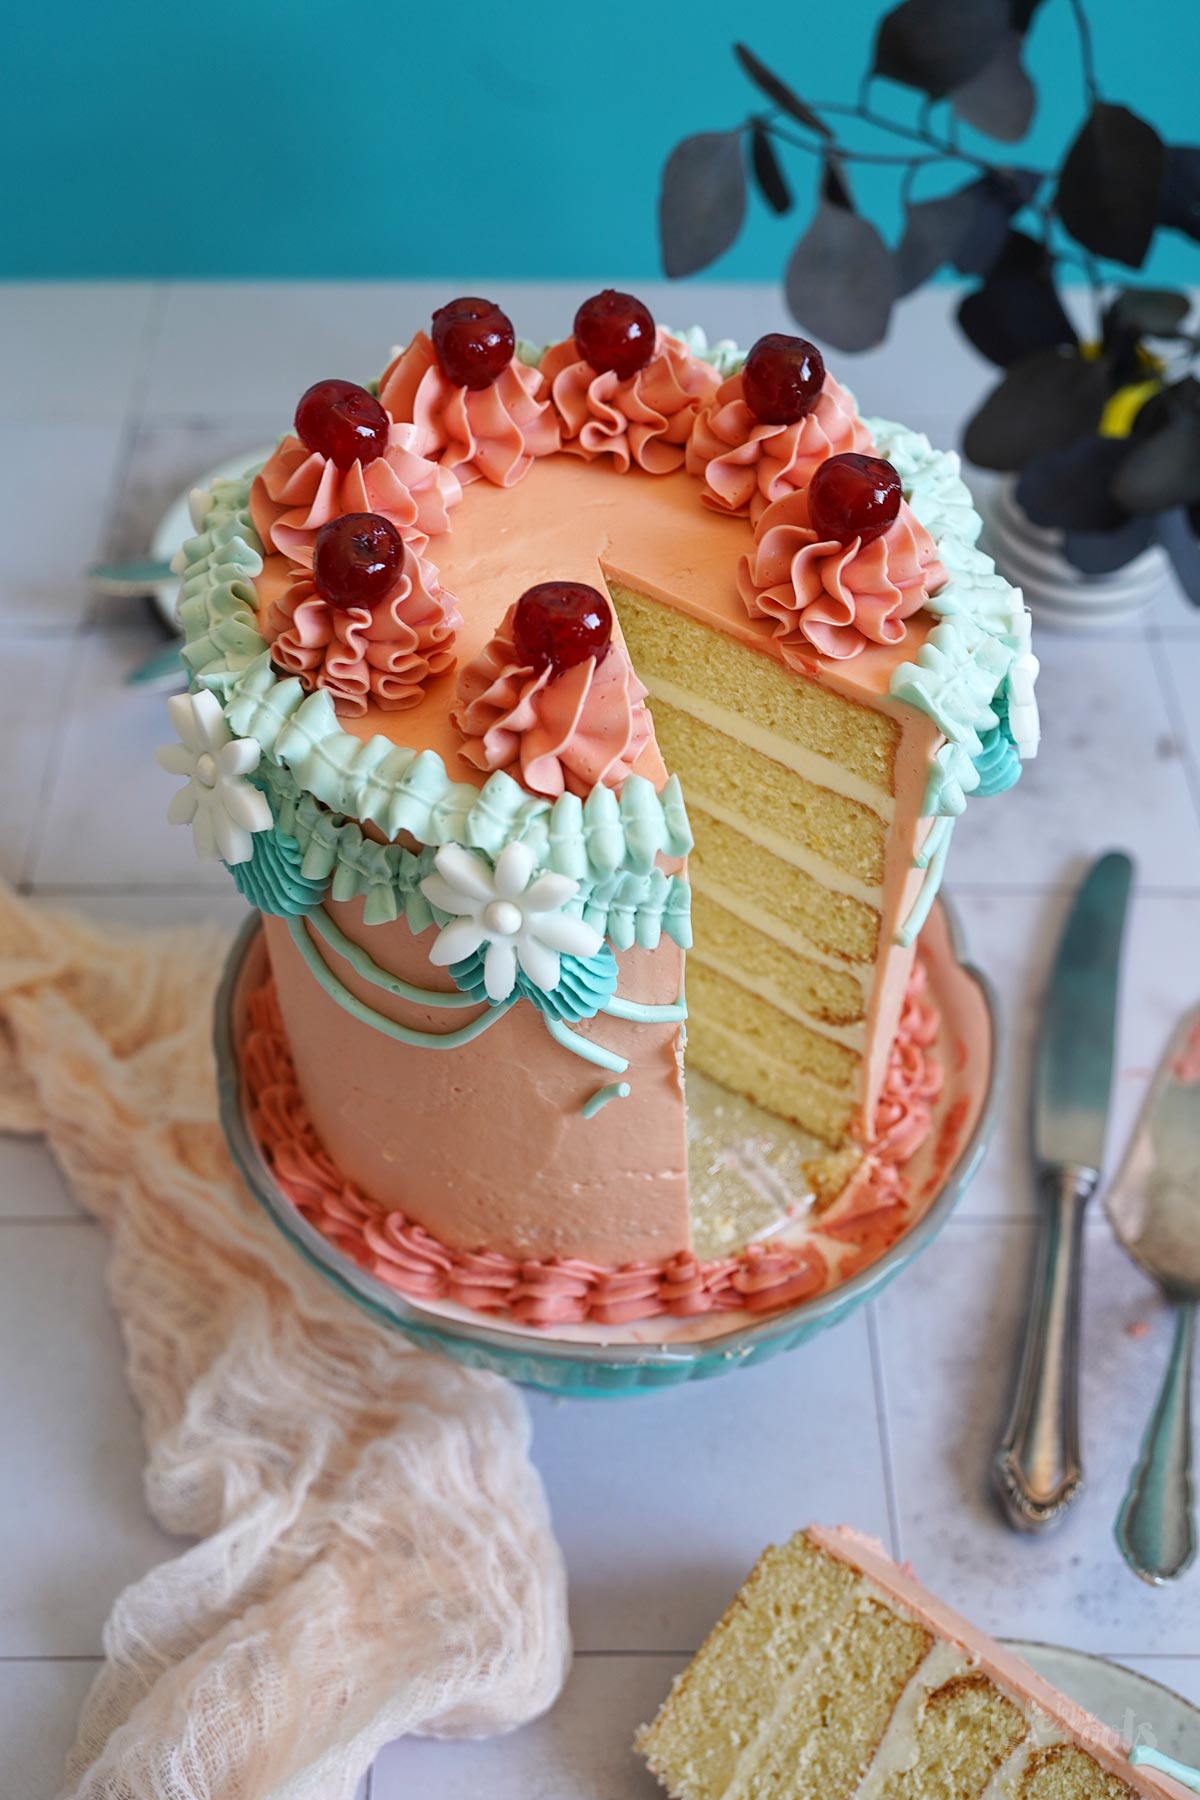
Well… no fruits have been used for decorations here – even though a layer of pineapple filling or something else would have been nice for this cake. But then it would have been even taller and that one barely fit into my fridge already. Everything is fine as it is.
Anyway. I wanted to try something new or better said – old. Bring back some ideas from a time before I was born. Means I had to dig deep. Cakes at the beginning of the last century were highly decorated. Something similar to this cake here, just done by a person that has real skills. Not like me ;) I have to be honest, I struggled a bit with the buttercream decorations. I do not have a very steady hand, so everything looks a bit wonky. Maybe I should have practiced a bit more before I did a cake like this one here… Well, this probably just means even a beginner can achieve something like this here – and that’s something. Isn’t it?!
The cake itself is a pretty basic cake. Did not struggle there. The only thing you might notice – here is no butter or oil used in the batter. The fat for the cake batter actually comes from the heavy cream that has been whipped and then added to the cake. That adds fat and fluffiness. Did not know that would work when I saw this in an old cook book… but it does. Quite well, actually. I like the texture of the cake.
Well… and the rest is good old buttercream. To make this cake not overly sweet I decided to go with German buttercream. Made with vanilla custard and butter as main ingredients. I love this type of buttercream because it is very soft and fluffy, and you can make it with a very small amount of added sugar… or even sugar-free if you like.
Anyway. I hope you like my attempt of recreating a cake from the past. It will be my only attempt I guess. I did not really enjoy decorating the cake because of my two left hands. I am just not made for jobs like that.
INGREDIENTS / ZUTATEN
For the buttercream:
1/2 cup (60g) cornstarch
3 tbsp. sugar
2 tsp. vanilla extract*
25.4 fl. oz. (750ml) milk (regular or dairy-free)
20 oz. (570g) butter, at room temperature
1/2 cup (60g) confectioners’ sugar
some food colors* (apricot, turquoise, etc.)
For the cake layers:
1 1/2 cups (300g) sugar (or xylitol*)
5 large eggs
3 tsp. vanilla extract*
4 cups (520g) all-purpose flour*
4 tsp. baking powder
1/4 tsp. salt
2 cups (480ml) heavy cream, cold
For the decoration (optional):
some cocktail cherries*
some fondant flowers
Für die Buttercreme:
60g Speisestärke
2 EL Zucker
2 TL Vanille Extrakt*
750ml Milch (normal oder pflanzlich)
570g Butter, Zimmertemperatur
60g Puderzucker
Lebensmittelfarben* (Apricot, Türkis, etc.)
Für die Kuchenböden:
300g Zucker (oder Xylit*)
5 Eier (L)
3 TL Vanille Extrakt*
520g Mehl (Type 405)*
4 TL Backpulver
1/4 TL Salz
480ml Schlagsahne, kalt
Für die Dekoration (optional):
einige Belegkirschen bzw. Cocktailkirschen*
einige Fondantblumen o.Ä.
DIRECTIONS / ZUBEREITUNG
1. Start with the buttercream by adding cornstarch, sugar, and vanilla extract to a small bowl. Add a small amount of the milk as well and stir to dissolve the cornstarch. Add the remaining milk to a saucepan and bring slowly to a boil (stir constantly, so it does not burn). Next, add the cornstarch mixture and stir it in. Let the custard bubble for a minute while stirring constantly. Remove from the heat and cover the custard immediately with a piece of plastic wrap – make sure the plastic wrap is directly on the custard. This way you will avoid a skin from forming on top of the custard. Let it cool down completely. This can be done a day in advance.
2. Preheat the oven to 160°C (320°F) convection heat. Line six springform tins (15cm)* with baking parchment and grease lightly. You can also use silicone molds* and just grease them lightly. You can actually work with fewer baking tins and bake the cakes in two batches – always worked for me so far.
3. Add the sugar and eggs to a large bowl and mix on high for about 6-8 minutes until very light and fluffy – the volume of the mixture should increase quite a bit. Add the vanilla extract and mix it in. Mix the flour with baking powder, and salt, then add to the bowl and mix in – do not overmix the batter! In a second bowl whip the heavy cream until stiff peaks form. Add the whipped cream in several batches to the bowl with the batter and carefully fold it in. Divide the cake batter between your baking tins and bake for about 23-25 minutes or until a toothpick inserted into the center of the cakes comes out clean. Take out of the oven and let cool down on a wire rack. You can do that a day in advance and wrap the cooled cakes (airtight) and continue with the cake the next day.
4. When ready to finish the cake continue with the buttercream by adding the butter and confectioners’ sugar for the buttercream to a large bowl and mix on high speed for about 4-5 minutes until very light and fluffy. Gradually add the cooled custard in small batches and mix well after each addition. When all the custard is added continue mixing for another 5-6 minutes until you get a very smooth and fluffy buttercream. Make sure the butter and custard have the same temperature or the two might not mix well.
5. Level the cake layers if they domed during baking. Place the first cake layer on a serving plate, add some buttercream on top and spread evenly. Top with a second cake layer, add more buttercream and repeat. Continue until all cake layers are stacked on top of each other. Cover the whole cake with a thin layer of buttercream and place in the fridge for about 20 minutes.
6. Divide the buttercream into several batches and color to your liking. I colored most of it in an apricot color to cover the whole cake with it, then smaller batches in a more intense apricot, light turquoise and a more intense turquoise. To get ribbons, swirls, and lines use different piping tips. If you want to decorate with buttercream more often it’s good to have an entire set of piping tips*. Finish the cake with fondant flowers and cocktail cherries to make it truly retro-looking.
1. Am besten mit der Buttercreme anfangen. Dazu Stärke, Zucker und Vanille Extrakt in einer kleinen Schüssel mit etwas von der Milch verrühren – die Stärke sollte sich komplett aufgelöst haben. Die restliche Milch in einen kleinen Topf geben und langsam auf dem Herd erhitzen. Sobald die Milch anfängt zu kochen, die Stärkemischung dazugeben und einrühren. Die Mischung sollte schnell andicken. Unter ständigem Rühren etwa eine Minute blubbern lassen, dann vom Herd ziehen. Ein Stück Klarsichtfolie auf den noch heißen Pudding legen, damit sich keine Haut bildet, und dann komplett abkühlen lassen. Der Pudding kann schon einen Tag vorab zubereitet werden.
2. Den Ofen auf 160°C (320°F) Umluft vorheizen. Sechs Springformen (15cm)* mit Backpapier auslegen und leicht einfetten. Ich verwende hier Silikonbackformen* – die muss man nur leicht fetten. Man kann mit nur 3 oder 4 Backformen arbeiten und die Kuchen in zwei Runden backen – bei mir hat das bisher immer gut funktioniert.
3. Zucker und Eier in eine große Schüssel geben und auf höchster Stufe etwa 6-8 Minuten lang hell und luftig aufschlagen – das Volumen der Masse sollte sich ordentlich vergrößern. Vanille Extrakt zugeben und unterrühren. Mehl mit Backpulver und Salz vermischen, dann in die große Schüssel dazugeben und kurz unterrühren – man sollte ab hier nicht mehr zu viel rühren. In einer zweiten Schüssel die Sahne steif schlagen, dann in mehreren Portionen zur großen Schüssel dazugeben und vorsichtig unterheben. Den Teig auf die Backformen verteilen und für etwa 23-25 Minuten backen. Mit einem Zahnstocher testen, ob noch Teig kleben bleibt, und die Kuchen erst herausholen, wenn dieser sauber herauskommt. Kuchen aus dem Ofen nehmen und auf einem Kuchengitter abkühlen lassen. Die Kuchenschichten kann man ebenfalls einen Tag eher backen und luftdicht eingepackt lagern, bis man für den Zusammenbau des Kuchens bereit ist.
4. Als Nächstes mit der Buttercreme weitermachen. Dafür die weiche Butter und den Puderzucker in die Schüssel einer Küchenmaschine geben und auf höchster Stufe etwa 4-5 Minuten luftig aufschlagen. Dann den abgekühlten Pudding in kleinen Portionen zur Butter dazugeben und gut unterrühren. Wenn der Pudding komplett in der Schüssel ist, noch einmal 5-6 Minuten auf höchster Stufe aufschlagen, bis eine sehr luftige und cremige Buttercreme entstanden ist. Man sollte darauf achten, dass Butter und Pudding in etwa dieselbe Temperatur haben, da sie sich sonst nicht ganz so gut verbinden.
5. Die Kuchenböden, falls notwendig, zurechtschneiden/begradigen, dann eine erste Kuchenschicht auf eine Servierplatte setzen. Etwas Buttercreme darauf verteilen und die zweite Kuchenschicht auflegen und leicht festdrücken – so oft wiederholen, bis alle Kuchenschichten aufgetürmt sind. Den kompletten Kuchen mit einer dünnen Schicht Buttercreme einstreichen (Crumb Coat) und dann für etwa 20 Minuten in den Kühlschrank stellen.
6. Die Buttercreme in mehrere Portionen aufteilen und nach Belieben einfärben. Ich habe einen Großteil der Creme in Apricot eingefärbt und damit die komplette Torte einmal eingestrichen. Den Rest hab’ ich in kleinere Portionen aufgeteilt und noch etwas intensiver Apricot gefärbt, dann etwas helleres und dunkleres Türkis. Mit diesen Farben und verschiedenen Spritzbeuteln/Aufsätzen hab’ ich dann die Torte dekoriert (s. Fotos). Wer öfter mal mit Buttercreme arbeiten will, dem empfehle ich ein Set mit Spritztüllen*. Zusätzlich kann man die Torte dann noch mit Fondantblumen und Belegkirschen o.Ä. dekorieren. Richtig »retro« wird es mit den knallroten Cocktailkirschen mit Stiel.
Craving more? Keep in touch on Facebook, Instagram and Pinterest for new post updates and more. You can also contact me with any questions or inquiries!
Here is a version of the recipe you can print easily.
Print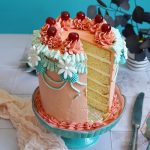
Retro Buttercream Layer Cake
- Prep Time: 01:00
- Cook Time: 00:25
- Total Time: 08:00
- Yield: 1 1x
- Category: Cakes
- Method: -
- Cuisine: United States
- Diet: Vegetarian
Description
This cake could be straight from an old cook book with over the top decorated cakes. It’s time to bring (Retro) Buttercream Layer Cakes back in fashion!
Ingredients
For the buttercream:
1/2 cup (60g) cornstarch
3 tbsp. sugar
2 tsp. vanilla extract*
25.4 fl. oz. (750ml) milk (regular or dairy-free)
20 oz. (570g) butter, at room temperature
1/2 cup (60g) confectioners‘ sugar
some food colors* (apricot, turquoise, etc.)
For the cake layers:
1 1/2 cups (300g) sugar (or xylitol*)
5 large eggs
3 tsp. vanilla extract*
4 cups (520g) all-purpose flour*
4 tsp. baking powder
1/4 tsp. salt
2 cups (480ml) heavy cream, cold
For the decoration (optional):
some cocktail cherries*
some fondant flowers
Instructions
1. Start with the buttercream by adding cornstarch, sugar, and vanilla extract to a small bowl. Add a small amount of the milk as well and stir to dissolve the cornstarch. Add the remaining milk to a saucepan and bring slowly to a boil (stir constantly, so it does not burn). Next, add the cornstarch mixture and stir it in. Let the custard bubble for a minute while stirring constantly. Remove from the heat and cover the custard immediately with a piece of plastic wrap – make sure the plastic wrap is directly on the custard. This way you will avoid a skin from forming on top of the custard. Let it cool down completely. This can be done a day in advance.
2. Preheat the oven to 160°C (320°F) convection heat. Line six springform tins (15cm)* with baking parchment and grease lightly. You can also use silicone molds* and just grease them lightly. You can actually work with fewer baking tins and bake the cakes in two batches – always worked for me so far.
3. Add the sugar and eggs to a large bowl and mix on high for about 6-8 minutes until very light and fluffy – the volume of the mixture should increase quite a bit. Add the vanilla extract and mix it in. Mix the flour with baking powder, and salt, then add to the bowl and mix in – do not overmix the batter! In a second bowl whip the heavy cream until stiff peaks form. Add the whipped cream in several batches to the bowl with the batter and carefully fold it in. Divide the cake batter between your baking tins and bake for about 23-25 minutes or until a toothpick inserted into the center of the cakes comes out clean. Take out of the oven and let cool down on a wire rack. You can do that a day in advance and wrap the cooled cakes (airtight) and continue with the cake the next day.
4. When ready to finish the cake continue with the buttercream by adding the butter and confectioners’ sugar for the buttercream to a large bowl and mix on high speed for about 4-5 minutes until very light and fluffy. Gradually add the cooled custard in small batches and mix well after each addition. When all the custard is added continue mixing for another 5-6 minutes until you get a very smooth and fluffy buttercream. Make sure the butter and custard have the same temperature or the two might not mix well.
5. Level the cake layers if they domed during baking. Place the first cake layer on a serving plate, add some buttercream on top and spread evenly. Top with a second cake layer, add more buttercream and repeat. Continue until all cake layers are stacked on top of each other. Cover the whole cake with a thin layer of buttercream and place in the fridge for about 20 minutes.
6. Divide the buttercream into several batches and color to your liking. I colored most of it in an apricot color to cover the whole cake with it, then smaller batches in a more intense apricot, light turquoise and a more intense turquoise. To get ribbons, swirls, and lines use different piping tips. If you want to decorate with buttercream more often it’s good to have an entire set of piping tips*. Finish the cake with fondant flowers and cocktail cherries to make it truly retro-looking.
Notes
The kitchen is calling, time to bake!
Links marked with an asterisk (*) are affiliate links (advertising/Werbung) to Amazon Germany. If you click on one of those links and buy something via this link, I will get a commission for that sale. The price of whatever you buy is not affected in any way by this.