Description
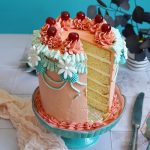
This cake could be straight from an old cook book with over the top decorated cakes. It’s time to bring (Retro) Buttercream Layer Cakes back in fashion!
Ingredients
For the buttercream:
1/2 cup (60g) cornstarch
3 tbsp. sugar
2 tsp. vanilla extract*
25.4 fl. oz. (750ml) milk (regular or dairy-free)
20 oz. (570g) butter, at room temperature
1/2 cup (60g) confectioners‘ sugar
some food colors* (apricot, turquoise, etc.)
For the cake layers:
1 1/2 cups (300g) sugar (or xylitol*)
5 large eggs
3 tsp. vanilla extract*
4 cups (520g) all-purpose flour*
4 tsp. baking powder
1/4 tsp. salt
2 cups (480ml) heavy cream, cold
For the decoration (optional):
some cocktail cherries*
some fondant flowers
Instructions
1. Start with the buttercream by adding cornstarch, sugar, and vanilla extract to a small bowl. Add a small amount of the milk as well and stir to dissolve the cornstarch. Add the remaining milk to a saucepan and bring slowly to a boil (stir constantly, so it does not burn). Next, add the cornstarch mixture and stir it in. Let the custard bubble for a minute while stirring constantly. Remove from the heat and cover the custard immediately with a piece of plastic wrap – make sure the plastic wrap is directly on the custard. This way you will avoid a skin from forming on top of the custard. Let it cool down completely. This can be done a day in advance.
2. Preheat the oven to 160°C (320°F) convection heat. Line six springform tins (15cm)* with baking parchment and grease lightly. You can also use silicone molds* and just grease them lightly. You can actually work with fewer baking tins and bake the cakes in two batches – always worked for me so far.
3. Add the sugar and eggs to a large bowl and mix on high for about 6-8 minutes until very light and fluffy – the volume of the mixture should increase quite a bit. Add the vanilla extract and mix it in. Mix the flour with baking powder, and salt, then add to the bowl and mix in – do not overmix the batter! In a second bowl whip the heavy cream until stiff peaks form. Add the whipped cream in several batches to the bowl with the batter and carefully fold it in. Divide the cake batter between your baking tins and bake for about 23-25 minutes or until a toothpick inserted into the center of the cakes comes out clean. Take out of the oven and let cool down on a wire rack. You can do that a day in advance and wrap the cooled cakes (airtight) and continue with the cake the next day.
4. When ready to finish the cake continue with the buttercream by adding the butter and confectioners’ sugar for the buttercream to a large bowl and mix on high speed for about 4-5 minutes until very light and fluffy. Gradually add the cooled custard in small batches and mix well after each addition. When all the custard is added continue mixing for another 5-6 minutes until you get a very smooth and fluffy buttercream. Make sure the butter and custard have the same temperature or the two might not mix well.
5. Level the cake layers if they domed during baking. Place the first cake layer on a serving plate, add some buttercream on top and spread evenly. Top with a second cake layer, add more buttercream and repeat. Continue until all cake layers are stacked on top of each other. Cover the whole cake with a thin layer of buttercream and place in the fridge for about 20 minutes.
6. Divide the buttercream into several batches and color to your liking. I colored most of it in an apricot color to cover the whole cake with it, then smaller batches in a more intense apricot, light turquoise and a more intense turquoise. To get ribbons, swirls, and lines use different piping tips. If you want to decorate with buttercream more often it’s good to have an entire set of piping tips*. Finish the cake with fondant flowers and cocktail cherries to make it truly retro-looking.
Notes
The kitchen is calling, time to bake!