
Denmark has a lot of sweet bakes to offer. Anyone who has ever been there for some time will surely be able to confirm this statement. We’ve been to Copenhagen several times and love the city, the people, and the food, of course. If you’ve never tried a Danish Christianshavner Tærte, you should change that as soon as possible! You don’t have the budget to go to Copenhagen? Well, what about baking some at home and enjoying them on the balcony? ;P
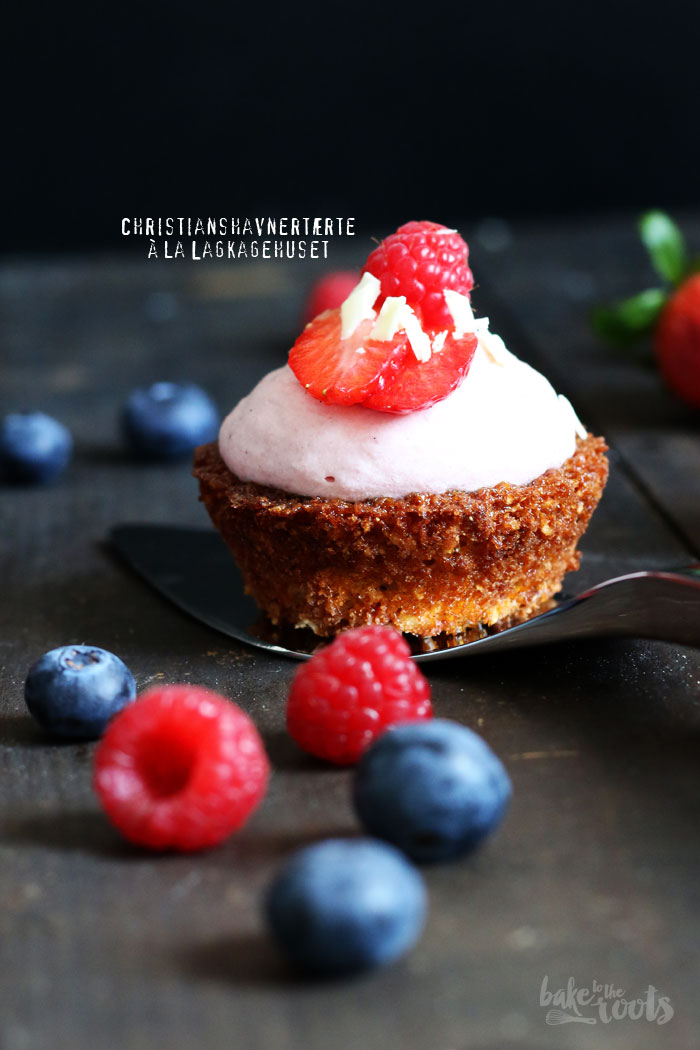
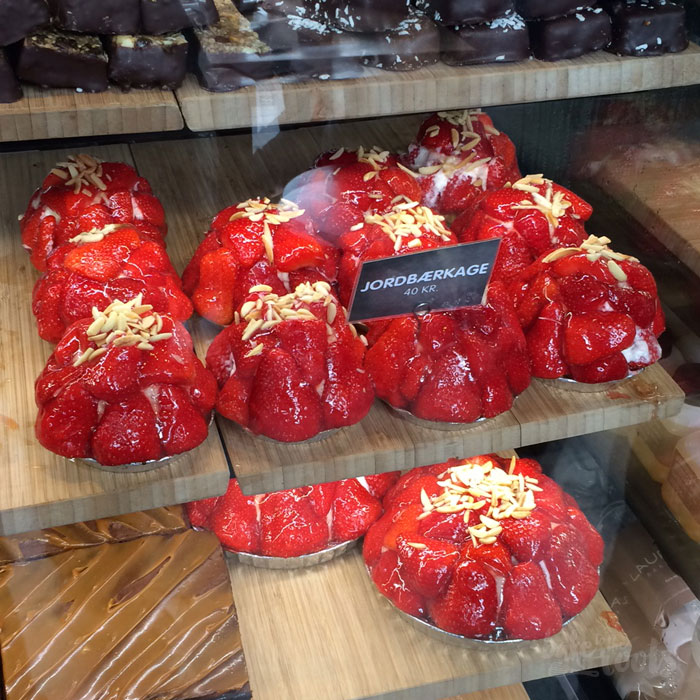
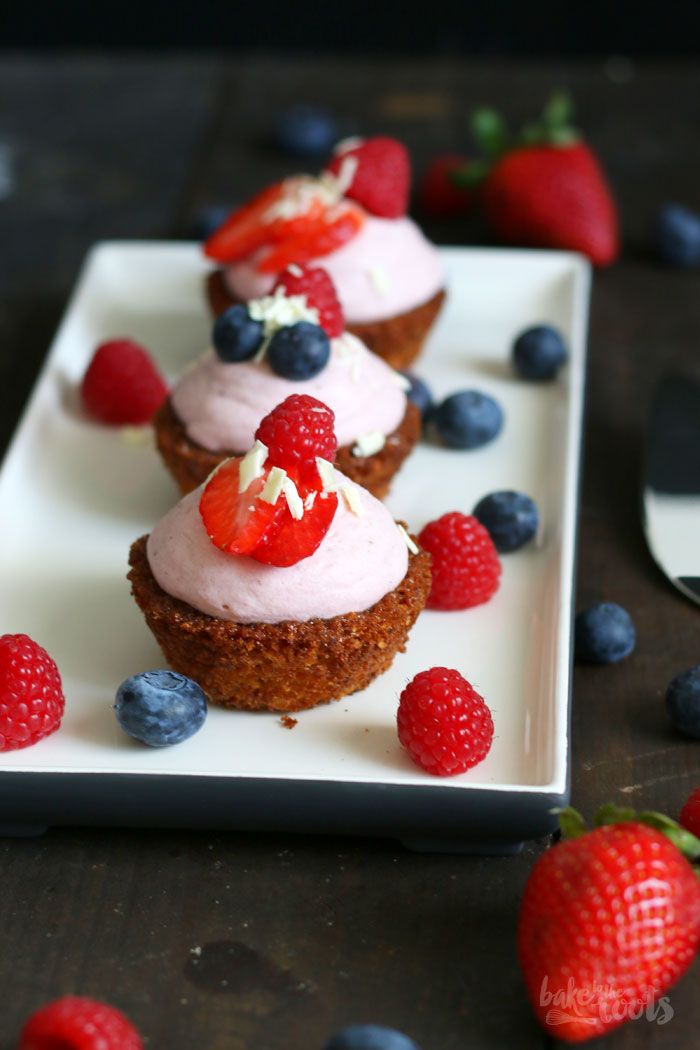
If you don’t know what Christianshavner Tærte means – that’s absolutely fine. We first came across these little cakes in a bakery called »Lagkagehuset« in Copenhagen. Another word you can’t pronounce? Well… Danish is not that easy. ;P Anyway. These hazelnut cakes with strawberry cream topping (let’s call ’em that) are available in different sizes – as small as you can see them here and bigger, so several people can enjoy one cake.
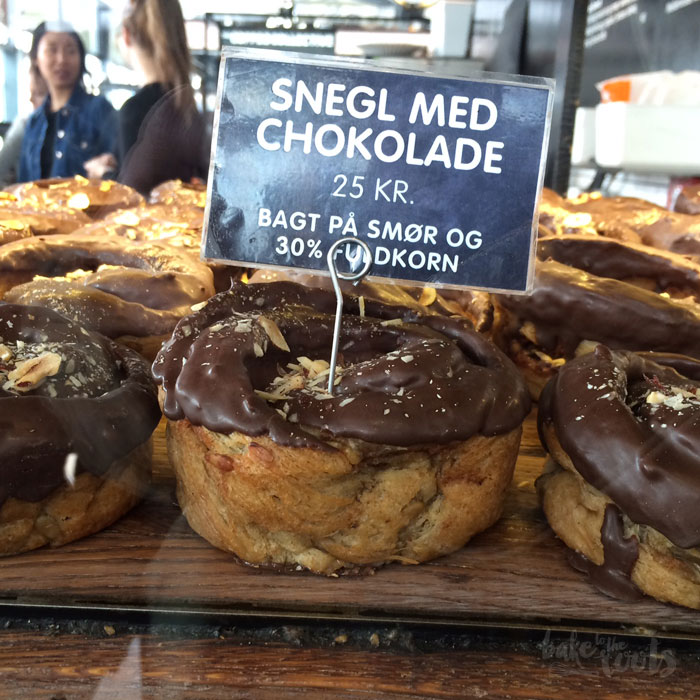
The Danes are simply masters of little sweet treats. That’s why there is a whole category of bakes dedicated to the country: Danish pastries! :P Unfortunately, I can’t say much about the history of the small hazelnut cakes, but we assume the name comes from a neighborhood in Copenhagen called Christianshavn. Makes sense, right?! ;)

This neighborhood is located on an artificial island and was created in the 17th century by King Christian IV in order to expand the city. This neighborhood is also home to the free city of Christiana. Ever heard of it? It’s a fascinating little corner of Copenhagen. ;) Anyone visiting the city should definitely stop by here. You can find some information about the area on the Visit Denmark website.
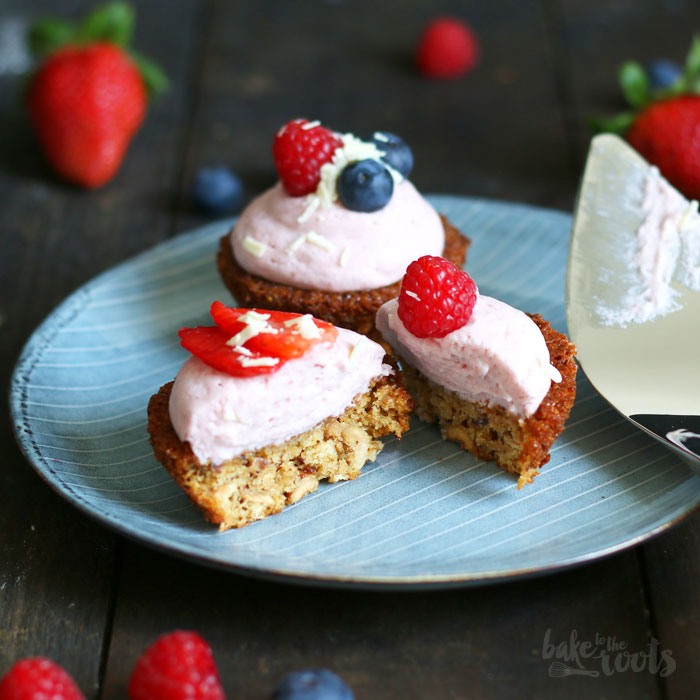
Back to business. These little sweet treats are quite simple hazelnut cakes made with roasted hazelnuts and butter cookies. The cream on top is basically just whipped heavy cream with strawberry purée, thickened a little with gelatin to make it more stable. In case you don’t want to use gelatin, you could also use agar-agar here… just sayin’.

There is no official recipe for these small cakes. At least we couldn’t find one, so we had to experiment a little. I think the results are quite good. But it wasn’t that difficult to bake the cakes and whip up the topping, to be honest… ;)
If you prefer to use other berries instead of strawberries (e.g. raspberries, blackberries, etc.), you can use those as well, of course. Just make sure those berries or fruit work well with gelatin. Stuff like pineapple, papaya or kiwi can cause problems when used in combination with gelatin.
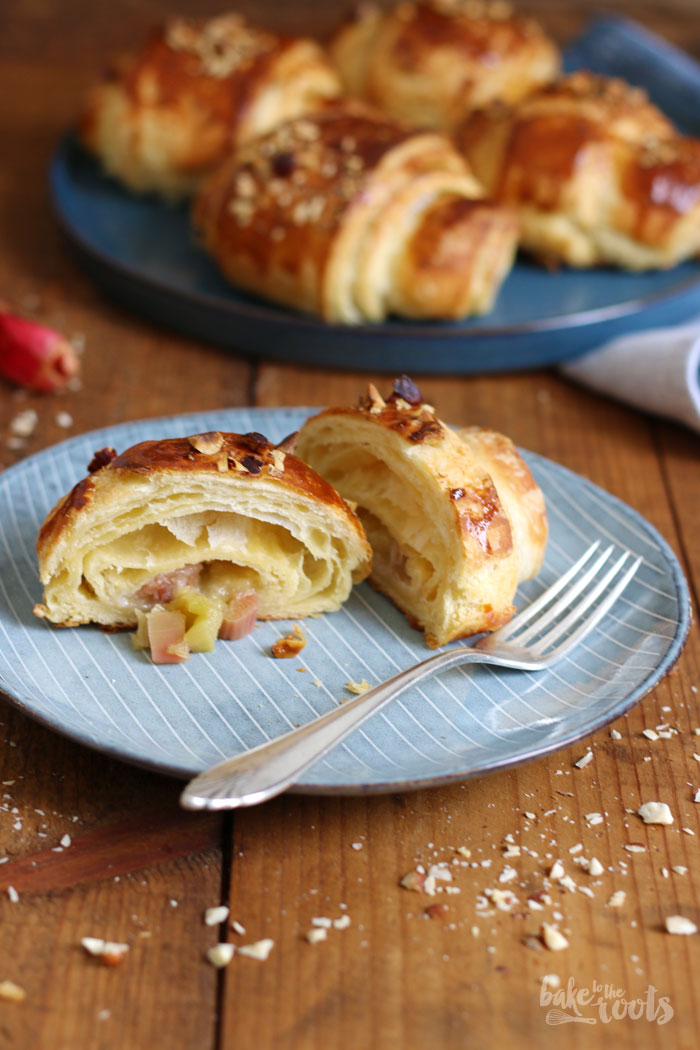
If you want to try more Danish treats, you might want to take a look at these two recipes here as well: our Danish Rhubarb Horns (Croissants) are a little more time-consuming to prepare, but so extremely delicious! The extra effort of making the dough for Danish pastries yourself is definitely worth it!
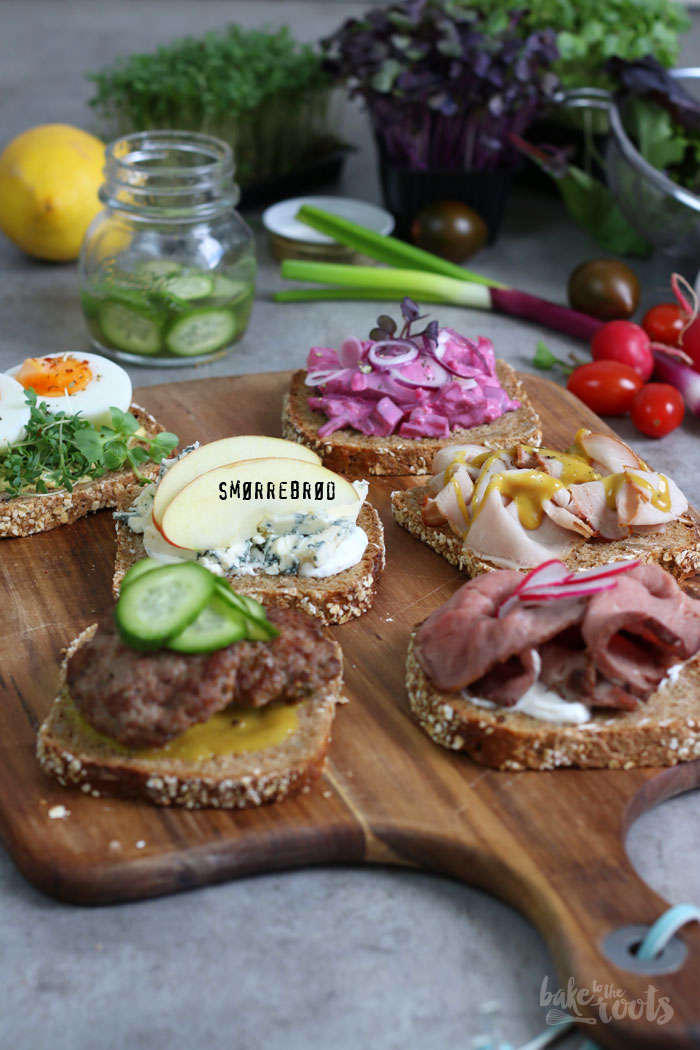
A little easier to prepare and also savory – Danish Smørrebrød aka. Open Faced Sandwiches. Germans have similar sandwiches and eat them often instead of a cooked dinner… but the Danish sandwiches are often much more elaborate and certainly nicer to look at. I can say that about German Abendbrot. I am German and have eaten it my whole life! ;P

INGREDIENTS / ZUTATEN
(6 small cakes)
For the topping:
(120g) strawberries, puréed
2 tbsp. confectioners’ sugar
1/2 tsp. vanilla bean paste*
1 1/2 gelatin leaves* (or agar-agar)
7 oz. (200g) heavy cream
For the dough:
2.8 oz. (80g) hazelnuts, whole
1 oz. (30g) shortbread cookies*
1 tsp. baking powder
2.7 oz. (75g) sugar
1 pinch of salt
1 tsp. vanilla bean paste*
2 medium egg whites
For the decoration:
a few berries (e.g. blueberries, raspberries, strawberries)
some white chocolate, grated
(6 kleine Kuchen)
Für das Topping:
120g Erdbeeren, püriert
2 EL Puderzucker
1/2 TL Vanillepaste*
1 1/2 Blätter Gelatine* (oder Agar-Agar)
200g Schlagsahne
Für den Teig:
80g Haselnusskerne
30g Butterkekse*
1 TL Backpulver
75g Zucker
1 Prise Salz
1 TL Vanillepaste*
2 Eiweiß (M), verquirlt
Für die Dekoration:
einige Beeren (z.B. Blaubeeren, Himbeeren, Erdbeeren)
etwas weiße Schokolade, geraspelt

DIRECTIONS / ZUBEREITUNG
1. Start with the strawberry cream. Add the gelatin leaves to a small bowl with cold water and let them soak for about 5-7 minutes. Add the strawberries to a small saucepan and purée with an immersion blender*. Next, add the confectioners’ sugar and the vanilla bean paste and mix. Place the saucepan on the stove and heat up – the strawberry purée should get hot, but not boil. Squeeze the gelatin to get rid of some water and add it to the purée – mix until dissolved completely. Remove from the heat and let cool down a bit.
2. Add the heavy cream to a tall bowl and mix on high until stiff peaks form. Mix about 1-2 tablespoons into the cooled strawberry purée. Fold in the remaining whipped cream until well combined and fill into a piping bag. Place in the fridge for at least 1-2 hours, so the cream can set a bit.
3. Preheat the oven to 190°C (375°F). Line a baking sheet with baking parchment and spread the hazelnuts evenly on top. Roast the nuts in the oven for about 8-10 minutes. Take em out and add them to a metal sieve. Rub the hazelnuts inside that sieve to get rid of the skins (you might want to do that with a paper towel). You can also rub the hazelnuts between two kitchen towels. Let the »naked« hazelnuts cool down a bit and then chop them (works best with a mixer). Do not turn them into powder, there should still be some bigger pieces visible.
4. Reduce the heat of the oven to 180°C (350°F). Grease a muffin tin or use paper liners. Crush the cookies and mix em with the chopped hazelnuts. Add baking powder, sugar, and salt and mix to combine. Next, add the vanilla bean paste and egg whites and mix until the sugar has dissolved completely. Fill six molds/paper liners with the batter and bake for about 20-24 minutes. The cakes should have a nice golden brown color and the centers should have set. Take out of the oven and let them cool down a bit, then remove from the tin (if you did not use paper liners, you have to loosen the cakes with a knife from the tin). Let cool down completely on a wire rack.
5. When the cakes are cooled and the cream has set, pipe a good amount onto each cake and decorate with some berries and grated chocolate. Store in the fridge until serving.
1. Mit der Erdbeercreme anfangen und dafür die Gelatine in einer kleinen Schüssel mit kaltem Wasser für etwa 5-7 Minuten einweichen lassen. Die Erdbeeren in einen Topf geben und mit einem Stabmixer* pürieren. Puderzucker und Vanillepaste zugeben und gut unterrühren. Den Topf auf den Herd stellen und die Erdbeermasse erhitzen – die Masse soll heiß werden, aber nicht kochen. Die Gelatine ausdrücken, in den Topf geben und so lange verrühren, bis sie sich komplett aufgelöst hat. Den Topf vom Herd nehmen und die Masse etwas abkühlen lassen.
2. Die Sahne in einem hohen Gefäß aufschlagen, bis sie steif ist. Etwa 1-2 Esslöffel der Sahne mit der abgekühlten Erdbeermasse verrühren, dann den Rest der Sahne vorsichtig unterheben. Die Masse in einen Spritzbeutel füllen und für 1-2 Stunden in den Kühlschrank legen.
3. Den Ofen auf 190°C (375°F) Ober-/Unterhitze vorheizen. Die Haselnüsse auf einem Backblech mit Backpapier verteilen und für etwa 8-10 Minuten im Ofen rösten lassen. Die Haselnüsse herausnehmen, in ein großes Metallsieb schütten und mit einem Papiertuch (als Schutz für die Finger) im Sieb reiben, damit sich die Häute der Nüsse lösen – man kann die Nüsse auch zwischen zwei Küchentüchern reiben. Nüsse abkühlen lassen und dann hacken (geht am schnellsten mit einem Mixer). Die Nüsse sollten nicht zu fein gehackt werden, es dürfen ruhig noch ein paar größere Stückchen dabei sein.
4. Die Temperatur des Ofens auf 180°C (350°F) Ober-/Unterhitze reduzieren. Ein Muffinblech gut einfetten oder mit Papierförmchen bestücken. Die Kekse zerbröseln und mit den Nüssen in eine Schüssel geben. Backpulver, Zucker und Salz zugeben und alles gut vermengen. Vanillepaste und Eiweiß zugeben und gut verrühren – der Zucker sollte sich aufgelöst haben. Die Masse auf sechs Mulden bzw. Förmchen verteilen und dann für etwa 20-24 Minuten backen – die Küchlein sollten gut Farbe bekommen haben und die Mitte eines Küchleins sollte bei Druck nur noch leicht nachgeben. Aus dem Ofen holen und etwas abkühlen lassen, dann aus der Form herauslösen (wer keine Papierförmchen benutzt hat, muss die Küchlein vorsichtig mit einem Messer vom Rand und Boden lösen). Auf einem Kuchengitter komplett abkühlen lassen.
5. Wenn die Küchlein abgekühlt und die Creme fest genug ist, auf jedes Küchlein eine gute Portion der Erdbeercreme aufspritzen und mit Beeren und geraspelter Schokolade dekorieren. Bis zum Servieren in den Kühlschrank stellen.
Craving more? Keep in touch on Facebook, Instagram and Pinterest for new post updates and more. You can also contact me with any questions or inquiries!
Here is a version of the recipe you can print easily.
Print
Christianshavner Tærte aka. Danish Hazelnut Cakes
- Prep Time: 00:30
- Cook Time: 00:35
- Total Time: 02:30
- Yield: 6 1x
- Category: Cakes
- Cuisine: Denmark
- Diet: Vegetarian
Description
These delicious little hazelnut cakes with strawberry whipped cream topping and fresh berries from Denmark are simply awesome! Very popular in Copenhagen!
Ingredients
Für das Topping:
120g Erdbeeren, püriert
2 EL Puderzucker
1/2 TL Vanillepaste*
1 1/2 Blätter Gelatine* (oder Agar-Agar)
200g Schlagsahne
Für den Teig:
80g Haselnusskerne
30g Butterkekse*
1 TL Backpulver
75g Zucker
1 Prise Salz
1 TL Vanillepaste*
2 Eiweiß (M), verquirlt
Für die Dekoration:
einige Beeren (z.B. Blaubeeren, Himbeeren, Erdbeeren)
etwas weiße Schokolade, geraspelt
Instructions
1. Start with the strawberry cream. Add the gelatin leaves to a small bowl with cold water and let them soak for about 5-7 minutes. Add the strawberries to a small saucepan and purée with an immersion blender*. Next, add the confectioners’ sugar and the vanilla bean paste and mix. Place the saucepan on the stove and heat up – the strawberry purée should get hot, but not boil. Squeeze the gelatin to get rid of some water and add it to the purée – mix until dissolved completely. Remove from the heat and let cool down a bit.
2. Add the heavy cream to a tall bowl and mix on high until stiff peaks form. Mix about 1-2 tablespoons into the cooled strawberry purée. Fold in the remaining whipped cream until well combined and fill into a piping bag. Place in the fridge for at least 1-2 hours, so the cream can set a bit.
3. Preheat the oven to 190°C (375°F). Line a baking sheet with baking parchment and spread the hazelnuts evenly on top. Roast the nuts in the oven for about 8-10 minutes. Take em out and add them to a metal sieve. Rub the hazelnuts inside that sieve to get rid of the skins (you might want to do that with a paper towel). You can also rub the hazelnuts between two kitchen towels. Let the »naked« hazelnuts cool down a bit and then chop them (works best with a mixer). Do not turn them into powder, there should still be some bigger pieces visible.
4. Reduce the heat of the oven to 180°C (350°F). Grease a muffin tin or use paper liners. Crush the cookies and mix em with the chopped hazelnuts. Add baking powder, sugar, and salt and mix to combine. Next, add the vanilla bean paste and egg whites and mix until the sugar has dissolved completely. Fill six molds/paper liners with the batter and bake for about 20-24 minutes. The cakes should have a nice golden brown color and the centers should have set. Take out of the oven and let them cool down a bit, then remove from the tin (if you did not use paper liners, you have to loosen the cakes with a knife from the tin). Let cool down completely on a wire rack.
5. When the cakes are cooled and the cream has set, pipe a good amount onto each cake and decorate with some berries and grated chocolate. Store in the fridge until serving.
Notes
Make something amazing in the kitchen!
Links marked with an asterisk (*) are affiliate links (advertising/Werbung) to Amazon Germany. If you click on one of those links and buy something via this link, I will get a commission for that sale. The price of whatever you buy is not affected in any way by this.


Ils sont magnifiques tes Christianhavn taert ! J’ai découvert ce dessert aussi à Copenhague dans la même boulangerie et j’ai adoré ! Le moelleux du gâteau avec le croquant des noisettes et cette mousse de fraises aérienne, quel délice ! Merci pour la recette, je vais essayer de la refaire pour me régaler.
I want to make this recipe as I love these cakes! Please can you give me more information about the ‘shortbread cookies’ used? Are they like digestive biscuits, rich tea biscuits or a plain/simple biscuit of just butter, flour, sugar? Thank you.
They are regular shortbread cookies. In Germany, we would say Butterkekse aka. butter cookies.
All plain cookies should work here I guess.
Cheers
Marc