Description
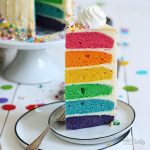
If you want lots of colors, this cake might be the perfect cake for you: a delicious Rainbow Layer Cake! The perfect celebration treat!
Ingredients
For the buttercream:
1/2 cup (60g) cornstarch*
3 tbsp. sugar (fine)*
2 tsp. vanilla extract*
25.4 fl. oz. (750ml) milk
11.6 oz. (330g) butter, at room temperature
4 tbsp. confectioners‘ sugar*
For the batter:
1 cup (230g) butter, at room temperature
1 1/4 cups (250g) sugar (fine)*
5 medium eggs
2 tsp. vanilla extract*
3 cups (400g) stronger all-purpose flour*
2 tsp. baking powder
1 pinch of salt
4 tbsp. milk
some food color* (purple, blue, green, yellow, orange, pink or red)
For the drip glaze:
4.2 oz. (120g) candy melts* (white or any color you like)
0.7 oz. (20g) hot water
edible gold color* (optional)
For the decoration:
3.5 oz. (100g) heavy cream
1 tsp. confectioners‘ sugar*
some rainbow sprinkles
Instructions
1. Start with the buttercream by cooking the custard. Add the cornstarch, sugar, and vanilla extract to a bowl and mix with a small amount of the milk until well combined. Add the rest of the milk to a small pot and bring to a boil. Add the cornstarch mixture and stir it in. Let it cook while stirring constantly until the custard has thickened nicely. Remove from the heat and immediately place a piece of plastic wrap on the surface of the custard to avoid the forming of skin. Let it cool down completely. Continue with the cake layers while the custard is cooling down.
2. Preheat the oven to 180°C (350°F). Grease six round baking tins (15cm)* and line with baking parchment. I only have four tins and had to do two rounds of baking with four and two tins in the oven.
3. Add the butter and sugar to a large bowl and mix for 4-5 minutes until very light and fluffy. Add the eggs one at a time and mix well after each addition. Add the vanilla extract and mix it in. Mix the flour with baking powder and salt and add together with the milk to the bowl, and mix at the lowest speed of your kitchen machine until just combined.
4. Divide the batter between six bowls and color with food color – don’t hold yourself back and use a good amount of food color to get a nice and bright result. Transfer the different colored batters to the baking tins, smooth out the top and bake them for about 12-16 minutes or until a wooden skewer inserted into the center of the cakes comes out clean. Take the cakes out of the oven and let them cool down inside the tins for some time, then remove them and let them cool down completely on a wire rack. If you did not bake all the tins at the same time, continue until all cake layers are done.
5. Continue with the buttercream by adding the butter and confectioners‘ sugar to a large bowl and mix on high speed for about 4-5 minutes until very light and fluffy. Gradually add the completely cooled custard in small batches and mix well after each addition. When all the custard is added continue mixing for another 5-6 minutes until you get a smooth and creamy buttercream. Make sure the butter and custard have the same temperature or the two might not mix well.
6. Assemble the cake. Level the cake layers first if they domed too much during baking. Start with the purple cake layer by placing it on a cake plate. Add some buttercream on top and spread evenly until the edges of the cake. Place the blue cake layer on top and repeat the whole process with the buttercream. The next color would be green, then yellow, orange, and finally pink (or red). Cover the whole cake with a thin layer of buttercream (crumb coat) and place it in the fridge for at least 20-30 minutes. Add more buttercream to the top and sides and smooth it out to get a clean surface. Place in the fridge again for another 15-20 minutes.
7. For the drip glaze add the candy melts to a microwave-safe bowl and heat up in 15-second increments until almost completely melted. Add the hot water and heat it up another 15 seconds in the microwave. Stir the mixture until smooth. Depending on the color of candy melts you used you can leave it as it is or add food color now and mix it in. Use a teaspoon and let small amounts of the glaze drip down the sides of the cake. If the first drip runs down the sides too quickly you might want to wait a bit longer for the glaze to thicken up a bit and be less runny. Do the drip thing around the edges of the cake, then pour the rest of the glaze on top and push with a spatula to the edges to »connect« the glaze with the one that is already along the edges to get one smooth layer. Place in the fridge to let the glaze set.
8. To decorate the cake whisk the heavy cream until stiff peaks form. Fill into a piping bag with a star tip and decorate the top of the cake to your liking. You can also press some rainbow sprinkles into the buttercream around the bottom of the cake and/or add it on top of the cake. Keep the cake in the fridge until serving.
Notes
Enjoy baking!