Description
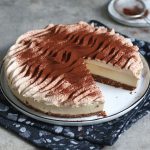
Delicious no-bake cheesecake with a nice cappuccino flavor. Perfect treat for a hot summer day!
Ingredients
Scale
For the base
- 7 oz. (200g) chocolate shortbread cookies
- 1.7 oz. (30g) almond paste or marzipan, grated
- 1/2 cup (120g) butter, melted
For the cheesecake layer
- 6 gelatin leaves
- 3 medium egg yolks
- 1/4 cup (50g) sugar
- 6.7 fl. oz. (200ml) milk
- 1.7 oz. (50g) KRÜGER Cappuccino Classico
- 8.8 oz. (250g) mascarpone
- 8.8 oz. (250g) ricotta cheese
- 1/3 cup (45g) confectioners’ sugar
- 7 oz. (200g) heavy cream
For the decoration
- 14 oz. (400g) heavy cream
- 2 tbsp. KRÜGER Cappuccino Double Chocolate
- 1/4 cup (30g) confectioners’ sugar
- cocoa powder for dusting
Instructions
- Line a 9 inches (23cm) springform tin with baking parchment and set aside. Add the chocolate cookies to a large freezer bag and crush with a rolling pin until you get very fine crumbs, add to a bowl. Grate the almond paste/marzipan finely (works best if you place it in the freezer for some time in advance) – add to the bowl as well. Melt the butter, add to the bowl and mix until all crumbs are moist. Pour into the prepared tin and press to the bottom to form a nice base. Place in the fridge until needed.
- Place the gelatin leaves in a bowl with cold water and let soak for 5-8 minutes. Mix the egg yolks with the sugar and set aside. Add the milk to a saucepan and bring to a boil. Add the instant cappuccino powder and mix in well. Add the egg yolk mixture and stir constantly until the mixture thickens. Let cook and bubble for a moment, then remove from the heat. Let cool down a bit. Drain the gelatin leaves, add to the saucepan and stir until dissolved completely. Set the custard aside to cool down.
- Mix the mascarpone with ricotta cheese and confectioners’ sugar in a large bowl until well combined. Take two tablespoons of that mixture and mix into the cooled cappuccino custard. Repeat twice, then pour the cappuccino custard into the bowl with the remaining mascarpone mixture and mix to combine. Set aside to cool down. Add the heavy cream to a tall bowl and mix on high speed until stiff peaks form. As soon as the custard mixture is cooled down to about room temperature, fold in the whipped cream, then pour into the prepared springform tin, smooth out the top and place in the fridge for 6 hours or over night.
- When cake is still cooling, heat up the heavy cream for the decoration a bit and mix with the chocolate instant coffee powder. Place in the fridge to get cold again. To finish the cake add the flavored heavy cream with the confectioners’ sugar in a tall bowl and whip until stiff peaks form. Fill the cream into a piping bag with a rose tip (looks like a raindrop) and decorate the cheesecake with waves (or any other way you like). Place the cheesecake in the fridge again for at least 30-45 minutes. Dust with cocoa powder right before serving.
Notes
- Enjoy coolin’!
Nutrition
- Serving Size: 12
