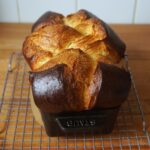
Description
Brioche Nanterre is a classic French bake we love to make for a brunch with the family. Also great for French Toast and other breakfast treats!
Ingredients
For the dough:
0.5 oz. (15g) fresh baker’s yeast
3 fl. oz. (90ml) cold water
12.3 oz. (350g) all-purpose flour*, plus a little more if needed
2.3 oz. (65g) sugar (fine)*
1/2 tsp. salt
2 large eggs
2 tsp. vanilla extract*
2 tsp. orange blossom water* (optional)
3.5 oz. (100g) cold butter, cut into small pieces
Additionally:
1 large egg yolk
about 0.7 oz. (20g) cold butter, cut into strips
Instructions
1. Dissolve the fresh baker’s yeast in the cold water and set aside.
2. Combine the flour, sugar, and salt in the bowl of a stand mixer fitted with a dough hook. Add the yeast water, eggs, vanilla extract, and orange blossom water (optional) and knead for about 5 minutes at medium speed. The dough will still be quite rough and sticky.
3. Reduce the speed slightly and gradually add the butter in small pieces, kneading until incorporated well. Knead the dough for another 5-6 minutes until no more pieces of butter are visible. Once the butter is well incorporated, increase the mixer speed again and knead for another 5-7 minutes. After this time, the dough should pull away from the sides of the bowl and pass the windowpane test (see note). If the dough passes the windowpane test after this time but doesn’t yet easily come away from the bowl, simply dust it with a little more flour (1/4 to 1/2 teaspoon should be sufficient) and briefly work it in. This will definitely help to get the dough out of the bowl more easily.
4. Shape the dough into a ball – if the dough is still very sticky, simply fold it over itself several times to create some tension – and place it in a large, lightly oiled bowl. The bowl should be relatively large, as the dough will rise considerably. Cover the bowl and let the dough rise at room temperature for about 30 minutes. Afterward, place the dough in the fridge for at least 8 hours (maximum 48 hours). To prevent the dough from drying out, the bowl should be very well covered.
5. Remove the risen dough from the fridge and divide it into three equal portions on a (minimally) floured surface and shape them into balls. The surface of the balls should have some tension. Cover the dough balls and let them rise for about 20 minutes.
6. Lightly grease a 23x12cm loaf tin* (or slightly larger) and line it with a piece of baking parchment. Roll out the dough balls into elongated ovals using a rolling pin, then roll them up tightly. The result should look like thick, short sausages. Place these rolled-up dough sausages, seam-side down and spaced apart, in the prepared loaf tin (see photos). Lightly whisk an egg yolk and brush the dough with it (store any leftovers in the fridge). Cover the loaf tin and let the dough rise again for about 2 1/2 hours – it will increase significantly in size during this time.
7. Preheat the oven to 170°C (340°F) fan-forced. When the dough has risen enough, the individual dough pieces should have fused into a compact loaf. Brush the dough once more with the remaining egg yolk, then make a lengthwise cut down the middle of the loaf with a sharp knife (the cut can be quite deep) and place thin strips of cold butter into the resulting slits (see photos). Place the loaf tin in the preheated oven and pour a little water onto the oven floor to create steam. Immediately close the oven door and bake the brioche for about 40 minutes. Remove the baked brioche from the oven and let it cool in the loaf tin for a while, then lift it out using the baking parchment and let it cool down completely on a wire rack.
Note: The windowpane test is a simple way to check if dough has been kneaded sufficiently. Simply stretch a piece of dough between your fingers. If you can stretch the dough so much that you can see through it, then enough gluten has formed. If the dough tears before you can see through it, it should be kneaded a little longer.
Notes
Let’s get baking!
