Description
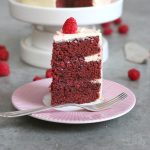
Raspberries and white chocolate are a winning combination – especially in this little cake. It’s the perfect cake to celebrate something special! :)
Ingredients
For the cake:
1 cup (240ml) milk
1 tbsp. white wine vinegar
red food coloring*
1/2 cup (120g) butter, at room temperature
1 1/4 cups (250g) sugar
2 large eggs
1 tsp. vanilla extract
1 1/2 cups (200g) all-purpose flour
1/3 cup (45g) cornstarch
2 tbsp. cocoa powder
1 tsp. baking soda
1/2 tsp. salt
For the buttercream:
3.5 oz. (100g) egg whites (about 3 eggs)
1 1/2 cups (150g) sugar
6.7 oz. (190g) butter, at room temperature
1 pinch of salt
1/2 tsp. vanilla extract
3.5 oz. (100g) white chocolate, melted and cooled
some drops pink food coloring* (optional)
For the filling:
3,5 oz. (100g) fresh raspberries
3,5 oz. (100g) raspberry marmalade
For the decoration:
some fresh raspberries
some white chocolate, grated
Instructions
1. Preheat the oven to 180°C (350°F). Line three 18cm springform tins* with baking parchment, grease them lightly and dust with some flour. Set aside.
2. Combine milk, vinegar, and some red food coloring and let the mixture thicken for about 5-8 minutes. You decide how red you want the cake, but for a strong color, you need quite a lot of food coloring.
3. Add the butter and sugar to a large bowl and mix until very light and fluffy. Add the eggs one at a time and mix well after each addition. Next, add the vanilla extract and stir in. Combine flour, cornstarch, cocoa powder, baking soda, and salt. Add these dry ingredients in several batches to the bowl, alternating with the (red) milk mixture – stir until just combined and do not overmix. Divide the batter evenly among the springform tins and bake the cakes for about 25-30 minutes – or until a toothpick inserted into the center of the cakes comes out clean. Take the cakes out of the oven and let them cool down for a moment inside the tins, then remove and let cool down completely on a wire rack.
4. For the buttercream, melt the white chocolate and let it cool down again. Add the egg whites and sugar to a heatproof bowl and place that on top of a saucepan with simmering water – the water should not touch the bowl though. Stir and heat the egg white mixture until it reaches a temperature of 71°C (160°F) and the sugar has dissolved completely.
5. Pour the mixture into the bowl of a food processor and mix on high for about 8-10 minutes until a thick, shiny meringue mixture has formed. It should only be lukewarm at best. If you don’t have a food processor, you can use a hand mixer as well, of course.
6. Gradually add the butter in small pieces to the bowl, adding more only when the butter previously added has been completely incorporated. Once all the butter has been used, add the salt and vanilla extract and continue mixing for about 2 minutes. Next, add the melted chocolate and mix for about 4-5 minutes longer.
7. Mix the raspberries for the filling with the raspberry jam, crushing the raspberries while mixing. You want a thick raspberry mixture.
8. Once the cake layers have cooled, the buttercream is ready, and the filling is prepared, you can start assembling the cake. Place the first cake layer on a serving plate and spread a thin layer of buttercream on top. Add some buttercream to a piping bag with a large round nozzle and pipe a ring/boarder of buttercream around the edge of the cake layer. Spread half of the raspberry filling evenly inside this ring/boarder, then place the second cake layer on top and press it down lightly. Repeat the process and spread a little buttercream on top of the second cake layer, pipe a ring and spread the remaining raspberry filling inside that ring. Place the last cake layer on top, press it down, and then coat the whole cake with a thin layer of buttercream. Place the cake in the fridge for about 30 minutes.
9. Coat the chilled cake with the remaining buttercream. If you want a light pink marble effect, as shown in the pictures, simply color a teaspoon of the buttercream with a little food coloring, spread it all over the cake, and then simply smooth it out. Decorate the finished cake with fresh raspberries and white chocolate to your liking.
Notes
The cake layers can be baked a day in advance. Simply wrap them loosely in plastic until needed to prevent them from drying out.