Description
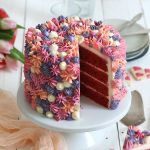
If you want to do something nice for your mother on Mother’s Day… How about a nice pink layer cake? Almost too cute to eat. Available in other colors too.
Ingredients
For the cake layers:
3 cups (390g) spelt flour*
1 cup (200g) sugar (fine)*
2 tbsp. cocoa powder*
1 tsp. baking soda
1/2 tsp. salt
2 large eggs, at room temperature
1 cup (240ml) buttermilk, at room temperature
3/4 cup (170g) butter, melted & cooled
1/2 cup (120ml) vegetable oil
1 tbsp. white wine vinegar*
1 tsp. vanilla extract*
red food color* (gel or powder)
For the buttercream:
6 large egg whites
1 1/2 cup (300g) sugar (fine)*
1/4 tsp. salt
15.8 oz. (450g) butter, at room temperature
1 1/2 tsp. vanilla extract*
1 1/2 cups (200g) confectioners‘ sugar
some red, pink & purple food color* (gel or powder)
some raspberry jam (optional)
some freeze-dried raspberries*, crumbled
some red/pink/purple sprinkles
Instructions
1. Preheat the oven to 180°C (350°F). Grease four 15cm baking tins (I used silicone molds*) and set aside. Make sure your ingredients are all at room temperature. Melt the butter and let it cool down again.
2. Add the spelt flour, sugar, cocoa powder, baking soda, and salt to a large bowl and mix until well combined. In a second bowl mix the eggs with buttermilk, melted butter, oil, vinegar, and vanilla extract until well combined. Add the red food color (gel or powder) and mix in – you want a nice red cake but it should not glow. Add the wet ingredients to the bowl with the dry ingredients and mix until well combined. Divide the batter between the prepared baking tins, smooth out the top, and bake for about 27-30 minutes or until a toothpick inserted into the center of the cakes comes out clean. Take them out of the oven and remove the cakes immediately from the tins and let them cool down on a wire rack. If you bake the cakes a day in advance wrap them in some plastic wrap so they do not dry out.
3. For the buttercream add the egg whites, sugar, and salt to a large bowl and place it on a pot with simmering water – the water should not touch the bowl! Mix until the sugar has dissolved completely and the mixture has reached a temperature of 71°C (160°F). It’s best to use a kitchen thermometer* here. Transfer the mixture to the bowl of a stand mixer. Whisk on high for about 5 minutes until stiff peaks form and the mixture has cooled down to room temperature, more or less.
4. Gradually add the soft butter (about a tablespoon at a time) and mix well – only add more butter when the butter you just added has disappeared. Add the confectioners‘ sugar and vanilla extract and mix in slowly, then mix on high for another 5-6 minutes until you get a very soft and silky buttercream. If the buttercream is very soft, place it in the fridge for about 30 minutes and then mix again.
5. To assemble the cake place a cake layer on a serving plate – flatten the cakes first if they domed a lot. Spread some raspberry jam on the cake (optional), then top with some buttercream, spread evenly, and sprinkle with crumbled freeze-dried raspberries. Place the next cake layer on top and repeat the process until you have all four cake layers with buttercream in between. Cover the whole cake with a thin layer of buttercream (it does not have to look super clean) and place it in the fridge for about 20-30 minutes.
6. Color the rest of the buttercream in different shades of red, pink, and purple (keep some white as well) and fill into piping bags with round and start tips. Pipe swirls and dots all over the cake. Decorate with some sprinkles and/or freeze-dried raspberries. Keep in the fridge until serving.
Notes
Enjoy baking!