Description
How about some delicious sugar cookies for Halloween? You might want to wash off some of the blood first, but then you got great Skull Cookies to celebrate.
Ingredients
For the dough:
3/4 cup (170g) butter
1/2 cup (100g) sugar (fine)*
1 large egg
1 tsp. vanilla extract*
2 cups (260g) stronger all-purpose flour*
1/4 tsp. baking powder
1/4 tsp. salt
1 1/2 tbsp. cocoa powder*
2 tbsp. black cocoa powder*
For the icing:
3 1/2 – 4 1/2 cups (450g-580g) confectioners‘ sugar*
1/4 tsp. cream of tartar*
3 medium egg whites, plus more if needed
1/2 tsp. fresh lemon juice
red/pink food color*
some candy eyes*
Instructions
1. Add the butter and sugar to a large bowl and mix for about 4-5 minutes until light and fluffy. Add the egg and vanilla extract and mix until well combined. Mix the flour with baking powder and salt and add to the bowl – mix until just combined. Divide the batter in half, add the regular cocoa to one portion and the black cocoa to the other dough portion. Wrap separately in plastic wrap and refrigerate for at least 2 hours (or overnight).
2. Preheat the oven to 165°C (325°F). Line a baking sheet with baking parchment and set aside. Take about half of each dough from the fridge, mix slightly and roll out on a floured surface – the dough should look marbled. Use a skull cookie cutter* and cut out as many cookies as you can and place on the baking sheet. Gather dough scraps, roll out again and cut out more cookies. Place leftover dough in the fridge. Bake the first batch of cookies for about 10-11 minutes. Take out of the oven and let cool down on the baking sheet for some time, then transfer to a wire rack and let cool down completely. Repeat with the remaining dough until all dough is used.
3. For the royal icing add about 3 1/2 cups (450g) of the confectioners’ sugar and the cream of tartar to a large bowl and mix until well combined. Add the egg whites and lemon juice and mix well until you got a smooth and shiny mixture. The icing should be thick, but not too firm – it should still flow off a spoon when you scoop it out of the bowl. Pour a bit more than 1/3 of the icing into a piping bag with a small round piping tip. Decorate the cookies with the icing as shown in the photos, leaving the area on top of the cookies free from icing. Let dry for about 2 hours.
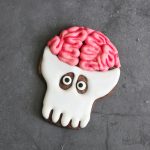
4. Color the rest of the icing with some red/pink food coloring and thicken it up with additional confectioners‘ sugar – you want the icing to be quite thick and not runny anymore. Fill into a piping bag with a slightly larger round piping tip, then pipe the »brains« in tight coils onto the empty space on the cookies. This works best if you hold the piping nozzle flat over the cookies. Try not to touch the white icing with the »brain« icing or it will discolor the white icing over time. Let the brains dry for 20 minutes. Dilute a few drops of red/pink food coloring with a tiny bit of water, then use a paintbrush to apply some of the food color to the spaces between the brain folds to highlight these folds. If you like, you can also glue sugar eyes into the eye sockets (optional). Let dry overnight.
Notes
Happy Halloween!