Description
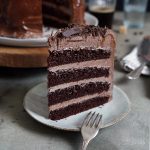
The ultimate cake for chocoholics: a delicious Coffee Cocoa Mousse Chocolate Cake. Layers of scrumptious chocolate cake in combination with a chocolate cocoa mousse frosting. So good!
Ingredients
For the chocolate cake:
1 3/4 cups (230g) all-purpose flour
1 oz. (30g) cornstarch
2.5 oz. (70g) cocoa powder
2 tsp. baking powder
1 tsp. baking soda
1/4 tsp. salt
3/4 cup (150g) sugar
3/4 cup (150g) brown sugar
1/2 cup (120ml) sunflower oil
7 oz. (200g) sour cream
3 medium eggs
1/2 cup (120ml) buttermilk
2 tsp. vanilla extract
1 cup (240ml) freshly brewed coffee
For the chocolate coffee frosting:
5 fl. oz. (150ml) freshly brewed coffee
3/4 cup (70g) cocoa powder
2 cups (460g) butter (or margarine), at room temperature
1 cup (130g) confectioners’ sugar
2 tbsp. maple syrup
1 tsp. vanilla extract
1 pinch of salt
7 oz. (200g) Ritter Sport Kakao-Mousse
3.5 oz. (100g) Ritter Sport Halbbitter
some chocolate shavings for decorations (optional)
Instructions
1. Preheat the oven to 350°F (180°C). Line four 8-inch cake pans with baking parchment and grease lightly. I prefer silicon molds* in most cases because they are easier to handle. Set everything aside.
2. Sift flour, cornstarch, cocoa powder, baking powder, baking soda, and salt into a bowl and mix to combine. In a second large bowl mix both sugars, oil, sour cream, eggs, buttermilk, and vanilla extract in a large bowl until well combined. Add about half of the dry ingredients and mix until well combined. Add the hot coffee and the rest of the dry ingredients and mix until just combined. Divide the batter between the cake pans and bake for about 25 minutes – or until a toothpick inserted into the centers of the cakes comes out clean. If your oven does not fit all cake pans at the same time you can bake, for example, in two batches with two cake pans at the same time. Take out of the oven and let cool down on a wire rack. You can prepare the cake layers a day in advance and store them well-wrapped until you are ready to continue with the frosting.
3. For the frosting brew some fresh coffee. Add together with the cocoa powder and mix until you get a smooth chocolate sauce. Set aside and let cool down.
4. In the bowl of a kitchen machine (with a whisk) mix the butter/margarine with confectioners’ sugar, maple syrup, vanilla extract, and salt. Whisk for 5-6 minutes on high until the mixture looks light and fluffy. Add the cooled chocolate sauce and mix for another 2-3 minutes until well incorporated.
5. While the kitchen machine is working, you can chop the chocolate coarsely and melt it (carefully) in the microwave (or in a bowl over a pot with simmering water). Let cool down a bit. When the chocolate sauce is well incorporated and the melted chocolate is a bit cooler, add it to the bowl and mix in. Mix everything for another 2-3 minutes – the frosting will be very soft. Place the bowl in the fridge for about 45-60 minutes to cool the frosting (check notes as well). Once the frosting has cooled for some time, stir it with a rubber spatula – if the frosting keeps its shape and does not collapse, you can continue with the cake.
6. Place the first cake layer on a serving plate or cake stand. Add some frosting on top and spread evenly. Repeat with the remaining cake layers and stack them on top of each other. Place the cake layers in the fridge for about 30 minutes to make sure everything stays where it should be. To finish the cake spread the remaining frosting on the sides and on top of the cake to cover everything – make swirls and waves, you don’t have to create a super smooth surface ;)
7. To decorate the cake sprinkle some chocolate shavings on top (optional).
Notes
Note 1: Depending on how warm the ingredients for the frosting are (chocolate sauce and melted chocolate), it may take a little longer to cool completely. One time it took me more than one hour longer because the melted chocolate had warmed everything a little too much ;)
Note 2: Leftovers should be stored in the fridge (up to 3 days are fine) – however, I recommend leaving the cake out for some time before serving again. The texture and flavors will be better when the cake is not too cold.
Note 3: The frosting will look dull when the cake has been in the fridge for a while – the frosting hardens in the cold and loses its shine. As you can see – my cake in the photos is shiny – that’s because I warmed the surface of the frosting slightly before taking the pictures. A kitchen torch is all you need here (a hair dryer also works if you have not yet decorated it with chocolate shavings). You don’t have to heat up the whole cake – a tiny bit of heat is all you need to give the cake a shiny exterior ;P