Description
Who would have guessed you could make jam with bell peppers? Well, you will probably never go for anything else anymore… it’s so good!
Ingredients
42 oz. (1,2kg) red peppers
1/2 cup (110ml) white wine vinegar* or honey vinegar
18 oz. (500g) jam sugar* (for 35 oz. fruits)
Instructions
1. Preheat the oven to 250°C (480°F). Line a baking sheet with baking parchment. Wash and dry the bell peppers. Remove the core and quarter them. Place them with the inner side down on the baking sheet and place the baking sheet on the highest level in the oven. Grill the bell peppers until they start to blacken – this can take 6-10 minutes depending on the oven. It is fine if they are partially burned, just don’t make black coal out of them. Take them out of the oven and place a wet kitchen towel on the bell peppers and let them steam for about 10 minutes.
2. The skins of the bell peppers should come off easily now. Remove all of them and cut off black parts if needed. Cut the peppers into not too small pieces. Take half of the bell peppers and puree with an immersion blender. Add the peppers that are still in pieces and the vinegar. This mix should have 35 oz. (1kg) all in all. Add the jam sugar and mix until well combined. Cover with plastic wrap and place in the fridge overnight.
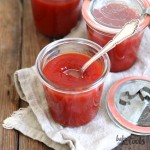
3. Wash the glass jars with hot water and place them on a clean kitchen towel. Pour the bell pepper mixture into a tall cooking pot (the higher the better to be save from splatters). Heat up and bring to a boil. When the mixture is boiling rapidly set a timer for 4 minutes and stir constantly with a wooden spoon. When the time is over take a bit of the jam and spread it on a plate. Is it still runny, give it another minute, is nice and thick you’re done. Remove the pot from the heat and fill the jam into the prepared glass jars. Close them and turn them upside down if they have a screw cap, otherwise just let them stand. Let cool down completely.
Notes
Enjoy cooking!