Description
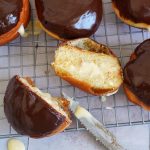
A classic flavor for donuts a lot of people love: Boston Cream Donuts. Fluffy donut meets vanilla custard and chocolate glaze. So good!
Ingredients
For the cream filling:
15.2 fl. oz. (450ml) regular milk
1/4 cup (50g) sugar (fine)* (or xylitol)
1.2 oz. (35g) cornstarch
4 large egg yolks
2 tsp. vanilla bean paste*
1 pinch of salt
1 oz. (30g) butter, in small pieces
For the dough:
6.4 fl. oz. (190ml) regular milk
1.4 oz. (40g) butter
2 tbsp. sugar (fine)*
3 cups (390g) stronger all-purpose flour*
0.25 oz. (7g) active dry yeast*
1 pinch of salt
3 large egg yolks
For the chocolate glaze:
3.5 oz. (100g) semi-sweet chocolate* (61%), chopped
2.5 oz. (70g) heavy cream
fat/oil for deep-frying
Instructions
1. Start with the cream filling (can be done a day in advance). Take a small amount of the milk and mix it with the sugar, cornstarch, egg yolks, vanilla paste, and salt in a small bowl until well combined – you don’t want to see any lumps of starch in the mixture. Heat up the remaining milk in a small pot/saucepan. When the milk starts boiling, add the cornstarch mixture and stir it in. Let simmer/bubble for 1-2 minutes while stirring constantly. The cream should thicken significantly. Add the butter in small pieces and stir in until melted completely. Remove from the heat and immediately press a piece of plastic wrap on top of the custard to prevent skin from forming. Let it cool down completely. Place the cooled cream in the fridge until ready to use.
2. For the donut dough, add milk, butter, and sugar to a small saucepan and gently heat up on the stove until the butter has melted, and the sugar has dissolved completely. Remove from the heat and let cool to about 36°C/96°F (lukewarm).
3. Add the flour to a large bowl (kitchen machine) and mix with the dry yeast and salt. Add the cooled mix and the egg yolks and knead for about 6-7 minutes until you get a nice and smooth dough that comes off easily from the sides of the bowl. Shape the dough into a ball, cover, and let rise in a warm place for about 1 hour. The volume should double more or less.
4. Roll out the dough on a lightly floured surface (approx. the thickness of a finger). Use a cookie cutter or glass and cut out circles with a diameter of about 7 cm. Collect scraps and roll out again to get more dough circles. I got 15 all in all here. Place the dough pieces on a lightly floured cutting board or baking sheet (with baking parchment), cover with a damp kitchen towel, and let rise for another 20-25 minutes.
5. Just before the dough pieces have finished their time, heat up some fat/oil in a small pot until you get a temperature of about 175°C (347°F) – a thermometer* is very helpful here. If the temperature is too low, the dough will soak up fat – if the heat is too high, the dough will darken too quickly and not bake properly. Fry the dough circles (no more than 2-3 at a time) in the hot fat. Deep-fry the donuts first on one side for about 2 minutes, then flip them and deep-fry for another minute or so. Take them out of the fat/oil and let them drain on a piece of kitchen paper.
6. For the chocolate glaze, roughly chop the chocolate. Place it together with the heavy cream in a small (shallow) bowl, and melt slowly in the microwave. You want a thick and smooth chocolate sauce.
7. To finish the donuts, add the vanilla cream to a piping bag with a donut nozzle*. Fill the completely cooled donuts with a good portion of the cream, then press them into the chocolate sauce. Place the glazed donuts on a cooling rack, so the glaze can firm up a bit. Like all donuts, these taste the best when fresh!
Notes
Have fun in the kitchen!