Description
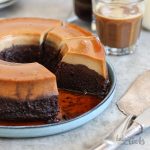
What happens when you combine a Brazilian flan and a chocolate cake? Delicious Magic with a hint of coffee! An absolute delight. We love this cake!
Ingredients
For the caramel sauce:
3/4 cup (150g) sugar
1/3 cup (80ml) water
For the cake batter:
1 cup (130g) all-purpose flour
1/3 cup (40g) cocoa powder
2 tsp. baking powder
1 pinch of salt
1/2 cup (120g) butter, at room temperature
1/3 cup (60g) sugar
2 medium eggs
1/2 tsp. vanilla extract
1/3 cup (80ml) milk
For the flan:
9 oz. (260g) condensed milk
2 tbsp. ground coffee
3 medium eggs
1/4 cup (60g) heavy cream
1 1/2 tsp. vanilla extract
3 tsp. (10g) all-purpose flour
Instructions
1. Start with the infused condensed milk for the flan. Add the condensed milk and the ground coffee to a small pot and heat up. The mixture does not have to boil, just get hot. Remove from the stove and let sit for about one hour. Pour through a fine-mesh sieve to get rid of the coffee pieces and set aside until needed for the flan.
2. For the caramel sauce add the sugar to a small pot. Heat up until the sugar starts to melt. Ass soon as the sugar has melted and got an amber color (do not burn it), add the water. Be careful here – the caramel is hot and will bubble up because of the water. The caramel will harden immediately, so stir until it melts again and you get a nice and smooth caramel sauce – that will take a minute or two. Take off the heat and let it cool down completely.
3. Preheat the oven to 350°F (180°C). Grease a 20cm savarin tin (Amazon Affiliate Link) and sprinkle it with sugar. Pour the cooled caramel sauce into the pan and place the tin into the freezer for 20 minutes so the sauce can firm up. If the caramel sauce is not hardened it will mix with the other ingredients.
4. Mix the flour with cocoa powder, baking powder, and salt in a small bowl and set aside. Add the butter and sugar to a large bowl and mix on high speed until light and fluffy. Add the eggs one after another and mix well after each addition. Add the vanilla extract and mix it in. Add the flour mixture together with the milk to the bowl and mix until just combined – do not overmix.
5. For the flan add the eggs to a large bowl and whisk slightly. Add the heavy cream, vanilla extract, coffee-infused condensed milk, and the flour and mix on high speed until everything is well combined and smooth. If you can still see some pieces of the egg or flour in the mix I recommend to pour it through a fine-mesh sieve first.
6. Prepare a large pan with hot water – your flan cake has to sit in water so it bakes very slowly. The water should come up to half the height of the savarin tin. Set aside.
7. Take the savarin tin with the hardened caramel layer out of the freezer and pour the chocolate batter onto the caramel and smooth out the top. Carefully pour the flan mixture on top of the cake batter – make sure it does not mix with the batter. Cover everything with a layer of aluminum foil and place it inside the pan with the hot water. Place both together in the center of the oven and bake the cake for 65-80 minutes. Remove the foil after 50-55 minutes. Check with a toothpick inserted into the cake layer (which should be on top by now) – it should come out clean. Take the cake out of the oven and let it cool down completely on a wire rack, then place it in the fridge for 6 hours or overnight.
8. To serve the cake add some hot water to a pan, place the cake shortly with the tin in the hot water to soften the caramel (similar to when you were baking the cake). You might have to loosen the cake slightly from the sides of the tin with a sharp knife. At some point you should be able to rotate the cake inside the tin easily – this is the moment the cake is ready to come out. Place a serving plate (with a rim) on top and flip to remove the cake from the tin.
Notes
Enjoy baking!