Description
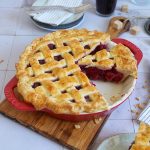
A classic bake for summer – homemade cherry pie. Super delicious and not too complicated to prepare. This pie should be baked at least once every summer ;)
Ingredients
For the filling:
about 42 oz. (1,2kg) fresh cherries, washed and pitted
3/4 cup (150g) sugar
1.4 oz. (40g) cornstarch
1/4 cup (60ml) water
2 1/2 tbsp. lemon juice
1 tsp. vanilla extract
2 tbsp. chia seeds (optional)
For the pie dough:
2 1/2 cups (320g) all-purpose flour
1 tbsp. sugar
1/2 tsp. salt
1 cup (230g) cold butter, in cubes
1/2 cup (120ml) ice water
1 tbsp. butter, cubed
1 medium egg, whisked
Instructions
1. Wash, dry, and pit the cherries. Set aside. In a large pot, mix sugar, cornstarch, water, lemon juice, and vanilla extract until well combined. Place the pot on the stove and cook the mixture over medium-high heat until it starts to thicken. Add the pitted cherries, mix well, and let everything simmer for about 8-10 minutes while stirring constantly. The cherries should be soft but not mushy, and the liquid (from the cherries) in the pot should have a nice, thick consistency. Remove from the stove and let cool down completely. Depending on the cherries and how much liquid they gave off, the consistency of the cherry pie filling might be a bit too soft/liquid. In that case, you can add some chia seeds to thicken the filling before adding it to your pie crust (optional).
2. For the pie crust, mix flour, sugar, and salt in a large bowl. Add the cold butter in small pieces and mix with the flour. Use a pastry cutter* to cut the butter into pea-size pieces. Gradually add some of the ice water and mix to combine. Add more and mix/knead until the dough starts holding together. The dough should be soft but not too sticky. Shape it into a ball, cut it in half, and flatten each piece into a small disc. Wrap both discs into plastic wrap and place them in the fridge for at least 2 hours (up to 2 days).
3. Preheat the oven to 390°F (200°C). Roll out the first dough disc on a floured surface – keep the other one in the fridge. The dough circle should be a bit larger than a 9-inch pie dish. Transfer the rolled-out dough to the pie dish and press to the bottom and sides – the dough should overlap the edges of the pie dish about 1 inch all around. Pour the cherry filling onto the pie crust and press it slightly down to avoid air pockets in the filling. Distribute the cubed butter (1 tbsp.) on top of the cherries and set the pie dish to the side. Roll out the second dough disc on your floured surface. This time, you want the dough circle to be only slightly larger than the pie dish. Cut it into strips (e.g. with a pizza cutter) – they can all be the same size or have different widths. Place them on top of the cherry filling and create a (weaved) lattice pattern. Press the strips and the overlapping dough around the edges together, cut off excess dough, and create a nice edge. You can do that by crimping the edge with your fingers or simply using a fork to press a pattern into the dough. Lightly brush the top of the pie with whisked egg.
4. Place the pie dish on a baking sheet and place it in the middle of the preheated oven. Bake the pie for about 20 minutes, then reduce the temperature to 375°F (190°C) and bake another 35-45 minutes or until the top is golden brown, and you can see the filling bubbling up around the edges. To avoid too much browning around the edges, you can cover the edges of the pie with some aluminum foil towards the end of the baking time. Take the pie out of the oven and let cool down completely – you want the pie to rest for at least 4 hours before slicing, so the filling is set when you cut into the pie. The pie is great with some vanilla ice cream. Leftover pie can be stored in the fridge for up to 4 days.
Notes
Let’s get baking!
